This section provides information on enabling the Atlas Integration and establishing the basic settings to support the related processes:
Atlas Settlement Statement Import
Additional setup is necessary as specified in the following areas:
Atlas SUDS XML Order Download Setup
Atlas SUDS XML Order Upload Setup
The following setup areas are affected by the Atlas Integration and detailed steps are included in the remainder of this topic. Items list accordingly to suggested order of entry, i.e., setup a van line, then setup agent records, etc.
IMPORTANT: Details for each setup area that are specific to the Atlas SUDS integration follow this listing. The setup areas are numbered so that one can scroll through the list and easily find the setup area(s) needed.
|
1. |
|
|
2. |
|
|
3. |
|
|
4. |
|
|
5. |
|
|
6. |
|
|
7. |
|
|
8. |
|
|
9. |
|
|
10. |
|
|
11. |
|
|
12. |
|
|
13. |
|
|
14. |
|
|
15. |
|
|
16. |
|
|
17. |
|
|
18. |
|
|
19. |
|
|
20. |
|
|
21. |
|
|
22. |
|
|
23. |
|
|
24. |
|
|
25. |
|
|
26. |
|
|
27. |
|
|
28. |
|
|
29. |
|
|
30. |
|
|
31. |
|
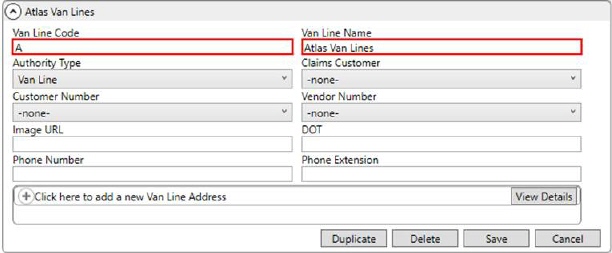
1. Van Line Setup |
Setup Area: MoversSuite Administration > Administration > Van Line
Establish a Van Line Setup record for Atlas Van Lines with a Van Line Code of A. Enter other data as needed.
Figure 20: Van Line Setup
The van line is associated to the MoversSuite Order Number.
Setup Area: MoversSuite Administration > Customer Service > Agent
For each agent that you wish to access the Atlas Integration, link their Agent Setup record to the Van Line of Atlas Van Lines.
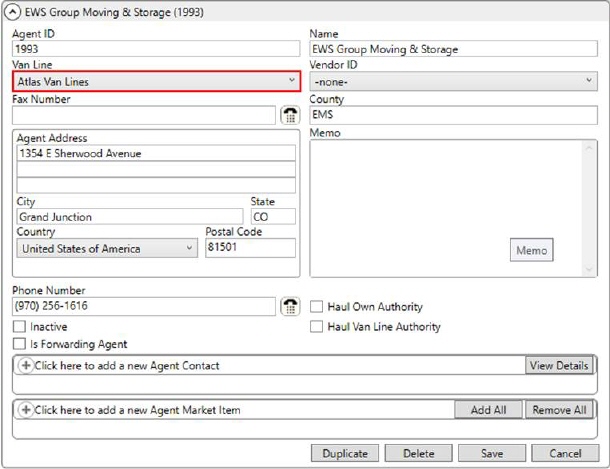
Figure 21: Agent Setup
Manage agent assignments through the Agents tab.
|
3. Branch Setup |
Setup Area: MoversSuite Administration > Administration > Branch
For the branch of the orders you wish to have access to the Atlas Integration, link their Branch Setup record to the Agent and Van Line that link to Atlas Van Lines.
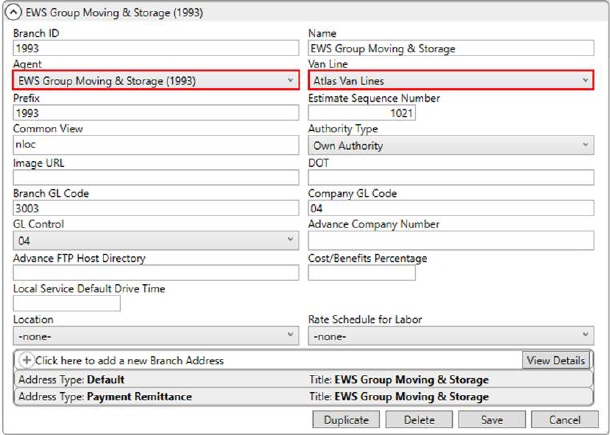
Figure 22: Branch Setup
Manage the branch of an order through the Book Order Information screen.
|
4. XML Interface Setup |
Setup Area: MoversSuite Administration > Administration > XML Interface
Establish an interface for the Atlas Van Lines within XML Interface Setup. Link this record to the established Van Line Item for Atlas and assign an External Code of A.
The Branch Item section comprises all the branches that this Atlas interface is available. Establish items for each supported Atlas branch.
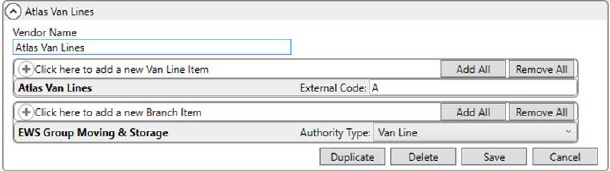
Figure 23: XML Interface Setup
|
5. XML System Setup |
Setup Area: MoversSuite Administration > Administration > XML System
Use the XML System Setup to establish systems, or processes, available for the Atlas Van Line interface. Create a single record specifying the Internal System and External System as AtlasSuds. Add an XML System Option for uploads, and then establish XML System Data Type Map items for the processes you wish to support on your system (specified below).
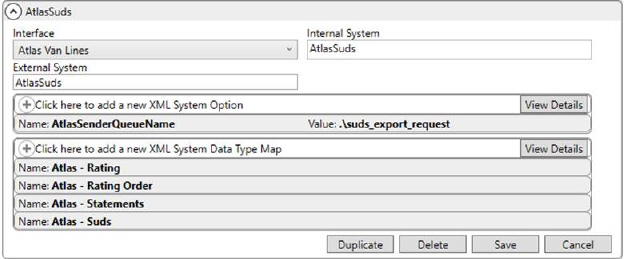
Figure 24: XML System Setup
For Atlas SUDS Order Uploads, establish an XML System Option titled AtlasSenderQueueName with a Value containing the same path as that of the Request Queue within Queue Service Server Setup. Refer to Atlas SUDS XML Order Upload Setup.

Figure 25: XML System Option
Again, verify that the path setting referenced for the Value set for the XML System Option matches that set for the Request Queue for the Atlas SUDS XML Upload record within Queue Service Server Setup.
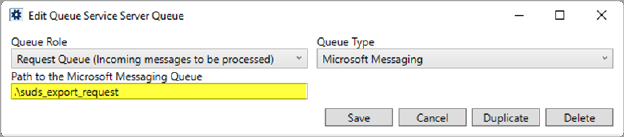
Figure 26: Server queue sample within Queue Service Server Setup
Create XML System Data Type Map entries to support the various processes. Defining these records enables the process and allows them to be visible through the Third Party Interface Order Monitor.
Support for the Rating Download
Create a mapping for Atlas - Rating linked to the Xml System Data Type Map of Rating. This defines the process to support an Atlas Revenue Import.

Figure 27: Sample Data Type Map within XML System Setup
Support for Order Uploads and Downloads
To support the Atlas SUDS Order Download processes, create a mapping for Atlas - Suds linked to the Xml System Data Type Map of Order Information.

Figure 28: Sample Data Type Map within XML System Setup
Support for Settlement Statements
Create a mapping for Atlas - Statements linked to the Xml System Data Type Map of Statement. This defines the process to support an Atlas Settlement Statement Import.

Figure 29: Sample Data Type Map within XML System Setup
|
6. Queue Service Setup |
Setup Area: MoversSuite Administration > Queue > Queue Service
Manage the MoversSuite Queue Service through the Queue Service Setup. This setup contains global settings for all processes on utilizing the queuing service.
Optionally, you can specify a location for the following three message types to store a copy of the message file exchanged between Atlas and the MoversSuite Queue Service:
Atlas Rating Download
Atlas Suds Flat File Download
Atlas Suds Xml Download
Atlas Suds Xml Upload

Figure 30: Queue Service Setup
|
7. Queue Service Server Setup |
Setup Area: MoversSuite Administration > Queue > Queue Server
Create Queue Service Server Setup records to establish server records for each supported Atlas process and manage the message files interpreted by the MoversSuite Queue Service.
Refer to the following topics for details on setup needed to support the specific process:
Atlas SUDS XML Order Download Setup
Atlas SUDS XML Order Upload Setup
|
8. Branch of Service Setup |
Setup Area: MoversSuite Administration > Military > Branch of Service
Use the Branch of Service Setup to map military service codes supported by Atlas to orders uploaded from MoversSuite.
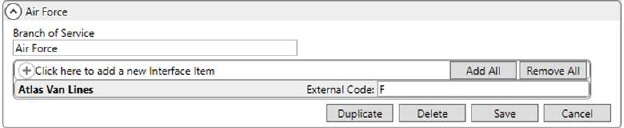
Figure 31: Branch of Service Setup
The following table lists the branch of service codes supported by Atlas.
|
External Code |
Description |
|
A |
Army |
|
F |
Air Force |
|
M |
Marines |
|
N |
Navy |
|
P |
Coast Guard |
Manage Branch of Service records for an order through the Military/Government tab.
Setup Area: MoversSuite Administration > Military > Carrier
The Document Type utilized within the Atlas Settlement Statement Import must match Payee Code values assigned as Carrier Payee Codes for supported Carrier Setup (Military/Government) record. These are needed to identify the carrier record.
Contact Atlas for the latest list of supported carrier payee codes.
Manage carrier assignments through the Military/Government tab.
|
10. Code of Service Setup |
Setup Area: MoversSuite Administration > Military > Code of Service
Use the Code of Service Setup to map military service codes supported by Atlas to orders uploaded from MoversSuite.
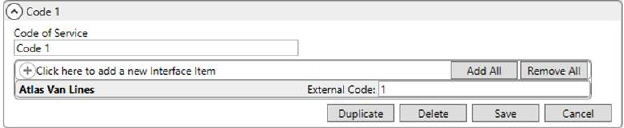
Figure 32: Code of Service Setup
Link External Codes to military assigned codes. For example, map an External Code of 1 for the Atlas Van Lines to the military Code 1, map External Code of 2 to a Code 2, etc.
Manage Code of Service records for an order through the Military/Government tab.
|
11. Commodity Setup |
Setup Area: MoversSuite Administration > Administration > Commodity
Establish a link between MoversSuite and booking division records supported by Atlas Integration by creating Commodity Setup records and linking the following to the Atlas Van Lines interface.
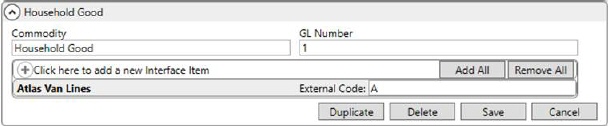
Figure 33: Commodity Setup
Commodity Codes are different based on the whether you are implementing the flat file download or XML upload/download. If you are defining a flat file download only, then you must define Commodity Codes that are compatible with Atlas SUDS 1.0. For the XML upload and download, you must define Atlas SUDS 4.0 codes.
Atlas SUDS 1.0 Codes (for flat file download)
|
External Code |
Description – Atlas Booking Division |
|
A |
Household goods |
|
B |
Special Products |
|
C |
Commercial Truckload |
|
G |
Smart Move Container |
|
H |
Canada Special Products |
|
I |
Canada Freight |
|
J |
Avail Intl Shipments |
|
K |
Canada Household Goods |
|
L |
Atlas Logistics |
Atlas SUDS 4.0 Codes (for XML upload/download)
|
External Code |
Description – Atlas Booking Division |
|
ACC |
Smart Move Container |
|
ALI |
Avail Intl Shipments |
|
CAS |
Canada Special Products |
|
CAF |
Canada Freight |
|
CAH |
Canada Household Goods |
|
CTD |
Commercial Truckload |
|
LOG |
Atlas Logistics |
|
RSG |
Household goods |
|
SPD |
Special Products |
Manage commodity assignments through the Move Information tab.
|
12. Commodity Detail Setup |
Setup Area: MoversSuite Administration > Administration > Commodity Detail
Use the Commodity Detail Setup to map commodity types supported by Atlas to orders uploaded from MoversSuite.
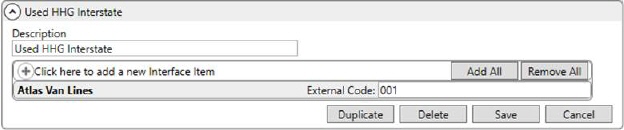
Figure 34: Commodity Detail Setup
The following table lists the commodity codes supported by Atlas.
|
External Code |
Description |
|
001 |
Used HHG Interstate |
|
002 |
Used HHG Intrastate |
|
003 |
Used HHG Freight-Forwarder |
|
004 |
Office Relocation |
|
015 |
Fine Arts |
|
016 |
Displays/Exhibits Fully Padded |
|
017 |
Displays/Exhibits Part Crate/Pad |
|
018 |
Displays/Exhibits Fully Crated |
|
019 |
General Commodities LTL |
|
020 |
General Commodities Truckload |
|
021 |
New HHG Products |
|
022 |
Electronics |
|
023 |
Store Fixtures |
|
024 |
2nd Proviso |
|
025 |
Auto Shows |
|
026 |
Hazardous Materials |
|
027 |
Used HHG FFWDR Commercial |
|
028 |
Used Equipment |
|
030 |
Service Only |
Manage Commodity Detail records for an order through the Billing Information tab.
|
13. Haul Mode Setup |
Setup Area: MoversSuite Administration > Administration > Haul Mode
Use the Haul Mode Setup to map military service codes supported by Atlas to orders uploaded from MoversSuite.
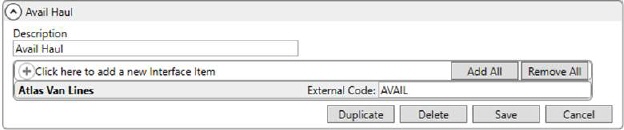
Figure 35: Haul Mode Setup
The following table lists the Haul Mode codes supported by Atlas.
|
External Code |
Description |
|
AVAIL |
Avail Haul |
|
AVL |
Atlas Agent to Haul |
|
LOC |
Agent Local Orders |
|
OTHER |
Other Agent to Haul |
|
SELF |
Agent Self-haul |
|
UND |
Undecided |
Manage Haul Mode records for an order through the Billing Information tab.
|
14. - 15. Item Codes and Service Codes Setup |
Setup Area: MoversSuite Administration > Accounting and Financial Services > Service Code (Accounting)
Establish Service Codes supported by Atlas Integration and link them to Item Codes to support rating and settlement processes. Utilize the Service Code (Accounting) Setup to establish the codes supported by Atlas and then link them to Item Code Setup records through the Service Code setting.
Utilize item and service codes through Payment Management and Revenue Entry modules.
Additionally, to support cartons in uploads and downloads, you must establish XML Item Code Setup records.
|
16. XML Item Code Setup |
Setup Area: MoversSuite Administration > Administration > XML Item Code
To upload and download Containers, Packing and Unpacking (CPU) counts, verify that each supported Material Type Setup item is linked to a supported Atlas code. This is done through XML Item Code Setup. Link the supported Atlas code, set as the XML Item Code, to the appropriate Item Code for the Atlas XML interface.
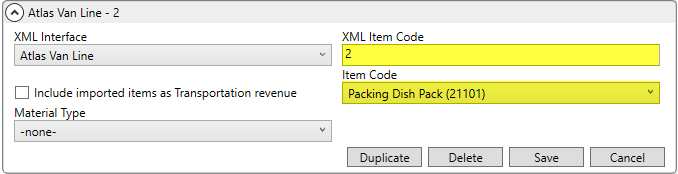
Figure 36: XML Item Code Setup
Create similar XML Item Code Setup records to the one shown above for all supported CPU items for your Atlas Integration. The following is current list of supported XML Item Codes for Atlas.
|
Atlas XML Item Code |
Atlas Packing Material Description |
|
2 |
Dishpack |
|
3 |
1.5 Cubic Foot (CF) Carton (AKA: Book) |
|
4 |
3.0 Cubic Foot (CF) Carton (AKA: Medium) |
|
5 |
4.5 Cubic Foot (CF) Carton (AKA: Large) |
|
6 |
6.0 Cubic Foot (CF) Carton (AKA: Extra Large) |
|
7 |
6.5 Cubic Foot (CF) Carton |
|
8 |
Wardrobe |
|
9 |
Mirror Carton |
|
10 |
Crib Mattress Carton |
|
11 |
Twin/Long Mattress Carton |
|
12 |
Double Mattress Carton |
|
13 |
King/Queen Mattress Carton |
|
14 |
Heavy Duty Carton (AKA: Double/Tri-Wall) |
|
15 |
Other Carton |
|
16 |
Flat Screen TV |
|
50 |
Grandfather Clock |
|
51 |
Gun |
|
52 |
Ironing Board |
|
53 |
Lamp Shade |
|
54 |
Pole Lamp |
|
55 |
Ski Carton |
|
56 |
Tea Chest |
|
57 |
Double / Tri-Wall Under 4cf |
|
58 |
Double / Tri-Wall 4 to7cf |
|
59 |
Double / Tri-Wall7 to15cf |
|
63 |
Mattress Cover |
|
81 |
Long Mattress Carton |
The Item Code linked to each of the XML Item Code Setup records must tie back to Material Type Setup records. Each of which can be assigned to orders through the Containers, Packing and Unpacking (CPU) feature in MoversSuite. In the example above (Figure 36), the Item Code links to a “Dish Pack” CPU through the Material CPU Type Item setting.

Figure 37: Material Type Setup
|
17. Move Type Setup |
Setup Area: MoversSuite Administration > Administration > Move Type
If you wish to include the Type of Move set within Move Information on Atlas uploads and downloads, then link Move Type Setup records to one or more of the following supported codes for each supported branch.
|
External Code |
Description |
|
LTRKLD |
Less Than Truckload |
|
SSS |
Small Shipment |
|
TRKGC |
Truckload (General Freight) |
|
TRKLD |
Truckload (Pad Wrap) |
|
|
If no mapping, then the Move Type is considered no applicable. |
NOTE: The Type of Move is not included in an upload or download if more than one mapping is found or if no mapping record exists.
|
18. Note Type Setup |
Setup Area: MoversSuite Administration > Customer Service > Note Type
Verify that the following Van Line Code values are established within Note Type Setup. This mapping is utilized to link incoming notes to MoversSuite types.

Figure 38: Note Type Setup
|
Van Line Code |
Note Type |
|
092 |
Dispatch Remarks |
|
3RDPTY |
Third Party |
|
AC |
Agent Confidential |
|
ACAUTH |
Account Auths |
|
ACCTCM |
Account Communications |
|
ACTAUT |
Account Autos |
|
ACTCHG |
Account Chrgs / Apps |
|
ACTGEN |
Account General |
|
ACTINV |
Account Inventory |
|
ACTOD |
Account Orig / Dest |
|
ACTSIT |
Account Storage |
|
ACTWTD |
Account Wgts / Dates |
|
ADJ |
Adjustments |
|
ATLACC |
Atlas Accel |
|
AUTHS |
Authorization |
|
B |
Billing |
|
BKGRCK |
Background Checks |
|
BKRCON |
Booker Confidential |
|
C |
Company |
|
CA |
Carrier |
|
CADEC |
CADEC Data |
|
CASLBR |
Casual Labor |
|
CCPAY |
Credit Card |
|
CKPAY |
Check |
|
CLM |
Claims |
|
CMD |
Commodity |
|
COLL |
Credit & Collections |
|
COMB |
LoadPin |
|
CONTPG |
Container Program |
|
COPRO |
Company Profile Only |
|
CSTSVC |
Customer Service |
|
CUSTOM |
Customs Seals |
|
D |
Driver |
|
DATES |
Dates |
|
DELAY |
Delay Location |
|
DI |
Delivery Instruction |
|
E |
EDI |
|
FILE |
File |
|
INVNOT |
Invoice Note |
|
IVAN |
IVAN Entry |
|
LBRRDY |
Labor Ready |
|
LI |
Loading Instruction |
|
LOGS |
Log Notes |
|
NONCOM |
Non-Compliance |
|
NONE |
None |
|
NOTIFY |
Notifications |
|
O |
Order |
|
P |
Pay To |
|
PAYREC |
Payment Received |
|
R |
Trailer |
|
REJ |
Rejection |
|
RWEIGH |
Reweigh |
|
S |
Settlement |
|
SAFETY |
Safety Notes |
|
SFTRPT |
Safety Report |
|
SPCNOT |
Special Notes |
|
SR |
SERV REQ |
|
T |
Tractor |
|
TA |
Task |
|
TANKSZ |
Tank Sizes |
|
TRANOT |
Transferee Notified |
|
TXTNOT |
Text Notifications |
|
Weigh |
Weighing Instructions |
Utilize note types when adding, editing, or viewing notes from within the Notes tab.
|
19. Order Cancellation Reason Setup |
Setup Area: MoversSuite Administration > Administration > Order Cancellation Reason
Link cancellation reasons to the Atlas interface for the following codes to support the Atlas SUDS Order Upload process.
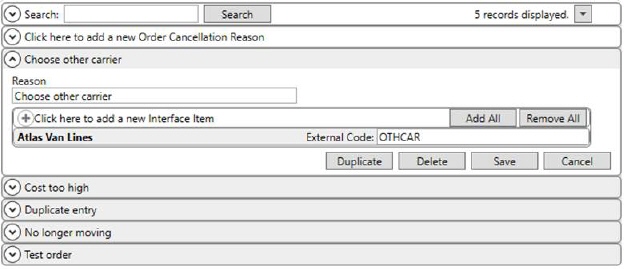
Figure 39: Order Cancellation Reason Setup
The following is a list of known, supported Atlas codes that you can establish as order cancellation reasons.
|
External Code |
Description |
|
DUPENT |
Duplicate entry |
|
HICOST |
Cost too high |
|
NOTMOV |
No longer moving |
|
OTHCAR |
Choose other carrier |
|
TSTORD |
Test Order |
|
NONE |
Uncancel Order Note: This external code is provided in the Atlas Uncancel Order type of Order Cancellation Reason Setup. Make sure that the Is Uncancel Reason flag is checked while uncancelling an order. |
These records are referenced by the Cancel Order Reason dialog. Of note, to get to the Cancel Order Reason dialog, at least one Order Status Setup record must be defined with the Is Cancelled Status flag set.

Figure 40: Order Status Setup
|
20. Packing Type Setup |
Setup Area: MoversSuite Administration > Administration > Packing Type
Set packing types for Atlas Integration in the Packing Type Setup.
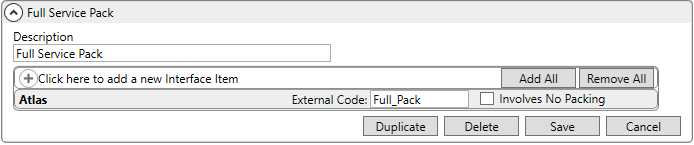
Figure 41: Packing Type Setup
Define mappings for the following supported codes. Instruct the application to consider the item as a non-packing type by checking the Involves No Packing flag for the No_Packing and None type.
|
External Code |
Check Involves No Packing flag (Yes/No)? |
|
Custom_Pack |
No |
|
Full_Pack |
No |
|
No_Packing |
Yes |
|
None |
Yes |
|
Packing |
No |
NOTE: The application uploads packing information that includes the packing agent along with the Packing Type.
|
21. Payment Type Setup |
Setup Area: MoversSuite Administration > Accounting and Financial Services > Payment Type
Link payment types to the Atlas interface for the following codes to support the Atlas Settlement Statement Import process.
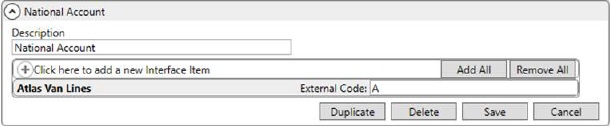
Figure 42: Payment Type Setup
|
External Code |
Description |
|
A |
National Account |
|
C |
Government Non Military |
|
E |
Military |
|
F |
COD |
|
I |
409 |
|
J |
Government Services Agency |
|
L |
Part NAC/Part COD |
|
M |
Split NAC |
|
O |
409 Managed |
|
P |
Agent To Bill |
|
Q |
409 Outsourced |
Manage the payment type of an order through the Billing Information tab.
|
22. - 23. Personnel and Security Setup |
Setup Area: MoversSuite Administration > Personnel > Personnel
Update Personnel Setup records for employees that link to Atlas based on their user identifiers. Create Interface Mapping records for supported roles for each person that associates to the Atlas Integration. The following roles are supported for Atlas downloads.
|
Atlas Role (Role ID) |
MoversSuite Labor Type |
|
Estimator (6) |
coor |
|
Salesman (9) |
Sales |
|
Surveyor (10) |
OA Surveyor |
For the above roles, map them the Atlas Van Lines interface and specify their sales number from the Atlas system as the User ID for the appropriate labor area. The identifier is typically the agency identifier followed by the employee code in the following format (where AAAA is for the agency and EEE for the employee code):
AAAA-EEE
For example, if the agency code is 1993 and employee code for a salesperson is 98, then you enter a User ID of 1993-098.
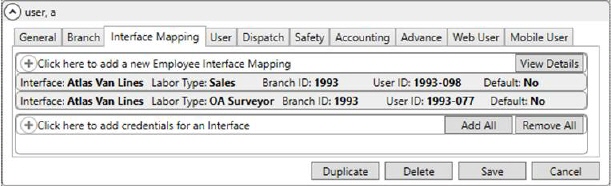
Figure 43: Interface Mapping tab within Personnel Setup
Manage salesperson and coordinator assignments through the Name, Address, Phone tab.
Manage OA surveyor assignments through the Agents tab.
For drivers, enter their identifier as the Driver Number within the Dispatch tab. Reference the same format as mentioned above with the agent code followed by the employee code.
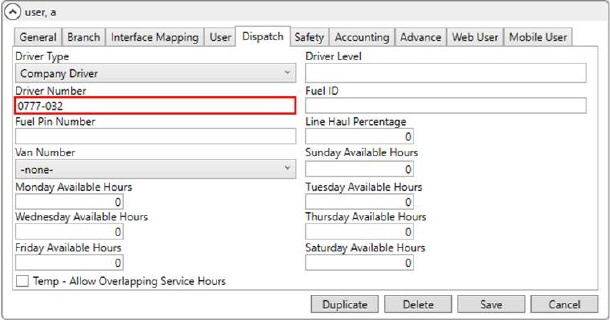
Figure 44: Dispatch tab within Personnel Setup
If Auto Dispatching, then verify that the system is setup, as detailed within the Auto Dispatching topic.
If you wish to grant user access to the Atlas Statement option through the Import option within Payment Management, then assign a single branch record with the Security Module of Atlas Statement Integration within Security Profile Setup. Only one record needs to be assigned to a profile to grant users to this function. NOTE: The Atlas Statement Integration module must also be enabled (see Security Modules).

Figure 45: Security Profile Setup
View driver assignments of an order through the Agents tab and through the Long Distance Dispatch module.
Access to the Atlas options within the Tools Menu is automatic based on the configuration of the order or lead. No additional setup is needed regarding Security Modules.
|
24. Shipment Status Setup |
Setup Area: MoversSuite Administration > Operations > Shipment Status
Define the Shipment Status codes supported by the various Atlas Integration processes within the Shipment Status Setup. Establish links between the Atlas Van Lines interface and the following supported codes.
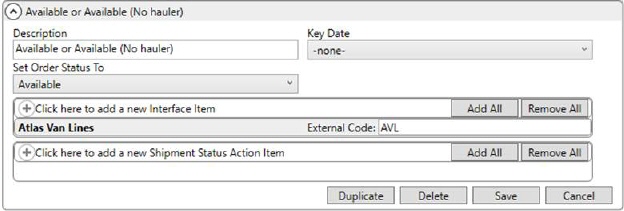
Figure 46: Shipment Status Setup
The following table lists the codes needed to support all Atlas Integration processes. The code usage varies between each process, i.e., CMP means one thing for a flat file download and represents something else for an order download.
Additionally, those codes with Order Status of Yes are included in the Atlas SUDS Order Upload as User Managed Order Status.
|
External Code |
Description |
Order Status |
|
AVL |
Available or Available (No Hauler) |
Yes |
|
CAN |
Cancelled |
Yes |
|
CAP |
|
|
|
CMP |
Complete or Delivered |
Yes |
|
DSP |
Dispatched |
|
|
EXC |
|
|
|
GOLIVE |
Accepted and Live Shipment |
|
|
PLN |
Planned or Available (Hauler) |
Yes |
|
PND |
Undecided (PND) |
|
|
SIT |
In Dest Storage or Storage-in-Transit |
Yes |
|
SITO |
In Origin Storage or SIT at Origin |
|
|
STD |
Started/In Transit |
Yes |
|
UNA |
Unaccepted |
|
|
UNB |
Agency Review Required |
|
|
UND |
Undecided (UND) |
|
|
UNLIVE |
Cancelled Unaccepted Shipment |
|
|
UNP |
Unprinted Reg Card |
|
|
UNR |
Rejected Shipment |
|
|
WADV |
Will Advise or Will Advise Dates/Weights |
|
Manage and track shipment progress through the Shipment Status History function.
|
25. Shipper Phone Type Setup |
Setup Area: MoversSuite Administration > Administration > Shipper Phone Type
Link payment types to the Atlas interface for the following codes to support the Atlas SUDS Order Download process.
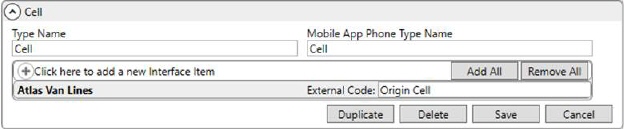
Figure 47: Shipper Phone Type Setup
The following is a list of External Code values to support MoversSuite phone types.
NOTE: Atlas allows for two phone number references per location. They can be the same type, i.e., two numbers set on the order mapping to the Origin Cell type.
|
External Code |
|
Destination Cell |
|
Destination Cell2 |
|
Destination Fax |
|
Destination Fax2 |
|
Destination Home |
|
Destination Home2 |
|
Destination Other |
|
Destination Other2 |
|
Destination Work |
|
Destination Work2 |
|
Origin Cell |
|
Origin Cell2 |
|
Origin Fax |
|
Origin Fax2 |
|
Origin Home |
|
Origin Home2 |
|
Origin Other |
|
Origin Other2 |
|
Origin Work |
|
Origin Work2 |
Manage the phone information of an order through the Name, Address, Phone tab.
See Atlas SUDS Order Download for more setup information.
Setup Area: MoversSuite Administration > Accounting and Financial Services > Statement Payment Code
Establish payment codes within Statement Payment Code Setup to support of Atlas Settlement Statement Import process.
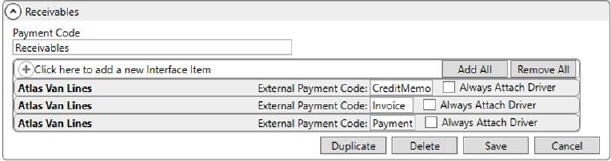
Figure 48: Statement Payment Code Setup
|
Payment Code |
External Payment Code |
|
Receivables |
CreditMemo |
|
Receivables |
Invoice |
|
Receivables |
Payment |
|
Payables |
MiscCharge |
|
Payables |
Return |
Statement payment codes are utilized within the Payment Management module.
|
27. Valuation Setup |
Setup Area: MoversSuite Administration > Customer Service > Valuation
Define Valuation Setup records to support exchanging valuation information between MoversSuite and Atlas. The External Code is comprised of a Valuation Type followed by a colon and the Valuation Unit. The Valuation Unit are defined as follows:
|
Valuation Unit |
Description |
|
LUMPSM |
Valuation Lump Sum – Assign this unit to all Valuation Setup records that are not Per Pound. |
|
VPERLB |
Valuation Per Pound – Assign this unit to all Valuation Setup records with the Per Pound flag checked. |
The Valuation Types are listed in the table below.
|
Valuation Type |
Description |
|
1 |
Option A - $0 Deductible |
|
2 |
Option B - $250 Deductible |
|
3 |
Option C - $500 Deductible |
|
4 |
Depreciated Value |
|
5 |
High Value |
|
6 |
Replacement Cost |
|
7 |
Legal Liability |
|
8 |
Exhibit Guard |
|
9 |
High Value Protection No Certificate |
|
A |
Government Val (CA Booking Division) |
|
B |
Declared Value (CA Booking Division) |
|
C |
Released (Local Haul Mode) |
|
D |
Local Val (Local Haul Mode) |
Append the Valuation Unit based on whether the Per Pound flag is checked or not. If the Per Pound flag is checked, then append the Valuation Type with a “:” followed by VPERLB (see Figure 49 below).
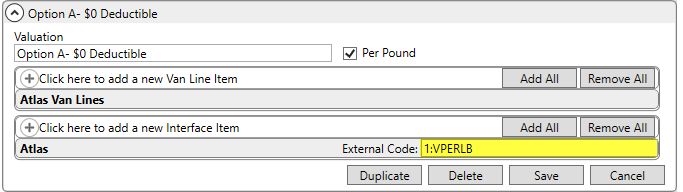
Figure 49: Valuation Setup
Manage valuation and related options through the Move Information tab.
|
28. Auto Class Setup |
Setup Area: MoversSuite Administration > Customer Service > Auto Class
Users must map Auto Class Setup records to known AutoInventory Types set forth on the Atlas side to corresponding External Codes.

The following are the Atlas AutoInventory Types and their External Codes to use for Auto Class Setup:
|
Atlas External Code |
Atlas Description |
|
002 |
Mounted Camper W/pickup |
|
003 |
Sedan |
|
029 |
Van A2ny Size |
|
030 |
Minivan |
|
034 |
Sport Utility Vehicle |
|
039 |
Coupe |
|
040 |
Convertible |
|
041 |
Hatchback |
|
042 |
Liftback |
|
043 |
Limo |
|
044 |
Roadster |
|
045 |
Station Wagon |
|
046 |
Truck without Camper |
|
270 |
Dune Buggy |
|
271 |
Specialty Vehicle |
|
29. Auto Make Setup |
Setup Area: MoversSuite Administration > Customer Service > Auto Make
It is recommended that Auto Make Setup records are created that match what in in use on the Atlas side. Atlas’ field size is limited to 12 characters. Should you want to enter a value larger than 12 characters within Auto Make, ensure that the first 12 characters match what Atlas supports for Make names.
For example, if they typically enter “Honda” for make, then they should verify that something matching that is established in a MoversSuite using the Auto Make Setup to create a corresponding Auto Make record.
|
30. Shipment Status Setup |
Setup Area: MoversSuite Administration > Operations > Shipment Status
See Shipment Status Setup for details.
|
31. Account Setup |
Setup Area: MoversSuite Administration > Customer Service > Account
Typically, Client ID and the Sub Account are populated during an Atlas import and no mappings are required to populate these fields. If desired, Account Setup records can be set to include a Default Client ID and a Default Sub Account. Setting these “Default” fields sets the Client ID and Sub Account information to be the defaults that are tied to the National Account. The Client ID and Sub Account information is located within the National Accounts section of Billing Information. See Account Setup for more details.