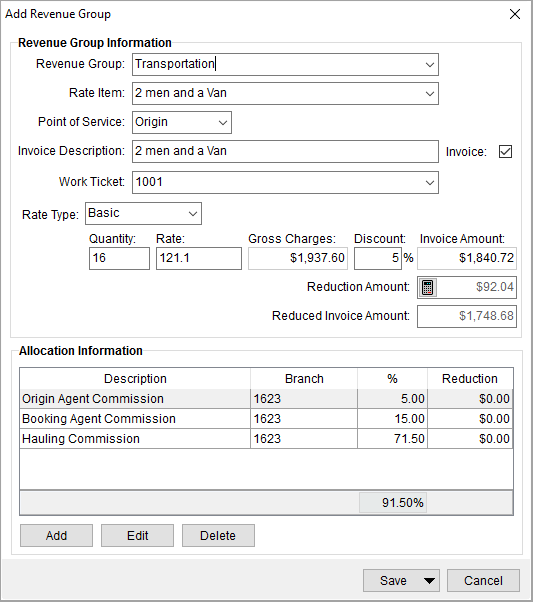
Revenue groups provide a way to combine related revenue items, create allocations, and provide an additional level of invoicing. The Add Revenue Group screen defines revenue for a group of transactions and sets forth allocations. You can access this screen through the Add Item > Revenue Group option and Edit Item of a group from within the Transactions tab.
Figure 27: Add Revenue Group
NOTE: Revenue group entries do not post to your GL.
Technical Field and Function Information
The table below describes the fields and functions available within this screen.
|
NOTES |
|
The Invoice Description is the only field that a user can update after any item associated to the group has posted. |
|
If any item associated to a revenue group or revenue item are included on an invoice, then the invoice must be voided prior to edited or deleting a revenue group or revenue item. View the Revenue Group Details Report for group listing and item code assignment. |
|
You can edit the Invoice Description, EDI Description, and Invoice flag on generated, but not invoiced, items. |
|
Field/Function |
Description | ||||||||
|
Revenue Group Information | |||||||||
|
Revenue Group |
Select the group name from the list of records defined within Revenue Group Setup. All similar revenue Item Codes will be linked together using this group. Revenue Groups do not generate posting transactions, however, they do print on invoices. See Revenue Group Details Report for a listing of all Revenue Groups and related data. Items display in the menu for this setting based on the Sort Order set within the Revenue Group Setup. | ||||||||
|
Rate Item |
Set the Rate Item and to define a particular rate scheme to apply to the group for invoicing. Setting this field will update the Invoice Description and set the rating data (Rate Type, Quantity fields, and Rate). The items available here are Item Codes set for the Rate Plan of the order (set on the Move Information tab) and defined through Rate Plan Setup. While importing items from a download, the application pulls these Item Code records from the Revenue Group Setup.
Note: This field is for invoicing only and does not affect actual revenue.
| ||||||||
|
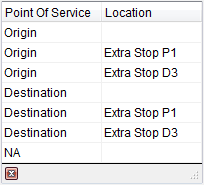
Point of Service |
Select a value to indicate where the Point of Service and Location originates.
Figure 28: Point of Service menu
Extra stop locations will appear with a caption of “Extra Stop” followed by the Stop Type (“P” for Pickup or “D” for Delivery) and the corresponding Stop Number (see Extra Stops).
Military EDI Integration The Point of Service updates through a UniGroup Rating Send (see UniGroup Downloads) and through EDI Item assignments. Setting the Point of Service affects which EDI Item options are available (as defined in EDI Customer Setup).
Sales Tax Integration This field also affects Sales Tax Integration. The address referenced by this field will be validated for the appropriate sales tax rates. The following address fields are checked for Sales Tax validation based on the Point of Service:
If the Point of Service field is not set, then the application will check the Origin location for Sales Tax rate validation. Refer to Point of Service Setup for more information. | ||||||||
|
EDI Item |
This field determines what rating information will display on invoices generated through Military EDI Invoice Integration. The EDI Item field is only available when the Customer of the order is defined as an EDI customer (through EDI Customer Setup). The value of this field will populate based on the selected Revenue Group, if explicitly defined within the Customer EDI Item section as part of the EDI Customer Setup. | ||||||||
|
Invoice Description |
The description of the selected service will display in this field by default and a user can update the text (up to 128 characters). This description will appear on invoices for this transaction. Users can update the Invoice Description for all non-invoiced items (posted or non-posted). To change an invoice description for an item on an invoice, a user will need to void the original invoice and recreate it through Invoicing. | ||||||||
|
|
Invoice Check the Invoice flag to have the group automatically appear on invoices. If the Invoice option is checked, the group lists with the selected invoice items within the New Complete Invoice. If not checked, you can still manually add the item to an invoice. The option defaults to what is set for the group within Revenue Group Setup for the Invoice Flag field. | ||||||||
|
Work Ticket |
Link the group to a local service Work Ticket through this selector. Selecting a Work Ticket facilitates commissions to local crew and drivers through any defined allocations on the group.
The Work Ticket selector provides a list of all tickets available for the order. Data within the drop-down selector includes the work ticket number, service date, service description, and any order segment associated to the ticket.
Work Tickets are established within the Dispatch Center for Local Services requests. You can change or set the Work Ticket after transactions generate for an item (through the Edit Item feature). This is to allow for commissioning on local crew and drivers. | ||||||||
|
Note: Refer to Rating Systems for an overview of the rating data available to you through this screen. | |||||||||
|
Rate Type |
Select a type from the list defined within Rate Type Setup used to determine how transactions are calculated and how they appear on the invoice. Additionally, special logics exists for “100-Weight” and “Miles” types. These two types retrieve order data to assist in computing the rate. Refer to Rate Type Setup for details. The Rate Type affects other rating data on this item, including Rate, Quantity field(s), and Gross Charges. Setting the Rate Type may trigger Advanced Rating as well. See Rating Systems for an overview and setup options. | ||||||||
|
Rate As |
If the Apply Regular, OT and Double Rates flag is set for the selected Rate Type (and Rate Plan), then the Rate As option appears. This option allows you to determine the default Rate for the item based on one of the following rates: Regular Rate Overtime Rate Double Time Rate
Refer to the Rate As Option topic for more information. | ||||||||
|
Quantity field(s) |
The quantity field labels are dependent on the selected Rate Type. The application multiples the value entered for the quantity field(s) by the Rate to compute Gross Charges. | ||||||||
|
Rate |
The rate applied to quantity values to compute the Gross Charges. The Rate may set automatically based on the Rate Plan and Item Code (Service) assigned to the record. View the Advanced Rating topic for more information. | ||||||||
|
Gross Charges |
This is the dollar amount of the charge prior to any discounts. The application will compute this based on the Rate Type values assigned to the group. | ||||||||
|
Discount |
The percentage discount reduces the Gross Charges to compute the Invoice Amount. You can instruct MoversSuite to discount automatically based on a particular contract. View Contract Master Setup for more information. | ||||||||
|
Invoice Amount |
This is the amount of the group prior to any reductions. This amount is computed as the Gross Charges less any Discounts. | ||||||||
|
Reduction Amount |
The calculator icon (
You can have the application automatically apply reductions to new revenue based on the Reduction Profile set within the Order Information (Revenue Entry) tab. Refer to occur using Reduction Profile and Reduction Profile Setup for more information. | ||||||||
|
Reduced Invoice Amount |
The Invoice Amount less the Reduction Amount displays in this field. This is the total amount invoiced for the group. | ||||||||
|
Allocation Information |
See Add Allocation Item for data column descriptions. | ||||||||
|
Manage predefined distributions of the revenue for a group in this section; an allocation occurs when a single revenue amount is separated into more than one revenue grouping. Create allocations automatically through predefined settings within Allocation Master Setup. NOTE: Only allocations for participating Sister Agent records are set automatically. | |||||||||
|
Description |
The description from the Item Code associated to the allocation displays in this column. | ||||||||
|
Branch |
This column displays the identification number of the revenue branch. | ||||||||
|
% |
The percentage of discounted revenue allocated to the branch displays in this column. The total percentage allocated for the group displays at the bottom of the % column. | ||||||||
|
Reduction |
The dollar amount of any reduction applied to the invoice amount displays in this column. | ||||||||
|
|
Add (Alt+A) This function opens the Add Allocation Item screen. | ||||||||
|
|
Edit (Alt+E) The function opens the Add Allocation Item screen in edit mode allowing a user to modify an existing record. | ||||||||
|
|
Delete (Alt+D) This function deletes the selected record without prompting the user for confirmation. | ||||||||
|
|
| ||||||||
|
|
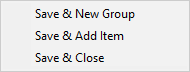
Save (Alt+S) The Save button provides a menu containing the following options:
Save & New Group (Alt+S+N) Select this option to save changes to the group and clear the screen for entry of a new revenue group.
Save & Add Item (Alt+S+A) Select this option to save changes to the group and open the Add Revenue Item screen to add a new revenue item to the group being saved.
Save & Close (Alt+S+S) Select this option to close the screen after saving changes to the revenue group.
Press here to save changes made and to close the screen. | ||||||||
|
|
Cancel (Alt+C) Press this button to discard any changes made and close the screen. | ||||||||
RELATED TOPICS:
Add Third Party Item (Revenue Entry)


 ) opens the