
The Document Management Viewer is a separate application that a user can launch from MoversSuite through the “Document Management View” option in the Tools Menu or by pressing the document icon next to the Order Name field in the Information Bar. The Document Management Viewer is only available for documents associated to Orders in the MoversSuite application.
Figure 2: Document Management icon
Click on the icon to access the viewer screen.
The icon itself will change to inform the user of the following states:
|
Icon |
Status Description |
|
|
No documents attached to order |
|
|
One or more documents attached to order |
|
|
Document upload error encountered |
The Document Management Viewer will list all attached documents for a particular order no matter which module a user is in. Additionally, the viewer shows any Custom Work Tickets if edited and saved through the Work Ticket button.
|
|
Users can launch only one viewer per Microsoft Windows session. Therefore, if running multiple instances of MoversSuite, only one viewer will display for all sessions; the viewer, however, will switch between sessions displaying the order most recently accessed through any MoversSuite sessions. |
The viewer works in conjunction with MoversSuite so that when a user switches between orders and modules, the viewer does likewise by displaying the documents linked to the latest order accessed within the current module.

The following table describes the fields and functions available within the Document Management Viewer.
|
Field/Function |
Description |
|
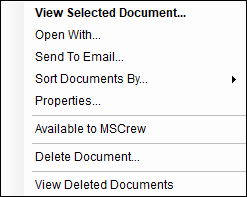
Right-click Options Right-click options available from the grid on this screen:
View Selected Document Selecting this option will automatically open the document(s) and render it through the appropriate application. Double-clicking anywhere on the document from within the viewer will also open the document.
Open With Selecting this option will open the Microsoft Windows Open With screen allowing the user to select which application to use to open a document with manually.
Send To Email This function opens a new mail message using the default mail utility, such as Microsoft Outlook, with the selected document(s) attached. The application will insert the document Description into the Subject of the mail message and will include the attachment name into the Body. When attaching more than one, the email subject will set to “See attached.”
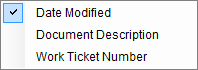
Sort Documents By By default, documents listed within the viewer sort chronologically by date within each group. Users can choose to sort by Document Description or Work Ticket Number as well.
Figure 3: Sort Documents By options
To update the sorting, right-mouse click on a document listing or category heading and select Sort Documents By, then select Date Modified, Document Description, or Work Ticket Number. The display will automatically reflect the selected sort option. The Sort Documents By option sorts all documents in all document groups. The Sort Documents By option is available when a user right-mouse clicks on a category heading.
Properties This option opens the Properties screen for the selected document where a user can view and modify document information.
Available to MSCrew This option will only appear when the “Show in MSCrew App” option is set for the Document Type associated to this file. Setting this flag allows the specific document to show within the MSCrew Documents Screen. See Document Type Setup for enabling this feature.
Send to Atlas This option sends a copy of the selected document to a defined AtlasNet interface. This option is available for qualified files. See AtlasNet Document Integration for more information.
Send to UniGroup TransDocs This option sends a copy of the selected document to a defined TransDocs interface. This option is available for qualified files. See TransDocs Integration for more information.
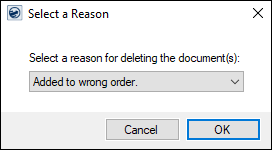
Delete Document Select this option to permanently remove a document from the MoversSuite Document Management system. Information on deleted documents, such as who deleted it, when it was deleted, and the reason it was deleted, is available through the Properties screen when the viewer is in View Deleted Documents mode (refer to the View Deleted Documents option description).
When deleting a document, you are prompted to enter a reason.
Figure 4: Select a Reason dialog
Your company can customize the reason descriptions through the Document Deletion Reason Setup.
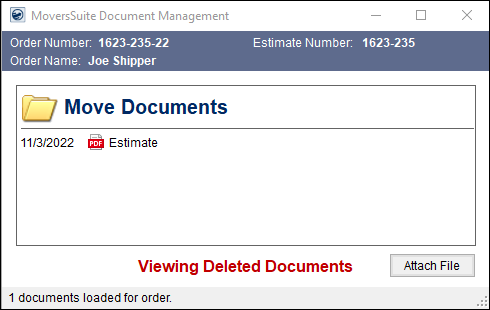
View Deleted Documents Selecting this option switches the viewer to display only deleted documents for the order. When in this mode, the application displays the caption “Viewing Deleted Documents” along the bottom of the screen and users can view information on the deleted file through the Properties screen.
Figure 5:Deleted Documents being viewed in Document Management Viewer screen
| |
|
Order Number |
The Order Number of the open order displays in this field. |
|
Estimate Number |
The estimate set for the order within Name, Address, Phone. |
|
Order Name |
This field displays the shipper name as set within First Name/MI and Last Name/Company Name fields within Name, Address, Phone. |
|
Document Group |
Users can associate a document to groupings defined within Document Group Setup. The groups provide a means of organizing documents, as well as providing the user the ability to expand or collapse the group listing as illustrated below: Open folder An expanded group is denoted by the open file folder icon:
Closed folder A collapsed group is denoted by the closed file folder icon:
Note: A right-click option on the document group name offers a user a Sort Documents By means of sorting documents within the group. |
|
Date |
The date that the document was added to the library or the date of the last modification displays in this column. |
|
File Icons |
The icons next to the file description indicate the type of file displayed and which program will open the document for viewing. The application uses the configuration of the user workstation (client-side PC or Citrix Server) to determine the file type and associated program. Theses settings may differ between workstations. If the Document Management Viewer is unable to identify the program to use for the file, then a default icon will appear; selecting the file with an unknown file type will activate the Open With dialog requesting the user to select an application. |
|
Description |
Displays the name assigned to the document. Users can modify the description through the Properties screen. |
|
Work Ticket Number |
If a work ticket is associated to the document, then the corresponding number will display in the listing. The work ticket number may include ellipses (…) in listing. The ellipses indicate that the full number is not in the display. Hover to see the complete number. This section also shows the Work Ticket Numbers of Work Ticket related documents added through MSCrew application.
Note: To display the Work Ticket Number associated to a document, the “Does this type include work tickets?” flag must be checked for the appropriate record(s) within Document Type Setup. |
|
Upload Status |
If an error occurs when an upload attempt fails, a
document error icon ( A successful upload will display a green upload icon
( Refer to TransDocs Integration Setup for more information on uploading and downloading documents. |
|
Document Notes |
Notes linked directly to a document will be available if
the note icon ( |
|
|
Attach File This function opens the Select File to Attach dialog allowing a user to browse through and select files to attach to an order. One or more documents can also be attached to an order by selecting files from either the computer desktop or from Microsoft Windows Explorer and then drag and drop the selected files into the viewer. Once the file or files are selected, then the Attach File dialog displays allowing you to adjust the file properties and confirm the add. |
|
Status Bar |
The status of actions affecting the documents and will appear within the status bar at the bottom of the viewer window. Additionally, an indicator on the right side of the bar will visually represent when a document download ( |
|
File Size |
The number indicates the file size of the associated file. Refer to the File Size Supported topic for related information. |
|
Refresh Button |
Clicking this button refreshes all the documents on the order. This is to ensure that you are viewing the most up-to-date list of documents, including those files added outside of your session, such as those download automatically or added by another user. |
Selecting Files
Users can select multiple documents at a time. Several options are available to multiple-selected records (see Right-click Option section in the table above for more information).
The following table lists the keyboard keystrokes used in selecting records.
|
Keystroke |
Description |
|
SHIFT + Click |
Select a range of records using this keystroke. |
|
CTRL + Click |
Select multiple records individually using this keystroke. |
|
CTRL + A |
Select all records in the data grid using this keystroke. |
Attaching Documents
Users can attach one or more files to the Document Management Viewer using the following methods:
|
Method |
Description |
|
|
Attach File This function opens the Select File To Attach screen allowing a user to select a single file to add to the library for the order. |
|
Automatically added documents |
Documents generated through the following processes automatically appear within the Document Management Viewer: •Documents generated based on Forms Designer Templates •Invoices and cash receipts generated through a Recurring Billing and Storage billing run •Messages sent through the MoversSuite Email Service
|
|
Drag and Drop |
The function of selecting one or more files from the computer desktop or a file location and dragging them into the viewer. For multiple files, press Ctrl while selecting the files then drag them to the viewer.
The user will receive separate Attach File screens for each file. An additional option to Cancel All attachments is available when attempting to attach more than one file.
Drag and drop functionality works with Microsoft Windows Explorer as well. This functionality is not available through a Citrix Neighborhood environment. |
|
AtlasNet |
Notifications for all documents for all orders within your Atlas agency group download and are available within the viewer. Additionally, you can also download the contents of the documents as well, which saves time when viewing. Refer to AtlasNet Document Integration for details. |
|
TransDocs |
Users can manually upload files to TransDocs through the
Send to UniGroup TransDocs option available through the right-click
options within the Document Management Viewer. Uploads will
automatically occur when defined correctly. These upload files will
have a success icon ( TransDocs files sent from UniGroup will automatically download into the library and be attached to an order. See TransDocs Integration Setup for more information on uploading and downloading documents. Of note, Tagged Image File (TIF or TIFF) and Portable Document Format (PDF) documents can be uploaded to the TransDocs system. Only TIF files will download into MoversSuite. |
RELATED TOPICS:
Add Active Database for Archiving
Archive Documents
Document Storage Management Setup


 ) will
appear. Users can hover over the icon to view the associated error
message or double-click this icon to view the error through the
) will
appear. Users can hover over the icon to view the associated error
message or double-click this icon to view the error through the  ).
).
 ) displays.
The text of the note will appear when the mouse is hovered over the
icon. Users can double-click or choose Properties from right-click
options to view and update the note.
) displays.
The text of the note will appear when the mouse is hovered over the
icon. Users can double-click or choose Properties from right-click
options to view and update the note.


 ) or upload
(
) or upload
( ) is in progress.
