The Work Ticket option allows those working in Local Dispatch to generate a unique ticket number and shows all the Custom Work Tickets associated to the order.
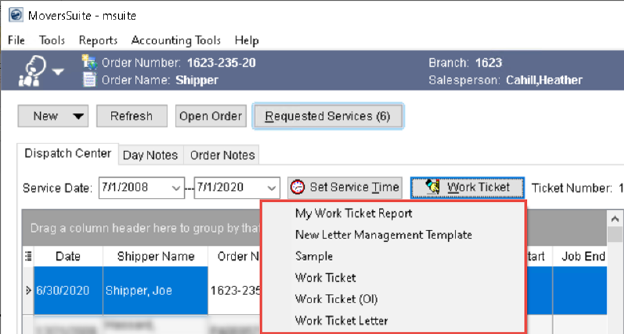
Available from within the Dispatch Center, pressing Work Ticket when you have one or more services selected within the dispatch grid, generates a Ticket Number and lists down all Custom Work Tickets created using Forms Designer Templates option.

Figure 25: Multiple Work Ticket reports within Dispatch Center
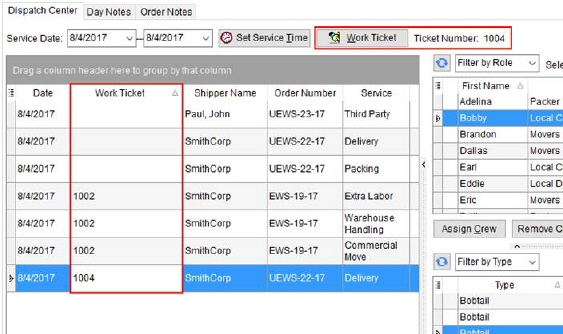
The generated Ticket Number displays next to the Work Ticket button when a service is selected. Additionally, you can view the ticket through a column within the Dispatch Center data grid.

Figure 26: Work Ticket items within Dispatch Center
Work Ticket Number
The work ticket number is assigned to a service or group of services that are scheduled for the same day and is generated by pressing the Work Ticket button through the Dispatch Center. This function also assigns a Ticket Number to the service which displays next to the button.
|
Technical Note |
|
The next Work Ticket Number to be assigned is stored within in the SysNumber table in the MoversSuite database. It is identified with a type of “WKT” for the SysNumberType column. Historically, this number started at 1000 being the first invoice number (as of MoversSuite 5.13.0). |
You can combine services for the same order and day by selecting them and pressing Work Ticket. This links them to a single Ticket Number and opens the Report Viewer to display the Work Ticket Report.
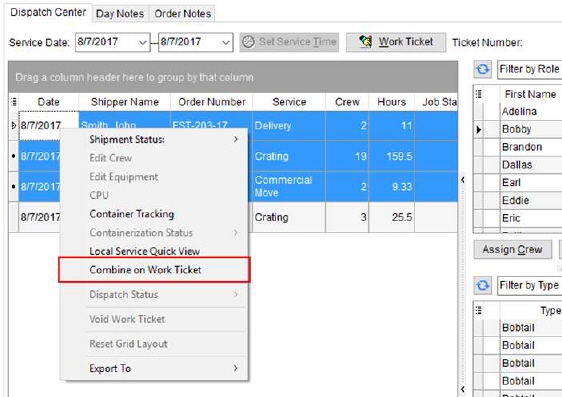
Additionally, you can select the services you wish to combine into a single ticket and choose the right-click option of Combine on Work Ticket. This option generates a Ticket Number for services under the same order for the same day. Of note, On Work Ticket Generation Setup can affect the use of Combine on Work Ticket by causing Required Fields. View the Work Ticket Report at any time by pressing Work Ticket for any of the combined services.

Figure 27: Right-click options within Dispatch Center
Once a Ticket Number is generated, you cannot re-issue it and pressing Work Ticket for a service with a ticket only opens the Work Ticket Report. If you inadvertently generate a Work Ticket incorrectly, you must void the ticket and recreate the service or services through the Add Local Service function.
The actual Ticket Number generated is comprised of a company-wide, sequential value incremented by one. This value is managed internally by the application. TECHNICAL NOTE: The value for the Ticket Number corresponds to the Sequence number set for the SysNumberType of WKT within the SysNumber table.
Void a Work Ticket
You have the option of cancelling a service or voiding a Work Ticket. Cancelling a service removes it from Local Services, sending it back to with a status of “Not Cleared,” where it can be reviewed, edited, and sent to dispatch. The option to Cancel Service is available from within the Dispatch Center. Once a Work Ticket is generated for a service, it cannot be cancelled. You can remove assignments from the service and change its service type to one that indicates a cancelled state; do this by editing the service and setting the Service field through the Add Local Service screen.
You also have the option to void a work ticket. You void ticket through the Void Work Ticket option available through the Right-Click Options (Local Dispatch). When you void a ticket, all assignments are removed from all services linked to the ticket. Additionally, all revenue associated to the services is not available to Revenue Entry functions.
You cannot void a ticket if actuals exist. You must first remove all actual assignments through the Enter Actuals screen. If the actuals already link to Revenue Entry items, then you are prevented from voiding the ticket.
Void information on a service displays within the Local Services grid. The Status is “Void” and the Voided On and Voided By data is set.