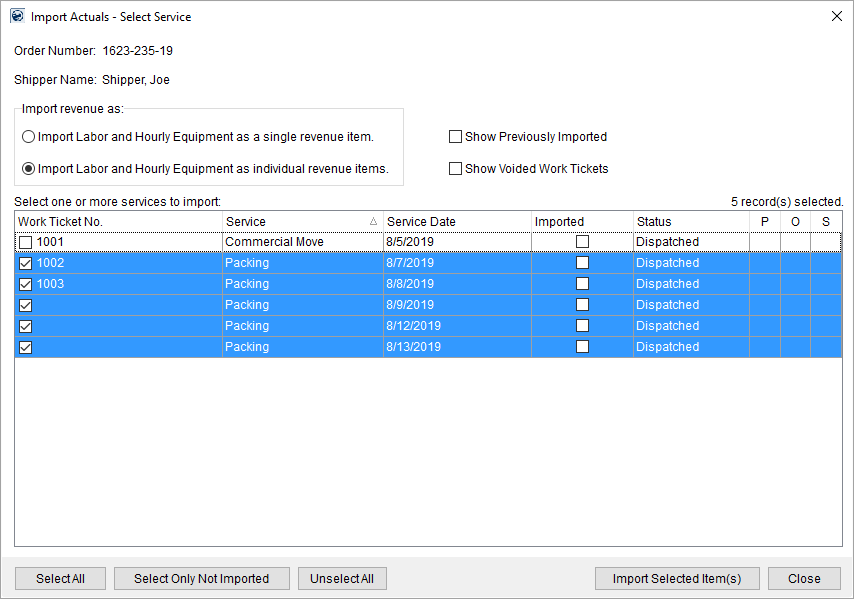
The Import Actuals function allows you to import revenue associated to Local Services into Transactions. The application imports the revenue for items assigned actual amounts and times through Enter Actuals screen.
Access this screen through the Import Revenue option in Transactions.
Figure 15: Import Actuals
You can use the “Select All”, “Select Only Not Imported”, and “Unselect All” buttons to make appropriate selections for the transactions grid.
Once you have selected the desired number of entries from the grid, use the “Import Selected Item(s)” button to import them. You will get status messages while the data is being imported.
Once the import is complete, the selection form will automatically be closed. If there are items remaining in the selection grid, it will remain open and you can close it manually after performing additional imports.
Voided Items Import
The import process will work if you have at least one non-voided item selected. Voided items will not be imported and will be simply skipped during import and will re-appear as "unprocessed" after the import completes. Previously imported items cannot be re-imported; however, you can use the “Show Previously Imported” checkbox to view them.
Items imported through the Import Actuals screen show in the Transactions grid under a group listing that includes the Work Ticket Number in the title, e.g. “Local Move – 1001” in Figure 16. Additionally, the service date prepends each revenue item, e.g. “05/15/2017 – Additional…” (see Figure 16).
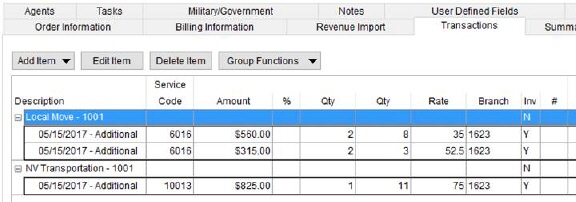
Figure 16: Transactions grid
Multiple Rated Services for the Same Day
If you attempt to import rated items associated to calculated labor, the application does check to see if there are services for the same day. If more than one service is available to import for the given day and you do not select all services for that day, then you receive warning that you must select all services.
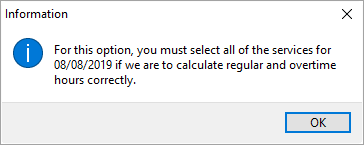
Figure 17: Multiple services for same day warning
Technical Field and Function Information
The following table describes the fields and functions available within this screen.
|
Field/Function |
Description |
|
Order Number |
This field displays the unique identifier assigned to the accessed order. See Order Number for more information. |
|
Shipper Name |
The shipper name as set through the Last Name/Company Name and First Name/MI fields in Name, Address, Phone displays here. |
|
Import revenue as |
Import revenue as You have two options allowing you to control how the revenue items import for labor and hourly-based equipment resources. The application references labor from what is entered for actuals within the Crew tab and what is referenced from what is set within Equipment Times within the Enter Actuals screen.
Import Labor and Hourly Equipment as a single revenue item Choose this option to bring in revenue associated to labor and/or hourly-based equipment as a single transaction item (default setting). When importing items, the application combines revenue for the same Service Code (Item Code) across multiple items into a single line entry. For example, if there are two items under Service Code 6016, then the application combines the amount into a single entry under the 6016 code.
Import Labor and Hourly Equipment as individual revenue items Choose this option to import revenue items associated to labor and/or hourly-based equipment as separate revenue line items based on the rate amount applied, as either regular, overtime, or double time. For example, if multiple crew work the service and their time links to a single Service Code, then the application creates up to three separate revenue items under that same Service Code: One for regular time, one for overtime, and one for double time. Additionally, for this option, the application lists equipment resources charged on an hourly basis separately (always at a regular rate). In order for this feature to work, the following must be established on your system: •The Apply Regular, OT and Double Rate flag must be set for the Rate Type (see Rate Type Setup). Refer to the Rate As Option topic for details. •Rates for Item Code must link to the Rate Plan set on the order (Rate Plan Setup), set for the corresponding Labor Type (Labor Type Setup) and Local Service Type (Local Service Type Setup). •The Rate Schedule for Labor must be defined to determine which rate is in effect. NOTE: If the overtime or double time rates are not set, the application automatically computes an overtime rate and double time rate based on the regular Rate set for the Item Code within Rate Plan Setup. The overtime rate computes at 1.5 times the amount of the regular rate and the double time rate computes as 2 times the amount of the regular rate.
|
|
Show Previously Imported |
Check this option to show previously imported items. However, the previously imported items cannot be re-imported. |
|
Show Voided Work Tickets |
Check this option to show voided work tickets. The import process will work if you have at least one non-voided item selected. Voided items will not be imported and will be simply skipped during import and will re-appear as "unprocessed" after the import completes. |
|
Select the service to import | |
|
Click on the record you wish to import and press OK. The following data is available to assist you in identifying the correct record. | |
|
Work Ticket Number |
The Work Ticket number assigned to the service through Local Dispatch displays in this field. |
|
Service |
The description set for the service through Local Services displays in this field. |
|
Service Date |
The date of service assigned to the record through Local Services. |
|
Imported |
This column will display a flag when actual of the service are imported into Transactions. |
|
Status |
The Local Service Status displays. |
|
P |
If multiple orders associate to the same order segment, then you can import revenue from any of the associated orders identified by their Partial, Overflow, and/or Setoff segment. Refer to Order Number and to Order Number Setup more information on the Partial, Overflow, and Setoff segments. |
|
O | |
|
S | |
|
|
Select All Selects all the items present in the transactions grid. |
|
|
Select Only Not Imported Selects items with Imported flag unchecked in the transactions grid. |
|
|
Unselect All Unselects all items in the transactions grid. |
|
|
Import Selected Item(s) Imports all the selected items from the transactions grid. |
|
|
Close Closed the transactions grid. |


