MoversSuite Administration > Accounting and Financial Services > Electronic Merchant
Link your system the merchant service provider, CSI Pay, and establish Online Payments functionality using this setup. Contact CSI Pay to setup an account and obtain the data and credentials specified for this setup. Once this data is setup users can access Electronic Payments functionality.
Figure 105: Electronic Merchant Setup with Constellation Payments (PYXiS) set for the Electronic Service
Instructions for the setting up an Electronic Merchant Setup record for CSI Pay (PYXiS):
1. Create a new Electronic Merchant Setup record.
2. Enter information to setup the Electronic Merchant Setup record for CSI Pay (PYXiS).
STEP 1: Create a new Electronic Merchant Setup record.
Setup Area: MoversSuite Administration > Electronic Merchant
From Electronic Merchant Setup, click Click here to add a new Electronic Merchant.

STEP 2: Enter information.
Setup Area: MoversSuite Administration > Electronic Merchant Setup > New Electronic Merchant record
From the New Electronic Merchant screen:
1. Merchant Name: Enter a name.
2. Electronic Service: Choose Constellation Payments (PYXiS). This prompts the fields required for CSI Pay’s specific Electronic Merchant Setup.
3. Enter the Order Note Type, which is “CSI Pay (PYXiS) Payments” in Figure 106 (which was created in Note Type Setup).
4. Enter the Merchant Preference Order. Use 100, 200, 300 (instead of 1,2,3).*
5. Enter the Transaction types that are permitted.*
6. Optionally, enter options for the Adjusting the actual deposit date from the charge/refund transaction date.*
7. Enter the Merchant Credentials.
8. Add Branch Item(s) to associate the branches for which you wish to offer Electronic Payments and Online Payments. You can only access Electronic and Online Payments functionality for orders assigned to branched established within the Branch Item listing. Additional security is also set on Personnel Setup records that control which branches they can select for payment assignment.
9. From the Online Payments tab, check Activate Online Payments. Continue setting information as detailed within Online Payments (tab).
10. Optionally, from the Hosted Payments Page Options tab , optionally, set options according to the Hosted Payment Page Options (tab) instructions.
11. Optionally, from the Web Page Around Hosted Page Options tab , optionally, set options according to the Web Page Around Hosted Page (tab) instructions.
12. Click Save.
*See Technical Table below for details.

Figure 106: Entering a new Electronic Merchant Setup record for CSI Pay.
Technical Field and Function Information
The following table describes the fields and functions within this setup.
|
Field/Function |
Description | |
|
Tab: General | ||
|
Merchant Name |
Provide a name of the merchant account with which is processing your Electronic Payments (up to 50 characters). | |
|
Electronic Service |
Select a service processor for your Electronic Payments. MoversSuite currently supports the following provider: | |
|
Merchant Account Code |
This is the merchant identifier. CSI Pay provides this value when they approve a new merchant then they provide us with their credentials. Enter the account number provided by CSI Pay(up to 20 characters). This needs to be entered only when a new record is added. | |
|
Order Note Type |
Specify Order Note Type for order notes while making Online Payments related transactions (credit card payments, refunds, etc.). You specify the Note Type for these Notes within the Order Note Type setting within the General tab. You can select from a list of existing types or add one through the Note Type Setup. | |
|
Merchant Preference Order |
Set the Merchant Preference Order to determine the order in which the Electronic Merchants will appear to the user in any drop downs (lower numbers appear first). It is recommended to use 100, 200, 300, etc. This is because if records are added in the future, it is easy to set a new preference, without having to change an existing record as would be necessary if changing an existing “1”: To make a new “1”, the previous Electronic Merchant Setup records would have to be changed. If record a used 100 to indicate the highest listing, then using 99 would create a new “number 1” in the preference order.
If two records have the same number set, then the record added most recently will list above the other record with the same number. | |
|
Merchant’s Active Status | ||
|
Use the Merchant’s Active Status to control if users can continue to use a given Electronic Merchant for that branch for various action types. This is how you can force a move from one electronic service to another over time and yet still allow refunds and voids and allow or not allow new sales on existing cards. | ||
|
|
When checked, no sales, voids, refunds nor new online payment links are possible.
Setting this initially is not advised during the “switching providers process” due to void and refunds not being allowed. Each company can determine when to set this status; however, once the account is closed with the First Provider, be sure to set this record to Inactive then.
If the Merchant’s Active Status is set to Inactive, be sure to remove all branches associated to the record using the Remove All button. | |
|
Disable New Sales and New Online Links
|
When checked, the merchant will no longer allow new sales charges. Voids and refunds can still be processed. | |
|
Disable New Cards/Bank Accounts/Online Links |
When checked, the merchant will no longer allow new cards to be charged, new card captures to occur nor new online links to be generated. When checked it does allow, though, existing cards and online links to be charged and voids/refunds to be processed.
NOTE: Click this to stop the use of this electronic merchant for the transaction type indicated on the Electronic Merchant record. This is a way to move processing to another Electronic Merchant.
The message in green shows what users can and cannot do with your current settings. As an example, the warning can be: Warning: Merchant is fully active. The online payments feature has never been configured for this merchant (use Online Payments tab to change.) | |
|
Electronic Service Url | ||
|
Use Production Url
|
Defaults to checked. Leave checked as it is required for behind the scenes systems. | |
|
Payment Service Url |
The URL defaults to the correct payment service URL when the Electronic Service field is set. MoversSuite processes electronic payments through this URL. Included in the information sent in the request are the Merchant Account Code and the login data set through Merchant Credentials. | |
|
Transaction types that permitted | ||
|
Identify which Payment Type is to be available through the Capture New Payment Method screen (from AutoPay Setup (Recurring Billing))and the Credit Card/Bank Payment or Authorization screens by ticking the option. | ||
|
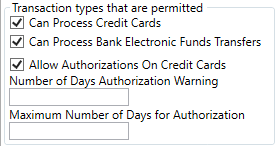
For the Electronic Service type: Constellation Payments (PYXiS) |
Check the option(s) that you wish to provide.
The Allow Authorization… option verifies the card is valid and puts a hold on the funds.
If Allow Authorizations On Credit Cards is checked then the following fields can be set: Enter a number for the Number of Days Authorization Warning. This provides a warning within ___________ that the aging date of the authorization is the number of days set in this field. This can be left blank. The Maximum Number of Days for Authorization is set to determine the number of days that can pass between the initial authorization and the day the authorization is processed in a completed credit card charge. If the authorization is not completed (charge) by the deadline, it must be voided.
If the Maximum Number of Days for authorization field is left empty, there will not be an expiration date to the authorization. | |
|
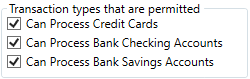
For the Electronic Service type: Constellation Payments (CSI Pay) |
Check the options that you wish to provide. | |
|
This record was last modified on / By |
The name of the MoversSuite user that last modified this record displays along with the date and time of the change. | |
|
Adjusting the actual deposit date from the charge/refund transactions date (Optional) | ||
|
By default, this is always unchecked and, therefore, turned off. | ||
|
Set Deposit Date Using Business Days Only
|
When checked, this allows the system to calculate approximately (which means it is not 100% guaranteed to be 100% accurate) when transactions will actually hit your bank account and then place transactions within batches by this calculated deposit date. This calculation uses business days, which are technically defined by the bank that interacts with this Electronic Merchant record. Business days are normally defined as Monday through Friday and exclude Holidays. MoversSuite has no way to differentiate “banking holidays” from your “company holidays”. The Admin screen for Holidays defines your recognized company holidays, should you choose to enter them. | |
|
Add This Many Business Days
|
CSI Pay recommends setting this to adjust by 2 business days.
This adds the specified number of business days to the date the deposit occurs on. This date is defined as the date at the SQL Server, adjusted for whatever time zone the transaction occurred in.
Note: This adds one additional business day if the time of day of the transaction is equal to or exceeds the daily deposit auto close time. | |
|
Daily Deposit Auto Close Time (use 24 hour clock)
|
NOTE: CSI Pay (PYXiS) begins to settle their accounts at 11pm EST with the end of processing around 2am.
CSI Pay recommends setting the time to 23:59 and adjust the time to where your bank is in relation to your SQL Server time zone. For example, if a SQL Server is in the Mountain time zone then: 1) For an Eastern time bank, adjust -2 hours for 22:00 or 2) For a Pacific time bank adjust 2 hours for 01:00. We use the UTC time they notify us of the result. What time the bank uses to determine “the time of the transaction” is unknown to us but is most likely before the time we use.
Be careful on how you enter the daily deposit auto close time. • 00:00 = 12:00 midnight (start of day) • 12:00 = 12:00 noon • 23:59 is a special time (since you cannot enter 24:00). The value 23:59 would include up to 23:59:59.999. Be careful to note the time zone of the “agreed cutoff time” and the time zone of your SQL Server and adjust the time you enter here accordingly. For example, if the agreed upon time is “6:00 pm Eastern Time”, but your SQL Server is using Mountain Time, then you would enter “16:00” here. Most EWS hosted Azure systems are using Mountain Time on the SQL Server.
There is a tool tip on the “Daily Deposit Auto Close Time” textbox that shows you the time your SQL Server saw when this admin screen was loaded to give you an idea (but not the name) of the time zone your SQL Server is currently using. In most cases, this will take some tweaking and adjusting by looking at the time of some late night and early morning online transactions and seeing how your bank handles them. Users can move cash receipts from one batch to another if this business day calculation is not quite right. Hopefully, for most calendar days, it should be closer than it was in the past (which was never correct). | |
|
Deposits are Credited on Saturdays
|
Check the “Deposits are credited on Saturdays” if the bank associated with this Electronic Merchant record makes deposits to your account on Saturdays. | |
|
Deposits are Credited on Sundays
|
Check the “Deposits are credited on Sundays” if the bank associated with this Electronic Merchant record makes deposits to your account on Sundays. | |
|
Adjust for Holidays |
Check the “Adjust for Holidays” (as defined in the Admin Holidays screen) if the bank associated with this Electronic Merchant record DOES NOT make deposits to your account on Holidays. | |
|
|
Clicking the Merchant Credentials button opens the Electronic Merchant Credentials dialog. Enter the Merchant ID and the Terminal ID for your account (the Terminal ID is like a “virtual card reader”) Click Close to save. Both IDs are encrypted.
See Electronic Merchant Credentials for more information. | |
|
|
This feature sends a request to the merchant service containing the credentials specified through the Merchant Credentials. When the process completes, a Credentials Verification Results dialog displays showing a successful verification or any error that may have occurred, such as invalid password. NOTE: This button is disabled while the record is being edited or being added. Once the Save or Add button is pressed, this button becomes enabled. It is verifying that the URL, credentials, and merchant Account ID will all work. | |
|
Branch Item | ||
|
A Branch can be assigned to one Electronic Merchant profile for each payment processing provider available, such as Remedy Payment and CSI Pay. If a Branch is assigned multiple Electronic Merchant Setup profiles, then the user must choose with Electronic Merchant Setup profile to use on each transaction. Add branches that you wish to support Electronic Payments for the Electronic Service provider specified.
Use the Merchant Preference Order to determine the order in which the Electronic Merchants will appear to the user in any drop downs (lower numbers appear first).
Use the Merchant’s Active Status to control if users can continue to use a given Electronic Merchant for that branch for various action types. This is how you can force a move from one electronic service to another over time and yet still allow refunds and voids and allow or not allow new sales on existing cards.
The branches specified must also support Cash Receipts. See Electronic and Online Payments for details. | ||
|
|
Click to select an individual Branch which adds that Branch to the profile. | |
|
|
Click to add all Branches to this profile. | |
|
|
Click to remove all Branches from this profile. | |
|
|
Click to keep changes made the record, including those entered through the Merchant Credentials function. | |
|
|
Cancel Revert changes to the record back to the last saved state. | |
|
Tab: Web Page Around Hosted Page | ||
|
See Web Page Around Hosted Page (tab) for details. | ||
|
Tab: Hosted Payment Page Options | ||
|
This tab is only available on a CSI Pay Electronic Merchant record set with Constellation Payments (PYXiS) as the Electronic Service.
See Hosted Payment Page Options (tab) for details. | ||
|
Tab: Online Payments | ||
|
See Online Payments (tab) for details. | ||
|
Tab: Token Import/Export Options NOTE: This tab will no longer be of use after 12/31/2023. | ||
|
For conversion of Recurring Billing payment tokens that are using CSI Pay to Recurring Billing payments token from PYXiS.
To transistion from the Electronic Service of Constellation Payments (CSI Pay) to Constellation Payments (PYXiS), use this tab. The transistion is not complete until both the export and the import process are completed.
NOTE: This tab is only available on a CSI Pay Electronic Merchant record set with Constellation Payments (CSI Pay) as the Electronic Service.
| ||
|
Export Options (These are not saved and only apply to this run)
IMPORTANT: Azure customers cannot export their own tokens. Contact Support Team to help with this process.
| ||
|
One Export File Per CSI-Pay Merchant |
The puts all the tokens into just one file. | |
|
Folder to Write the Export File(s) To |
Designate the folder path that the tokens will use when exported to CSI Pay. | |
|
Exports CSI-Pay Payment Method Tokens For Transistioning to PYXiS Button |
Click this button to export all the Constellation Payments (CSI Pay) Recurring Billing tokens currently in use to CSI Pay. When clicked, the file is generated and sent to CSI Pay. | |
|
Import Options (These are not saved and only apply to this run) | ||
|
Filename (including path) of the PYXiS Tokens to be Imported |
The Support Team will have your Filename to be entered. | |
|
Skip the First Row Of The Import File |
| |
|
Do Test Pass Only, No updating |
This performs a test to ensure all is working properly; however, the new PYXiS tokens will not be applied until the Import button is clicked. | |
|
Imports New PYXiS Payment Method Tokens For Transistioning away from CSI-Pay Button |
After completingt the Export Process, CSI will a return a file to the location set within Folder TO Write the Export Files To which contains the new Recurring Billing Constellation Payments (PYXiS) tokens. Click this button to accept the tokens and apply them the existing Recurring Billing. | |
|
|
Save is available on existing Electronic Merchant records. When (Unsaved) is shown on a record and then Save is clicked, the MoversConnect Api Service screen appears: During this time, the Hosted Payment Page is being stored on the record. When the Hosted Payment Page is then used within MoversSuite, that Hosted Payment Page is used; therefore, the Hosted Payment Page does not need to be regenerated with each use.
Also, the Hosted Payment Page Options (tab) and Web Page Around Hosted Page (tab) options are sent up to MoversConnect when Save is clicked.
| |
|
|
Add is available when adding a new Electronic Merchant record. Click to keep changes made the record, including those entered through the Merchant Credentials function. | |
|
|
Cancel Revert changes to the record back to the last saved state. | |
|
|
Duplicate Create an exact copy of the Electronic Merchant Setup record. If used, it is recommended that the Online Payments > Online Transaction Identifier is changed to differentiate between the two providers, though this is not required. | |
|
|
Delete If the record is not in use, you can press Delete to remove this provider record from the system. | |