This section includes the setup information and instructions needed to support importing data from MSO&ISales into MoversSuite.
PREREQUISTES:
You must have the following in place prior to going through the provided steps:
•You must have connectors established for both MoversConnect and VendorConnect. Please contact our Sales Team for more information.
•Once our Sales Team confirms that everything is enabled, then proceed with the steps below.
•Have the needed codes on hand as noted in various setup areas, which list under Step 5.
STEPS:
Use the following instructions to enable data from MSO&ISales to be available within MoversSuite.
1. Define an MSO&ISales interface within XML Interface Setup.
2. Enable order processing for MSO&ISales imports through XML System Setup.
3. Using VendorConnect Setup, link your vendor to the MSO&ISales data type and define which branches support the leads coming in from MSO&ISales.
4. Establish data mappings for the following:
STEP 1: Define an interface for MSO&ISales
MoversSuite Administration > Administration > XML Interface
Create a single XML Interface Setup record with the Vendor Name set to “MS O&I Sales”.
To create this record, click Click here to add a new Interface at the top of the screen.

Figure 40: Click to add a new XML Interface record.
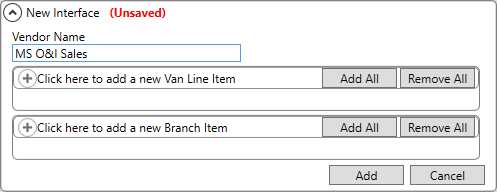
From the New Interface screen, enter “MS O&I Sales” for the Vendor Name, as shown below. Click Add to save the record.

Figure 41: Complete this screen to create a new XML Interface record.
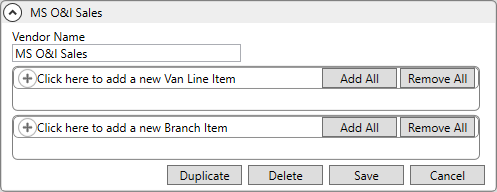
Once saved, the new record will look like this:

Figure 42: An XML Interface record named "MS O&I Sales."
STEP 2: Define a system option for MSO&ISales
MoversSuite Administration > Administration > XML System
A single XML System Setup record for MS O&I Sales needs to be created and this record needs a specific XML System Data Type Map, which is detailed in this step.
To create the record, from XML System Setup, click Click here to add a new XML System, which is at the top of the screen. This opens the New XML System blank record. Enter the following, as shown in Figure 43:
|
Field |
Data Required |
|
Interface |
MS O&I Sales |
|
Internal System |
MS O&I Sales |
|
External System |
MS O&I Sales |

Figure 43: Data is set on for the new MS O&I Sales XML System record.
Then click Click here to add a new XML System Data Type Map towards the top of the screen. This opens the Add XML System Data Type Map screen. Create XML System Data Type Map for this record with the following information and then click Add:
|
Field |
Data Required |
|
Xml System Data Type |
Order Information |
|
Name |
MS O&I Sales Order Information |

Figure 44: Add XML System Data Type Map dialog
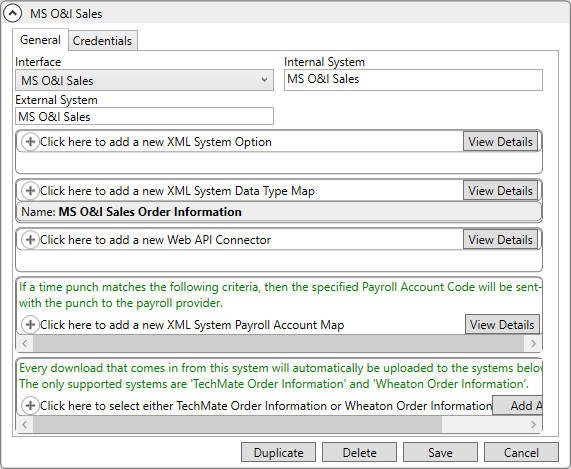
The completed new XML System record should look like this:

Figure 45: XML Setup record named MS O&I Sales.
STEP 3: Establish connections through VendorConnect Setup
MoversSuite Administration > MoversConnect > VendorConnect
Use the VendorConnect Setup to create a record which links your VendorConnect Vendor to the XmlSystem Data Type Map of “MS O&I Sales Order Information.” Enable which branches support MSO&ISales imports by setting each branch under Branch Item.
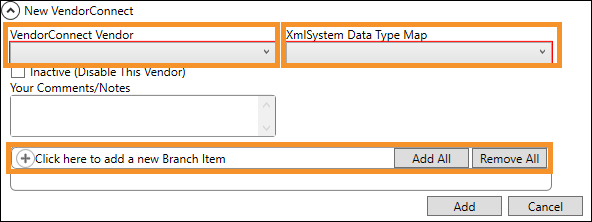
To create this record, click Click here to add a new VendorConnect. From the New VendorConnect screen, set the following:
|
Field |
Data Required |
|
VendorConnect Vendor |
MS O&I Sales |
|
XmlSystem Data Type Map |
MS O&I Sales Order Information |
|
Branch Item |
(Add branches needed) |

Figure 46: A blank New VendorConnect record showing the fields which need to be set to create the connection.
STEP 4: Establish mappings through various setup areas
MoversSuite Administration > Administration > Labor Type
MoversSuite Administration > Administration > Commodity
MoversSuite Administration > Administration > Equipment Type
MoversSuite Administration > Operations > Local Service Type
MoversSuite Administration > Accounting and Financial Services > Rate Type
MoversSuite Administration > Administration > Shipper Phone Type
MoversSuite Administration > Administration > XML Item Code
MoversSuite Administration > Customer Service > Address Location Type
MoversSuite Administration > Personnel > Personnel
Setup each of the following areas. Of note, the following setup areas are required for Local Service Imports: Labor Type Setup, Commodity Setup, Equipment Type Setup, Local Service Type Setup
Labor Type Setup
Establish support for Labor Type Setup records needed when importing Local Services (Office & Industrial). Add an Interface Item for each supported record setting the External Code to the corresponding value within the MSO&ISales system. Choose MSO&ISales for the Interface and the External Code must be exactly as shown within MSO&ISales. Labor Type records are referenced within the Labor Request shown in Add Local Service (Office & Industrial).
Commodity Setup
Establish support for Commodity Setup records needed when importing a Quote. Add an Interface Item for each supported record setting the External Code to the corresponding value within the MSO&ISales system. Commodity, along with Type of Move, and Authority, all set within the Job Information tab are required for importing quotes into Revenue Entry and for generating Transactions.
Equipment Type Setup
Establish support for Equipment Type Setup records needed when importing Local Services (Office & Industrial). Add an Interface Item for each supported record setting the External Code to the corresponding value within the MSO&ISales system. Equipment Type records are referenced within the Equipment Request shown in Add Local Service (Office & Industrial).
Rate Type Setup
Establish support for Rate Type Setup records needed when importing a Quote. Add an Interface Item for each supported record setting the External Code to the corresponding value within the MSO&ISales system.
Local Service Type Setup
Establish support for Local Service Type Setup records needed when importing Local Services (Office & Industrial). Add an Interface Item for each supported record setting the External Code to the corresponding value within the MSO&ISales system. Also, verify that the Branch corresponds to one of the supported branches.
The Local Service Type defines the Service setting required when importing services as displayed within the Add Local Service (Office & Industrial) dialog.
Shipper Phone Type Setup
Define Shipper Phone Type Setup records needed to import phone information for contact records into the Contacts and Locations tab. Estabishe Interface Item records for each of the folloiwng supported types:
|
External Code |
MoversSuite Reference |
|
MAIN |
Phone Number within the Add/Edit Order Contact dialog. |
|
MOBILE |
Mobile Number within the Add/Edit Order Contact dialog. |
|
FAX |
Fax Number within the Add/Edit Order Contact dialog. |
XML Item Code Setup
Add XML Item Code Setup records for the types of revenue needing to be supported on a quote from MSO&ISales. Specifically, the set the XML Interface to “MSO&I Sales” and the XML Item Code must link to revenue types supported within the MSO&ISales system. Verify that the Item Code value is set and references the correct revenue item you wish to import.
Address Location Type Setup
Define Address Location Type Setup records needed to import location addresses into the Contacts and Locations tab. Estabishe Interface Item records for each of the folloiwng supported types:
|
External Code |
MoversSuite Reference |
|
ORIG |
Location Address Type of “Origin” within the Add/Edit Order Location dialog. |
|
DEST |
Location Address Type of “Destination” within the Add/Edit Order Location dialog. |
|
OTHER |
Location Address Type of “Other” within the Add/Edit Order Location dialog. |
These locations are also referenced within the Add Local Service (Office & Industrial) dialog.
There can only be one Origin and one Destination location on an order. However, multiple Other locations can be defined.
Personnel Setup
Update Personnel Setup records to link Project Managers to MSO&ISales through Interface Mapping tab. Create a single record for each supported person that includes the following:
Interface set to “MS O&I Sales”
User ID matches how they are defined within the MSO&ISales system
Labor Type of “Project Manager”
Optionally, define which Branch they associate with. Note that multiple records can be defined for each branch or the Use as default when Branch not defined option can be turned on instead.

Figure 47: Add Employee Interface Mapping dialog
NOTE: Employees must be active in order to be recognized on the import. Refer to the Status field within the General tab of Personnel Setup to verify.