
This section describes the setup needed to support importing .CSV files through the Generic Import option in Payment Management.
NOTE: See Generic Import Setup for Chargebacks for setup specific to importing Personnel Charges, Driver Chargebacks, or Vendor Chargebacks.
The following are the general steps to set up your system to process Generic Import files (followed by detailed information on each step):
1. Define an interface to process imports under (XML Interface Setup).
2. Define system data types to process under (XML System Setup).
3. Add supported payment codes that link to an interface (Statement Payment Code Setup).
4. Add any needed Services Codes (Service Code (Accounting) Setup) and related Item Codes (Item Code Setup).
5. Enable user permissions and access privileges.
6. Create a CSV import file and test.
STEP 1: Establish an XML Interface
Create a record within XML Interface Setup. This establishes an interface that is assignable to other setup areas.
From MoversSuite Administration > Administration > XML Interface Setup, use the Click here to add a new Interface to start.
Figure 37: Click to add a new Interface
From the New Interface screen, enter a Vendor Name. Enter a Vendor Name, which will be the company identifier for the import. The Vendor Name can be any value up to 50 characters. It is not necessary to add a Van Line Item nor a Branch Item on this record. Click Add.

Figure 38: XML Interface Setup
STEP 2: Establish the XML System
Create an XML System Setup record.
From MoversSuite Administration > Administration > XML System Setup, use the Click here to add a new XML System to start.

Figure 39: Click here to add a new XML System
From the New XML System screen, choose the Interface. (The options are those created under XML Interface Setup.) Then we suggest that the Internal System and External System values be set to the same name as that of the Interface, in the example below they all are ACH Deposits.
NOTE: The name entered under Internal System will be what lists under System Data Type /Column B on the Generic Import File Format spreadsheet.

Figure 40: XML System Setup
Then, choose Click here to add a new XML System Data Type Map (Figure 40) to open the Add XML System Data Type Map screen. For Xml System Date Type, choose Statement. Enter a Name, such as ACH Deposits, Lockbox, etc. You can specify as many data type records as needed.

Figure 41: Add XML System Data Type Map dialog
The Name value defined within XML System Data Type Map must match the System Data Type value specified within the Generic Import File Format spreadsheet.

If the process cannot make a match, then an error appears like the one illustrated below (Figure 40).
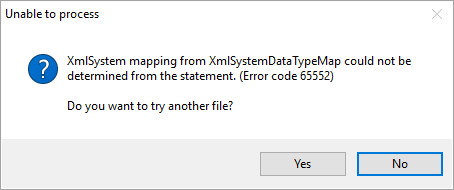
Figure 42: Unable to process error
STEP 3: Establish supported payment codes
Choose a Statement Payment Code record to create an Interface Item and assign an External Payment Code to determine the type of payment.
From MoversSuite Administration > Accounting and Financial > Statement Payment Code Setup, choose a record. Choose Click here to add a new Interface Item

Figure 43: Statement Payment Code Setup
Create a new Interface Item to the record, or update existing records, to include all supported External Payment Codes for the specified Interface or process. Examples of External Payment Codes, are shown in Figure 44. Check Always Attach Driver, if the item involves a Driver. When checked, Always Attach Driver automatically apply the chargeback to the Driver's Vendor Record on their Personnel record.
NOTE: If setting up a new Interface Item, the new item will initially list at the bottom, as shown in Figure 44. Once the new Interface Item has an External Payment Code set, it will then list alphabetically.

Figure 44: New Interface initially locates at the bottom of the list.
For reference, the Payment Type column (within the Generic Import File Format spreadsheet) shown in Figure 45 matches the External Payment Code set on the Statement Payment Code record (Figure 44). Notice that “Z” is set as the External Payment Code within Figure 44 and “Z” is the reference within Payment Type in Figure 45. If a match is not made, then the item shows as an error within the Statement Import Summary. When errors occur for the Payment Code, users can set manually set the item to one of the values defined within Statement Payment Code Setup.

Figure 45: Payment Type needs to match an External Payment Code set within Statement Payment Code Setup. Details for this spreadsheet can be found within the Online Help by entering Generic Import File Format under Topics.
STEP 4: Establish Item Codes and Service Codes
Utilize Item Code Setup and Service Code (Accounting) Setup to verify that supported codes are available. If you wish for the import process to automatically apply imported items, then verify that each Service Code defined within Service Code (Accounting) Setup matches those you wish to use within the Generic Import file.

Figure 46: Service Code (Accounting) Setup
Each Service Code (Accounting) Setup record must link to an established Item Code to ensure that transactions generate correctly for the imported items.
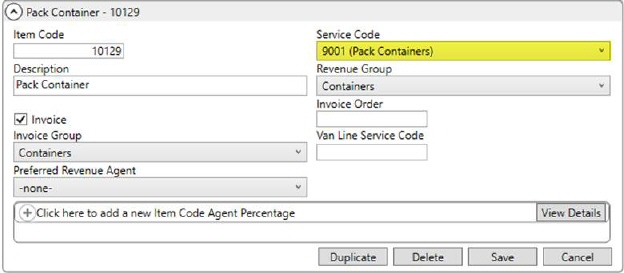
Figure 47: Item Code Setup
Refer to the Item Code Setup topic for additional information.
See the Import Auto Apply Options topic for information on auto applying imported items.
STEP 5: Enable user permissions and access privileges
Users need access to the Import Menu and have security privileges to process the import file.
Access to the Import Menu is through Full privileges on the Payment Management module assigned to an employee through Security Profile Setup.
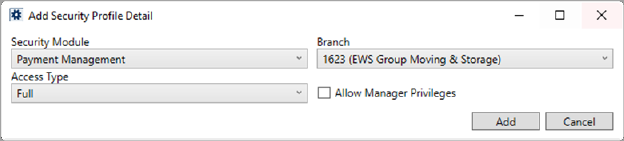
Figure 48: Add Security Profile Detail example
Additionally, SQL security must be established for each person to grant them privilege rights to the MoversSuite API Service as well as to your company-specific account for Microsoft Dynamics GP. Refer to the topic for User Setup for SQL Security details. (Note: The previous statement is not applicable to .CSV Imports through Payment Management.)
Related setup areas:
STEP 6: Create a CSV import file and test.
With a list of Payment Types, Service Codes, and System Data Types at hand, you can download and update the template provided through the Generic Import File Format topic. Reference the following steps to assist you in creating the import file and testing.
|
Step |
Description |
|
1 |
Open the CSV template, which is available through the Excel icon within the Generic Import File Format topic. |
|
2 |
Save this template to a folder on your system that is accessible to MoversSuite. For example, you may locate these files within a folder titled C:\\Program Files\MoversSuite\Statement Imports. The file you save is a Microsoft Spreadsheet (.XLSX). You may even consider keeping a copy of this template local to reference for future imports, i.e. save it to a folder titled Templates. |
|
3 |
Open the template make updates according to the layout specified within the Generic Import File Format topic. NOTE: Use the Find and Replace (CTRL+F) and the Copy and Paste (CTRL+C, CTRL+V) features to assist you in setting up forms quickly. |
|
4 |
When changes are complete, save the file as a Comma Separated Values (.CSV) file within import file folder named under Step 2. When this file imports through Payment Management, it is moved to the Processed folder within this same directory. If the Processed folder does not already exist, then the import process adds it automatically. Provide a useful name for the file so that it is easily discerned from others that you may have. For example, you may incorporate the date in the file name along with its type, e.g. 20180815-ACH Import.CSV. |
|
5 |
Open Payment Management. |
|
7 |
Choose Generic Import (.CSV) through the Import Menu function. |
|
7 |
Locate and open the import file. The file select dialog opens to the last folder you accessed. So, if the last folder you accessed was the location of the import files, then you this folder opens by default. Otherwise, you may need locate the folder. |
|
8 |
Verify the data in the Statement Import Summary screen. You can set and update the following fields within this screen: Import As Journal/Deposit Date Branch Batch Name Cash/Clearing Account
You can also link items to an order or payment code through options. Additionally, you can choose to charge matching vendor for payables and claims associated to driver and update the auto apply options, as well. If you wish to make further corrections or edits, you can Cancel out of the import and update the .CSV file directly and then repeat the import process. |
|
9 |
If everything looks acceptable on the Statement Import Summary screen, then press Import and a new batch is created within the Batch Management tab with a Status of Open for General Payments and a Status of System for Cash Receipts. |
|
10 |
Process the import using general Payment Management and Cash Receipts procedures. |
RELATED TOPICS:
Payment Management Setup and Administration