
Utilize this setup to enable Recurring Billing and Storage functionality on your system.
The following list includes the setup areas needed to establish the basic framework for Recurring Billing and Storage. Following this are details on each step.
1. Create cycle types available on your system (Storage Billing Cycle Type Setup)
2. Enable storage revenue deferral (Storage Deferral Setup)
3. Link storage records to established revenue items (Storage Item Type Setup, Item Code Setup, Rate Plan Setup, Revenue Group Setup)
4. Create types to determine invoices and calculation types (Storage Type Setup)
5. Define warehouse records to identify storage and billing centers (Warehouse Setup)
6. Establish user access to features and functionality (Security Profile Setup, Personnel Setup, Report Profile Setup)
7. Update email settings to support email generation (System Email Setup, Electronic and Online Payments Setup)
8. Integrate with a payment provider to provide online payment options for your customers (Electronic and Online Payments Setup)
9. Test functionality
Reference the Recurring Billing Order Setup topic for a list of minimum required fields.
STEP 1: Create Billing Cycle Types
Utilize the Storage Billing Cycle Type Setup to establish records assignable to a Billing Record through the Billing Cycle field. Create records for each cycle type you wish to support, e.g. Monthly, Quarterly, Annually, etc. This record is referenced by the billing process to identify how many days are in the billing cycle, whether to includes charges from a prior period, and options for prorating.
Figure 29: Storage Billing Cycle Type Setup
Refer to Storage Billing Cycle Type Setup for more information.
STEP 2: Enable Storage Deferral
Reference the Storage Deferral Setup to establish the GL account to reference for deferred revenue generated during a billing run, typically a billing run that includes multiple-monthly periods, such as a quarterly billing.
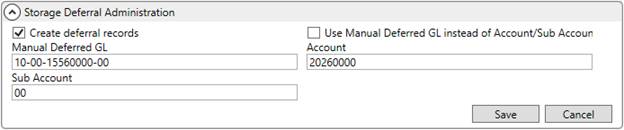
Figure 30: Storage Deferral Setup
Refer to Storage Deferral Setup for more information.
STEP 3: Create Storage Item Type records
Use Storage Item Type Setup to establish records assignable to Billing Items through the Item Type selector within Add Billing Item. This allows you to link a billing item to an Item Code needed to generate accounting transactions.

Figure 31: Storage Item Type Setup
The Revenue Group for the selected Item Code must also be available to the process. Available groups are identified as those with the Revenue group for storage billing flag set within Revenue Group Setup.
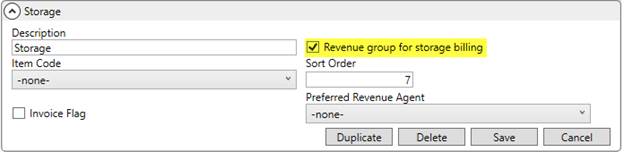
Figure 32: Revenue Group Setup
Additionally, rating associated to an Item Code referenced by a storage run is defined within Rate Plan Setup. This rating is referenced through the Add Billing Item screen.
Refer to the following topics for more information:
STEP 4: Create Storage Type records
Establish records assignable to the Billing Type setting for the Billing Record through Storage Type Setup. This assignment determines whether invoices should be created automatically and whether the billed amount for storage is based on a Daily or Monthly basis.

Figure 33: Storage Type Setup
Refer to Storage Type Setup for more information.
STEP 5: Create Warehouse records
Warehouse records are assignable to billing items through the Warehouse setting within Add Billing Item. The Warehouse Setup records determine the branch receiving revenue and the branch credited for the revenue of the storage item transactions generated for the record.
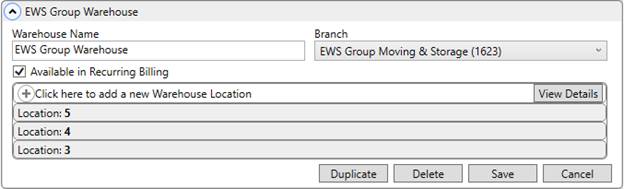
Figure 34: Warehouse Setup
You can also flag records to show as available for assignment on the Billing Record. Warehouse Locations are utilized by Container Management.
Refer to Warehouse Setup for more information.
STEP 6: Update user access records
Grant personnel access to Recurring Billing and Storage and related functionality through assignment to the following modules within Security Profile Setup:
Recurring Billing Setup
Access Type of “Read Only” restricts users to viewing details only within Recurring Billing. Access Type of “Full” grants user access to all module functionality.
Recurring Billing Management
Access Type of “Read Only” restricts users to viewing past billing runs and billing details only within Recurring Billing Generation. Access Type of “Full” grants user access to all module functionality.
Electronic Payment Management
If processing Recurring Payments, then assigning this module grants a user the privilege of using the Payment Method Management option from the AutoPay Setup (Recurring Billing) screen to update the payment method of a Recurring Billing record. Assign “Full” access for a branch you wish users to access. Refer to for details.
Branches associated to each of the profile modules must match those within the Assigned Branches within the Branch tab on employee Personnel Setup records.
The Allow Manager Privileges flag does not affect Recurring Billing and Storage functionality.
Other security modules may need to be available to personnel depending on their role within your organization. For example, if you wish personnel to also generate customer statements, then they also need access to the Customer Statement module to access the Generate Statement functionality. Refer to the Security Modules topic for a complete listing.
Users working through a storage run need access to the following reports:
Recurring Billing Check Report
Storage Billing Summary Report
Assigning these reports, and others, is done through the Report Profile setting with the User tab of each appropriate Personnel Setup record. Verify each available report through Report Profile Setup.
Additionally, an invoice report is also referenced by the Recurring Billing Generation process. The report referenced is identified with a System Location of Recurring Billing Invoice within Report Setup.
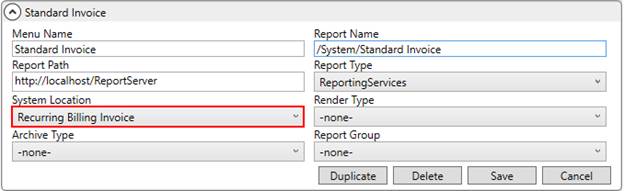
Figure 35: Report Setup for Recurring Billing Invoice
STEP 7: Enable email functionality
You can set up the system to email customers their invoices and/or payments made through the Electronic and Online Payments service.
To enable sending invoices to a customer, simply enter their address(es) through the Email Recurring Billing Invoice to field on the Payment Setup tab. This instructs the application to generate invoices and send them out through the Report Viewer during a billing run.
This same email address field is also referenced for Recurring Payments. Refer to the Electronic and Online Payments Setup topic for instructions.
As part of the email functionality, you can determine what displays for the subject and body of an email message through System Email Setup. Specific to email messages generated for Recurring Billing and Storage, you can manage the Recurring Billing type through the System Email Setup (Figure 35).
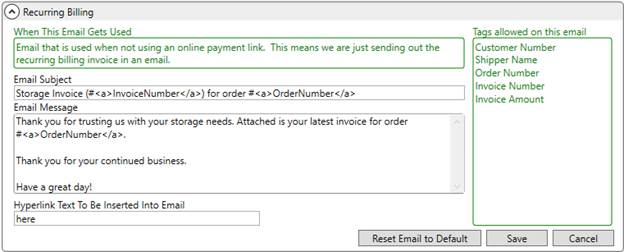
Figure 36: Recurring Billing entry within System Email Setup
Refer to the Electronic and Online Payments Setup topic for more information.
If your company utilizes the MoversSuite Email Service, then you can also reference the MoversSuite Email Service Setup and Administration topic, as well.
STEP 8: Enable payment processing
If you wish for your customers to make payments for storage items, then you can enable the Electronic and Online Payments service. Refer to the following topics for details:
Electronic and Online Payments
Electronic and Online Payments Setup
STEP 9: Test
Once setup is complete, you can build an order, run storage, and verify invoices and/or payments generated correctly.
RELATED TOPIC:
Electronic and Online Payments Setup