This section describes the setup necessary to enable the Factoring functionality.
PREREQUISITES
Factoring is an optional, add-on module that must be purchased through EWS Group. Please contact the EWS Sales Team for more information.
Have the following information on hand prior to working through the Factoring setup steps:
•Contra and Due From GL account numbers.
•Client Code and Client Trade Style values for each supported branch.
•List of customers you wish included in factoring (include Customer Name, Customer ID, and Class).
•List of users you wish to have access to the Factoring screen and which administrators you wish to have access to Factoring setup screens.
STEPS
Follow these steps to enable Factoring functionality on your system:
1. Set GL accounts and pre-payment Item Codes through Factoring Setup.
2. Define supported branches through Factoring Branch Setup.
3. Define which customers to include through the Factoring Customer Setup.
4. Update Security Profile Setup records to allow users to access functionality.
5. Update Admin Profile Setup records to allow administrators access to functional setup areas.
STEP 1: Update Factoring Setup record
Setup area: MoversSuite Administration > Factoring > Factoring Setup
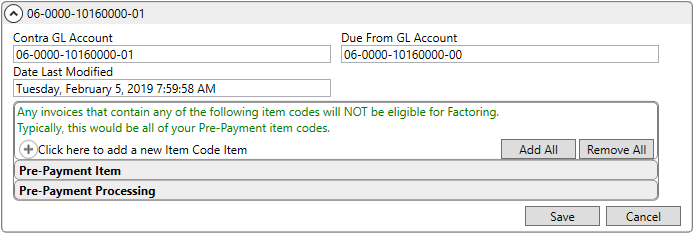
Open the Factoring Setup to define the GL accounts needed along with defining which Item Codes (pre-payment type codes) to exclude from Factoring.
Figure 10: Factoring Setup
The Contra GL Account is the full account established in Microsoft Dynamics GP needed to record the contra Accounts Receivables as the neutralized offset of the Due From GL Account, where the Due From GL Account is the anticipated Accounts Receivables. When invoice data is sent to the factoring company through the Factoring screen, the application creates a single journal entry transaction for the amount of the batch, debiting the Due From GL and crediting the Contra GL.
Add Item Code Items for each Item Code that you consider a pre-payment item. Invoices containing these specific Item Codes cannot be factored.
STEP 2: Add Factoring Branch Setup record
Setup area: MoversSuite Administration > Factoring > Factoring Branch Setup
Define branches that you wish included in Factoring within Factoring Branch Setup. Only branch records defined in this setup are eligible for factoring.

Figure 11: Factoring Branch Setup
Set the Branch to include from the list of those available through Branch Setup. Branches defined within this setup display in the Branch drop-down selector within the Factoring screen.
Associate the appropriate Client Code (up to 7 digits) and Client Trade Style (up to 2 characters) assigned by the company providing the factoring service for each supported branch record. Each code is included in the data transmitted when transactions are processed through the Factoring screen.
Client Code and Client Trade Style are utilized in the batch file name as well.
STEP 3: Add Factoring Customer Setup records
Setup area: MoversSuite Administration > Factoring > Factoring Customer Setup
Establish a Factoring Customer Setup record for each customer you wish included in factoring. Only customers defined in this setup are eligible for factoring.
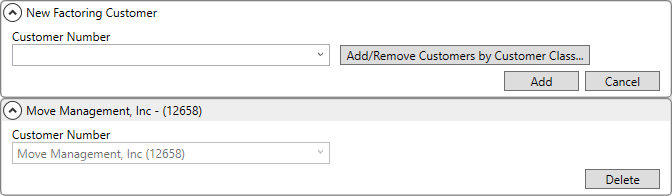
Figure 12: Factoring Customer Setup
Utilize the Customer Quick Find to locate the Customer
Number you wish to add to the list of included records. You can also click
on  to add a list of
customers by their associated customer class. Clicking this button opens the Add/Remove
Customers by Customer Class dialog.
to add a list of
customers by their associated customer class. Clicking this button opens the Add/Remove
Customers by Customer Class dialog.
NOTE: Pull in the latest customer list from Microsoft Dynamics GP through the Data Warehouse Refresh feature.
STEP 4: Update Security Profile Setup records
Setup area: MoversSuite Administration > Personnel > Security Profile
Use Security Profile Setup to assign personnel to access Factoring functionality within MoversSuite.

Figure 13: Security Profile Setup record
Add and update records through the Group By feature or through the Security Profile Detail section within the Security Profile Setup.
Assign the Security Module to “Factoring” for each supported branch. The list of branches assigned to one or more profile should match the list of supported branches defined within Factoring Branch Setup (see Step #2).
Set the Access Type to “Full” if you wish these employees to have the ability to Process invoices for the specified branches within the Factoring screen.
The Allow Manager Privileges flag has no Factoring functionality assigned to it.
STEP 5: Update Admin Profile Setup records
Setup area: MoversSuite Administration > Personnel > Admin Profile
Use Admin Profile Setup to assign administrators to access Factoring setup screens within MoversSuite Administration.
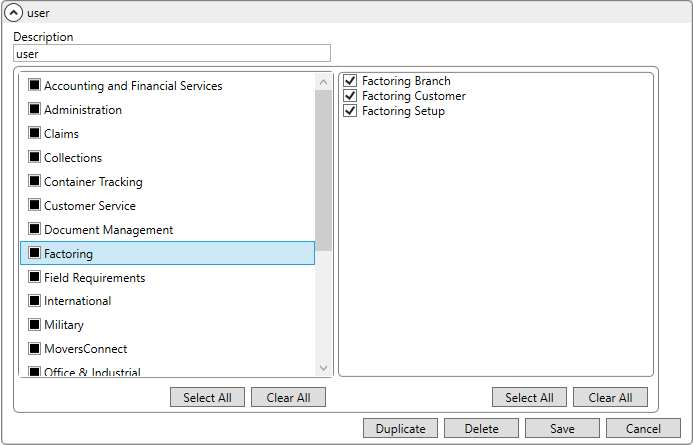
Figure 14: Admin Profile Setup record
Each of the three Factoring screens can be assigned to a role to grant permission to the specific setup areas.