
The Crew Punch Integration utilizes the MoversSuite API Service to send punch activity directly to the Crew Punch system for payroll processing. To enable this feature, your company must sign up for and enable MSCrew along with establishing payroll services through Crew Punch.
In addition to MSCrew, the Add Punches screen in Mobile Crew Time feature can also be used to add the time punches.
The following steps are needed to enable the Crew Punch Integration (followed by detailed description of each step):
NOTE: Please see ADP Integration Setup if using ADP.
1. Establish an account with Crew Punch and verify required account information.
2. Sign up and begin using MSCrew.
3. Enable Payroll Export within the Global System Option.
4. Add an XML Interface Setup record.
5. Add an XML System Setup record.
6. Update Branch Setup records.
7. Update Crew Activity Setup records.
8. Update Local Service type and classification records.
9. Verify GL values for Classification, Authority, Commodity, and Move Type records.
10. Update personnel records to access the Export Punches to Payroll screen.
STEP 1: Establish Crew Punch account and verify account information
Contact Crew Punch and establish a payroll processing account. Crew Punch requires formatted information in the data received, specifically Crew Punch builds a GL account number from transmitted data. Your company may need to verify the information needed to support your specific GL account numbers. Refer to Crew Punch Integration Export Content for the currently supported format.
Below is a list of needed information from Crew Punch:
•Testing and actual IP address for payroll export requests, i.e. “https://www.paycomonline.net/paycomapi/v1.1/paycomapi.svc”
•Online credentials (SID and Token vanlues) for payroll export requests
•Supported GL account number format
•Verify that employee numbers are established within the Crew Punch system
STEP 2: Enable MSCrew functionality
Export Punches to Payroll relies on data received through punch activity within MSCrew. Refer to MSCrew Setup and Administration for more information.
Once you are signed up for Crew Punch and MSCrew, EWS Group provides some basic setup information, which includes enabling the PayCom Integration module and setting any needed Global System Option (Step #3).
STEP 3: Update Global System Option
Enable Crew Punch Integration functionality by setting the Payroll Export option within the Global System Option to a Value of True. NOTE: This step along with enabling the Crew Punch Integration module is typically is performed by EWS Group support personnel.
Figure 125: Global System Option
STEP 4: Add an XML Interface record
Create a single XML Interface Setup record for Crew Punch with a Vendor Name of PayCom.
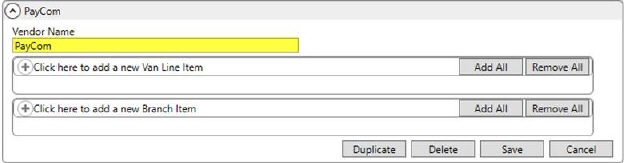
Figure 126: XML Interface Setup record
STEP 5: Add an XML System record
Establish a single XML System Setup record for Crew Punch that includes the following values:
|
Field |
Value |
|
Interface |
Select PayCom from the list of values defined within XML Interface Setup |
|
Internal System |
PayCom |
|
External System |
PayCom |
|
XML System Option |
|
|
Create a single option record for the API URL. | |
|
Name |
PayComApiUrl |
|
Value |
Enter the URL provided by PayCom for exporting payroll data to (Step 1) |
The following is an example XML System Setup record for Crew Punch.
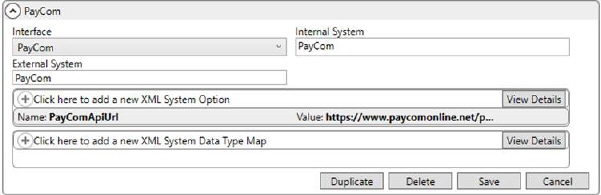
Figure 127: XML System Setup
STEP 6: Update Branch Setup records
For each branch that you wish to export payroll data to Crew Punch, add the following Branch Option values within Branch Setup to provide a credential data for communicating with Crew Punch.
Add two options to each supported branch record using the Add Interface Branch Option dialog.
Define the PayCom token:
|
Field |
Value |
|
Interface |
Select PayCom from the list of values defined within XML Interface Setup |
|
Option Type |
PayCom Token |
|
Value |
Enter the token value provided by PayCom. |
Define the PayCom security identifier:
|
Field |
Value |
|
Interface |
Select PayCom from the list of values defined within XML Interface Setup |
|
Option Type |
PayCom SID |
|
Value |
Enter the security identifier provided by PayCom. |
The following is an example of the Add Interface Branch Option dialog.
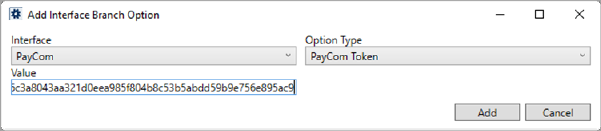
Figure 128: Add Interface Branch Option dialog
Below is an example of the recommended options for each branch (Value is unique to each company).

Figure 129: Interface Branch Option section within Branch Setup
To add the time punches through the Add Punches screen in the MoversSuite application, a Time Zone must be affiliated to the branch in the Branch Setup. To do so, simply select a Time Zone from the Time Zone drop down menu right above the Branch Address in Branch Setup and press Save.
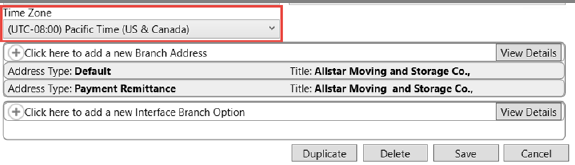
Figure 130: Time Zone option within Branch Setup
STEP 7: Update Crew Activity Setup records
For each supported activity, link each Crew Activity Setup record to a supported External Codes for Crew Punch. This information is used to determine punch in and out times for up to eight different types.
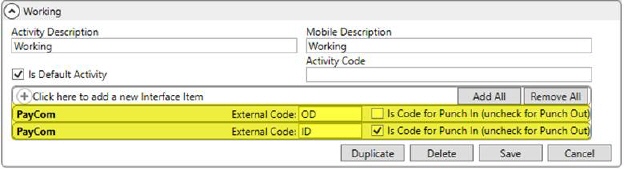
Figure 131: Sample Crew Activity Setup record
The following External Codes are currently supported by Crew Punch. Contact Crew Punch for a list of the latest supported codes. As in the example above (Figure 119), you can specify multiple External Code values for each activity.
|
Description |
External Code |
|
In for the Day |
ID |
|
Out for the Day |
OD |
|
In for Lunch |
IL |
|
Out for Lunch |
OL |
|
In for Break |
IB |
|
Out for Break |
OB |
|
In for Transfer |
IX |
|
Out for Transfer |
OX |
STEP 8: Update Local Service type and classification records
The Crew Punch Integration utilizes Local Service Classification records to identify the GL Code associated to crew activity. The GL Code, known to Crew Punch as the Position Code, is needed to construct a GL account number. This information is then sent to Crew Punch for their processing needs.
The export process identifies the needed Position Code through the Classification set for the Local Service Type associated to the crew activity. Classification records are defined within the Local Service Classification Setup. This is a simple setup where you just provide the classification title.

Figure 132: Local Service Classification Setup
For each defined Classification, you can create any number of mapping records within the Local Service Classification GL Map Setup. These records identify the Position Code for the Classification based on any combination of Authority Type, Move Type Group, and/or Commodity Type (Commodity Setup) set on the order.
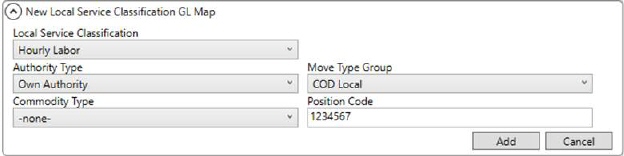
Figure 133: Local Service Classification GL Map Setup
The application attempts to identify the correct mapping based on the Classification assigned to the Local Service Type. Then, it attempts to identify the specific record based on the other settings. What this means is that you can define mapping records as granular or as general as your needs dictate. You can have records that only match on the classification. Or you can define records where you wish to match on all settings. The application attempts to identify a mapping record by comparing the following in this order:
1. Attempts to match on all settings first (Local Service Classification, Authority, Move Type Group, and Commodity)
2. Next, attempt to match on Local Service Classification, Authority, and Move Type Group
3. Next, attempt to match on Local Service Classification, Authority, and Commodity
4. Next, attempt to match on Local Service Classification and Authority
5. Next, attempt to match on Local Service Classification, Move Type Group, and Commodity
6. Next, attempt to match on Local Service Classification and Move Type Group
7. Next, attempt to match on Local Service Classification and Commodity
8. Next, attempt to match on Local Service Classification only
Once a match is found, then the corresponding Position Code is referenced.
Once all mapping records are established, you can then assign the Classification to each supported Local Service Type Setup record.
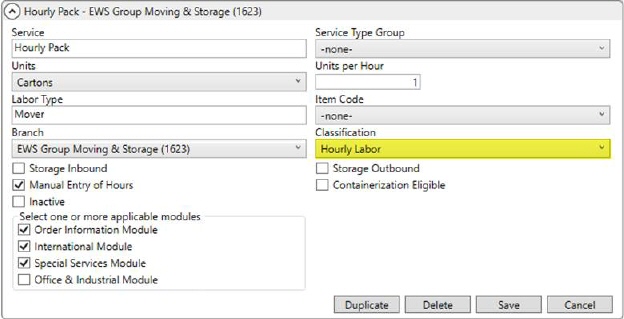
Figure 134: Labor Type Setup
Crew activity links to a Local Service Type when activity is processed through the Enter Actuals function in Local Dispatch. Again, the Local Service Type is referenced along with the Authority, Type of Move, and Commodity settings on the order to determine the correct Position Code through the Local Service Classification GL Map Setup records.
In summary, create all needed Local Service Classification GL Map Setup records and assign them to Local Service Type Setup records through the Classification setting.
STEP 9: Verify GL Codes
Crew Punch generates GL accounts for each activity based on what is included in the export. Some of this information pulls from the Position Code set within Local Service Classification GL Map Setup, some information is hard-coded, and the remainder is built from the GL Number pulled from the following setup areas:
The seven-digit GL Code referenced through the Position Code within the Local Service Classification GL Map Setup (see Step 8) must match the last seven digits of the generated GL account number. For example, if the Position Code is 1234567, then an example GL account would be something similar to this format: XX-XXXX-XXX12345-67.
Verify that the correct GL account is available based on GL Number and the Position Code for each supported Local Service Classification GL Map Setup record (and possibly other scenarios). The GL account must exist within your accounting database, e.g. Microsoft Dynamics GP.
The details of the GL information are referenced through the export itself. Refer to the Crew Punch Integration Export Content topic for a complete list of data exported to Crew Punch along with settings that determine the GL account processed.
STEP 10: Update personnel records
Update security to grant personnel access to the Export Punches to Payroll screen, also verify that the Employee Number of your MSCrew personnel is set correctly to match what is supported by Crew Punch.
To grant access to the Export Punches to Payroll screen, verify that there is a record established for each supported branch to the PayCom Integration Security Module. Only those branches linked to a person’s Security Profile Setup record can be selected from the Branch field within the Export Punches to Payroll screen.

Figure 135: Security Profile Setup detail record
|
NOTE |
|
For Crew Punch advance transactions, the GL Account data is built and maintained with respect to the Default branch of the employee as set in the Branch Setup. Refer to the GL Account Components for Crew Punch Advances topic for a list of components of the GL Account data that is maintained. |
Access Type and the Allow Manager Privileges flag has no effect on functionality.
Since there is an option to edit a time entry through the Mobile Crew Time screen within the Export Punches to Payroll screen, employees you wish to grant such access must also be setup accordingly. View the Mobile Crew Time and MSCrew Setup and Administration topics for more information.
For each crew member included in an export, verify that their Employee Number is set within the General tab of their Personnel Setup record and that it also supported on the Crew Punch system.
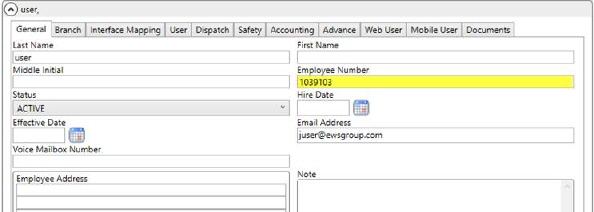
Figure 136: General tab within Personnel Setup