Use this section to enable the Tasks System. Basically, most setup is related to establishing task items within Tasks Setup and verifying that they link to appropriate personnel. Additional setup is needed to control certain aspects of task generation. The following list includes setup areas needed to establish a Tasks System followed by detailed information on each setup area:
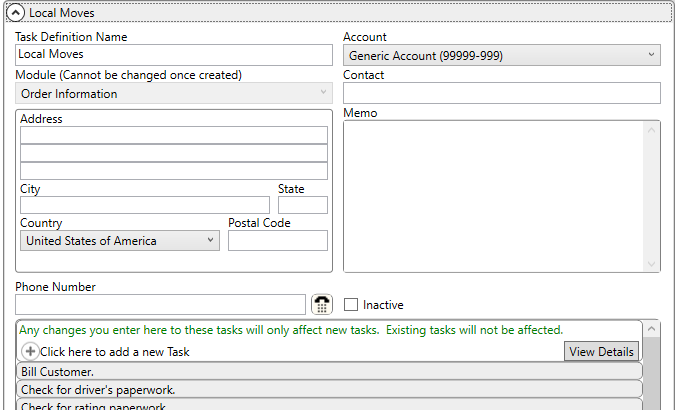
Tasks Setup
Establish a template of to-do items, within the Tasks Setup. The Task Definition Name is considered a template of to-do items and is assigned to an order through the Task Definition setting within the Name, Address, Phone tab and through Account Profile Setup. The Module determines whether the record is available through the Claims or through the Order Information module (Order Information applies to all non-Claims modules, including International Orders, Office & Industrial, Order Information, and Special Services).
Figure 16: Task Setup
Task Dependency Dates
Next, build a list of Task items. These are the individual to-do items that comprise the workflow of personnel. The application computes a due date for the item as the number of Due Days before or after (based on the Due Type) of the Dependency Date. In the example below (Figure 17), a task of Confirm Requested Services shows up within the Tasks and Workflow grids with a due date that is five days before the Load Date set on the order. The task is assigned to the OA Coordinator set on the order, as well.
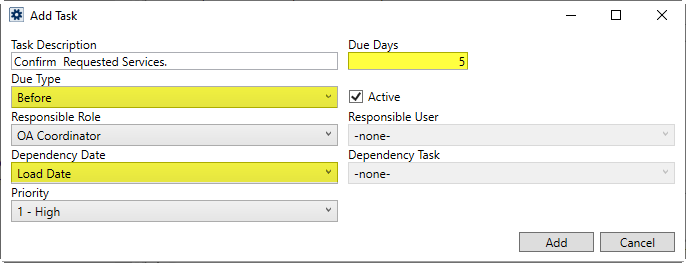
Figure 17: Task item example
Completion of Other Task
You can also configure a task to be based on the completion of another task. Here is how this Dependency Type works:
Assume that you have a “Task B” that is dependent upon the completion of some other “Task A”, then:
•If Task A is not yet completed, then Task B’s due date is unknown and will appear as blank (meaning, not due yet).
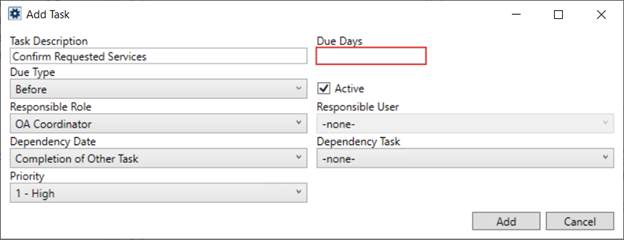
Figure 18: Completion of Other Task Dependency Date
•The moment that Task A is marked as completed, we can now calculate Task B’s due date and it is calculated from this moment’s date. This is why this type of task should be due “after” the other task because if it is due before Task A is completed, it will be overdue the instant that Task A is marked as completed.
•If Task A is subsequently changed from “Completed” to “Not Completed”, then:
o If Task B is marked as completed, Task B is not changed.
o If Task B is not yet completed, then Task B’s due date will be removed since Task A is not yet completed.
•If Task A is subsequently changed from “Applicable” to “Not Applicable”, then:
o If Task B is marked as completed, Task B is not changed.
o If Task B is not yet completed, then Task B’s due date will be calculated using the current time that Task A was marked as “Not Applicable”. Marking a task as Not Applicable is (in this case) the same as saying it was completed.
•If Task A is subsequently changed from “Not Applicable” back to “Applicable”, then:
o If Task B is marked as completed, Task B is not changed.
o If Task B is not yet completed, then Task B’s due date will be removed since Task A is not yet completed.
Of note, the due date of Task B has nothing to do with the due date of Task A. Task B just needs to be worked on and then eventually marked as completed sometime after Task A completes.
In the following example (Figure 19), the same task item from the example above (Figure 17), is now configured to add a due date based on the completion of the Confirm order information task. The Dependency Task is a different task associated to the same Tasks Setup record being updated.
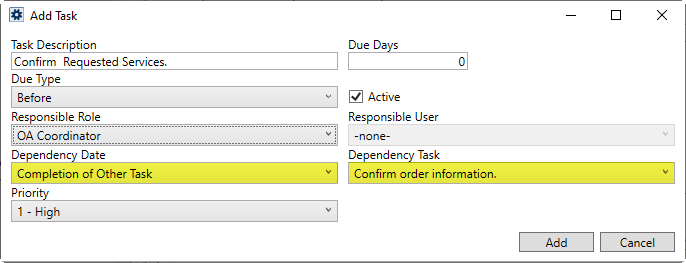
Figure 19: Example Task based on the completion of another task
It is not advised to set the Due Days to something other than 0 (zero). It is possible, but you will receive a confirmation warning. The intent of the Completion of Other Task option is to build the due date of new task as the completion of the other task and not necessarily three days after or before, for example.
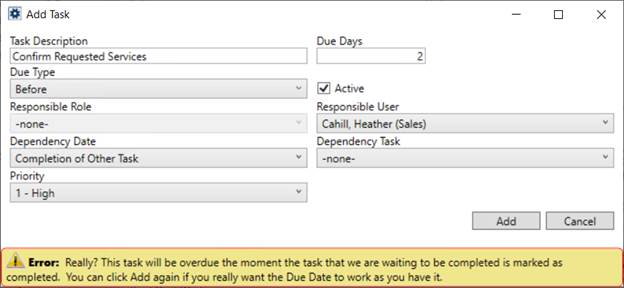
Figure 20: Non-Zero Due Days Error
If you wish to assign the due date of task based on when a document is added to the system, then you can choose the Document Received option from the list of Dependency Dates. Choosing the Document Received option enables the Document Type setting, from which you can choose the type of document that triggers setting the due date on the task item. In the following example, when a document of type “Bill of Lading” is added to the order, a new task is added to the order with the due date set to what is specified on the detail item.
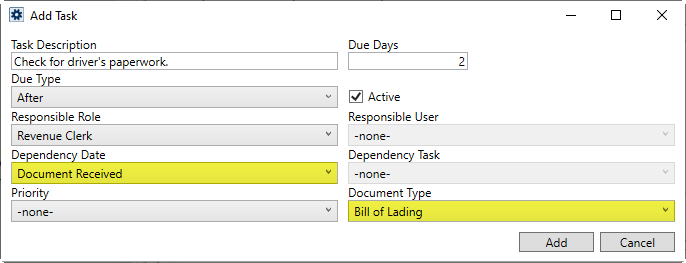
Figure 21: Add Task with Document Received dependency
The Dependency Date values available to you along with their corresponding field location in MoversSuite list within the Task Dependency Dates and Task Dependency Dates by Category topics.
Task Assignment
The application can assign the task for you based on the role on the order or you can set it to particular person. Choosing the Responsible Role instructs the application to retrieve that party set on the order. In the following example, the application will automatically assign the task to the OA Coordinator set within the Agents tab.
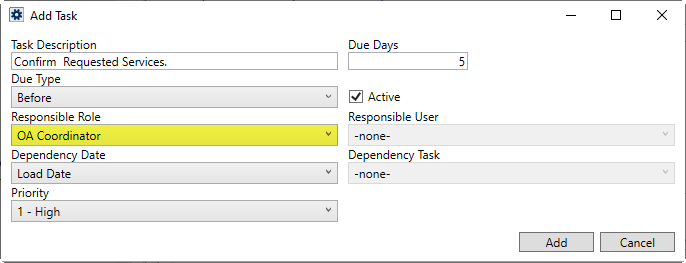
Figure 22: Add Task dialog
Refer to the Responsible Role description within Add Task (Tasks Setup) for details on where in the application these personnel are assigned.
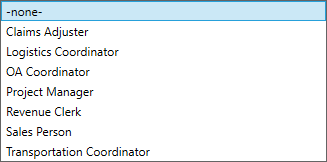
Figure 23: Responsible Role options
Optionally, you can set the Responsible Role to “None” to enable selecting a specific person from the Responsible User setting. This list includes all active personnel defined on your system. Of note, this person must be assigned to the same branch as the order record to be assigned automatically. In other words, the branch of the order must match one of the branches set within the Branch tab of their Personnel Setup record.
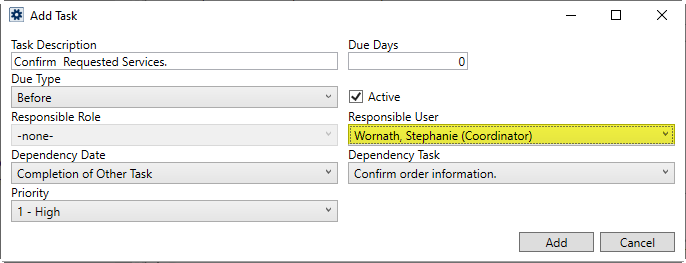
Figure 24: Responsible User example
Other options include the ability to hide a task by unchecking the Active flag and setting a Priority. The Priority allows someone working within the Tasks and Workflow grids to provide an addition order to the task list.
Task List Report for Verification
For a report summary of the task lists by role, you can view the Task List Report. This report displays the Task Description, which Account Profile the record is assigned to, the Dependency Date, and the Due Type. Group options allow you to view by Account Profile or by Responsible User.
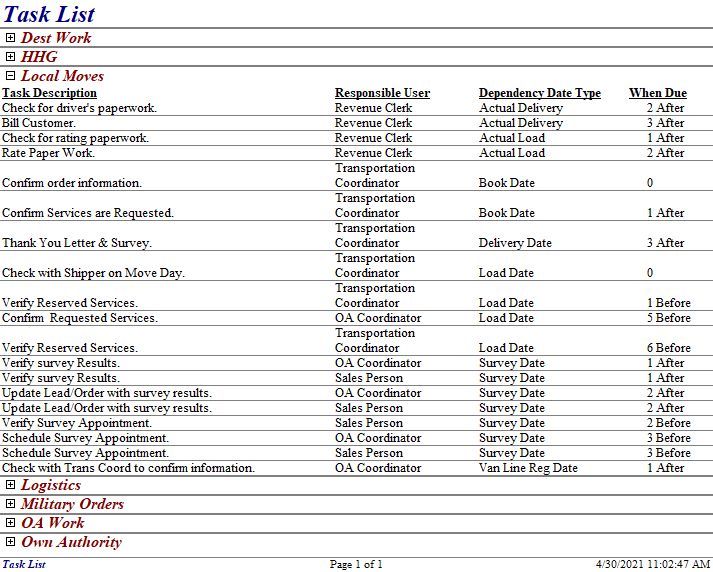
Figure 25: Task List Report grouped by Account Profile
Task Priority Setup
You can update the list of Priority options available to a task item within Tasks Setup by defining values within the Task Priority Setup. By default, three priority options are defined for you. They include the following:
1 - High
2 - Medium
3 - Low
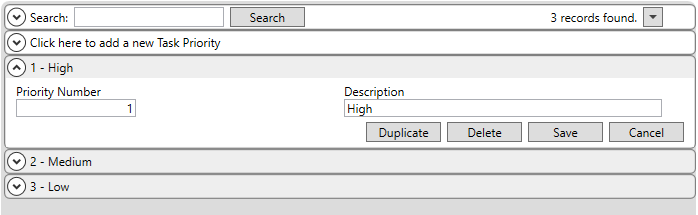
Figure 26: Task Priority Setup
You can update these defaults or added new ones as needed. The Priority Number provides a value in which can be sorted by within the Tasks and Workflow grids.
Link Tasks to Account Profiles
You can set the Task Definition and Task Group on the Order Defaults tab of an Account Profile Setup record.
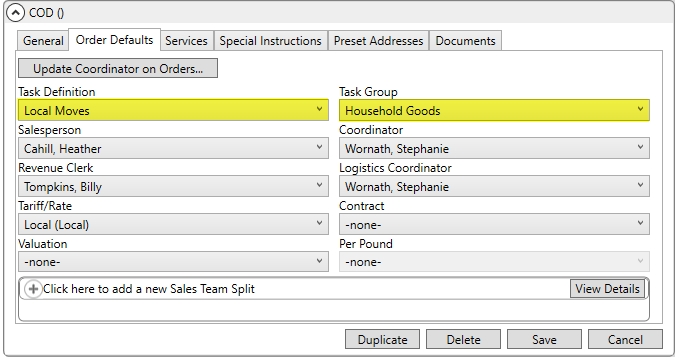
Figure 27: Order Defaults tab within Account Profile Setup
When a lead or order is assigned to the profile, the tasks settings are automatically set.
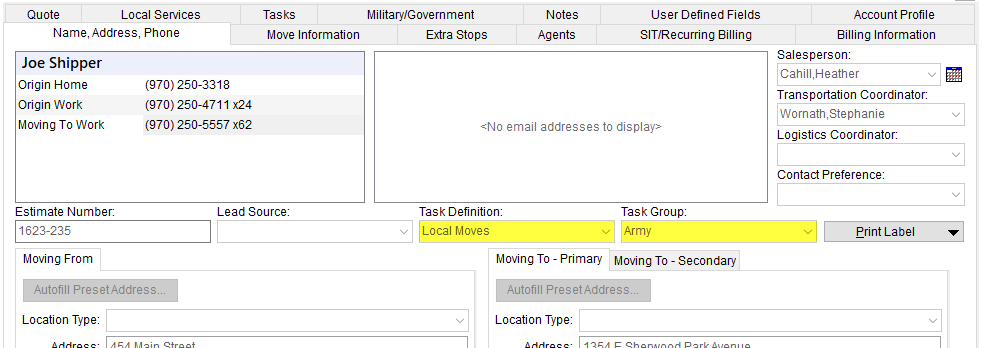
Figure 28: Name, Address, Phone tab
You can view the Task List Report to see a list of tasks by Responsible User assigned to specific Account Profile records.
Link Profiles to Order Status
When the status of an order changes, you can instruct the application to regenerate or clear all tasks as well.
Setting the Clear Move Dates flag within Order Status Setup regenerates the list of tasks when the order status is changed. If the Is Cancelled Status flag is also set, then the application removes (or clears) all Tasks items.

Figure 29: Order Status Setup example
Security Access to Tasks Functionality
Control user access to Tasks functionality through the Security Profile Setup and through the assigned branches within Branch tab of Personnel Setup.
Tasks functionality assignment is available through the Security Modules:
Full access to any of the above modules grants a person the ability to do the following within the corresponding module, provided the branch is one of the assigned branches for the person:
•Set the Task Definition and Task Group on the order
•Perform all functions within the Tasks and/or Workflow tabs
•View tasks for orders for which they have Read Only access
For example, if you wish someone to have full access to all Tasks functions for a branch within the Order Information module, then update their Security Profile Setup record to have the Branch with an Access Type of Full and verify that the branch is also in their assigned branches within the Branch tab of their Personnel Setup record.
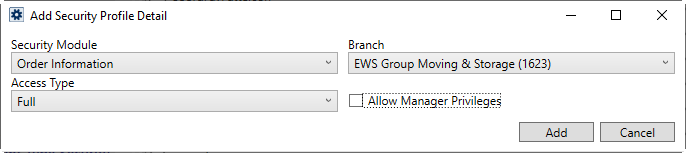
Figure 30: Add/Edit Security Profile Detail entry
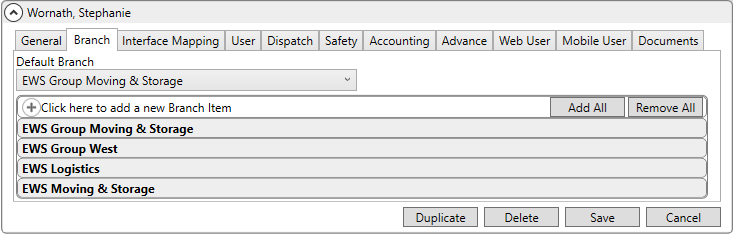
Figure 31: Branch tab within Personnel Setup
Read-only Tasks functionality is based on branch assignment. If you only want a person to view tasks on an order for a specific branch, then set the Access Type to Read Only within their Security Profile Setup record.