
MoversSuite > Revenue Entry > SIT/Recurring Billing tab
Utilize the Recurring Billing section available through the SIT/Recurring Billing tab to establish a record to include within the Recurring Billing Generation process.
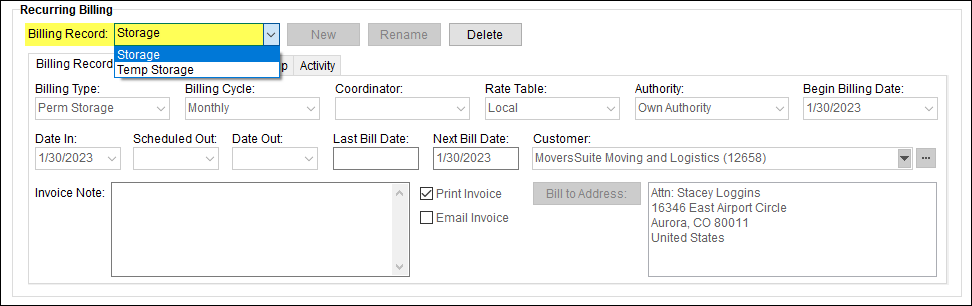
Figure 4: Recurring Billing section
To create a new Recurring Billing Record:
1. From Revenue Entry, click the Edit button.
2. Click New button from the Recurring Billing section.
3. Enter name to identify the new record.
4. Enter variables such as Billing Type, Billing Cycle, Begin Billing Date and Date In to create the metrics for this recurring billing record.
5. Click Save.
6. Establish Billing Item(s).
7. Establish Payment Setup.
NOTE: Multiple recurring billing records can be associated to a single order.
STEP 1: From Revenue Entry, and on the order needed, click Edit.
It may first be necessary to click the Edit button at the top of the application and near the header to edit the screen.

STEP 2:
From the Recurring Billing section within Revenue Entry, click New.

STEP 3:
Enter a name for the Recurring Billing Record being created. The name can be up to 64 characters.

STEP 4:
Enter information into the fields. Billing Type, Billing Cycle, Begin Billing Date and Date In are required to this recurring billing record to link this record to the Recurring Billing Generation process. Billing Type options are the records into in Storage Type Setup. See Billing Record for more information on the fields.

STEP 5: Save the Billing Record.
Click Save the save the new Recurring Billing record.

When saved, the new recurring billing record will list as an option within Billing Record. If there is only one record associated to the order, then that record’s name will be entered as the default.
If any of the mandatory fields are missing, an error message, such as in Figure 7, appears prompting you to fill these fields.

Figure 7: Error dialog
STEP 6: Establish Billing Item(s).
Next, establish one or more Billing Items for the record. These are the specific charges applied during a billing run.
STEP 7: Establish Payment Setup.
Establish automatic or online payments through the Payment Setup tab. You can receive payments automatically for the credit card or bank account captured from the customer or you can establish Online Payments to send the customer an email with a hyperlink to make a payment online. Refer to the Electronic and Online Payments topic for more information.
Changes made to the record, including any billing generation, is documented within the Activity (Recurring Billing) tab.
Refer to the Recurring Billing Overview and Recurring Billing Order Setup topics for more information.
Technical Field and Function Information
The following table describes the general functions available within Recurring Billing.
|
Function |
Description |
|
Billing Record |
Select a Billing Record Select a record from the list of those defined for the order. Open the order in Edit mode to update the record through the various sub-tabs: |
|
|
New (Alt+N) Create a new billing record for the open order. Pressing New prompts you to enter the name for the new billing record (up to 64 characters). Once the order is saved, you must navigate to a different order or the Contents Screen and re-open the order to edit the details of the new record. |
|
|
Rename (Alt+D) Change the name of the open billing record through the Rename option. A prompt appears allowing you to update the name for the record (up to 64 characters). |
|
|
Delete (Alt+D) Pressing Delete removes a billing record from the system. You are prompted to confirm the request. Records with posted transactions cannot be deleted. If you wish to remove a record from inclusion in the Recurring Billing Generation process, then proceed with an End Billing from the Billing Items sub-tab. |
RELATED TOPICS:
Electronic and Online Payments
Recurring Billing Setup and Administration


