
This topic provides information on setting up Capacity Planning on your system.
NOTE: There is no user security associated to Capacity Planning. If you can access the server hosting the MoversSuite, then you can bring up the Capacity Planning page within the default browser.
Use following steps in MoversSuite Administration when establishing Capacity Planning.
NOTE: Following this list are details on each step.
1. Add Capacity Buckets. (Capacity Bucket Setup)
2. Add Daily Packing Capacity for each branch of service. (Daily Packing Capacity Setup)
3. Set column visibility and labels. (Capacity Settings)
4. Adjust the Capacity Used Threshold. (Capacity Used Threshold Setup)
5. Update Labor Type and Personnel records. (Labor Type Setup and Personnel Setup)
6. Update Equipment records. (Equipment Type Setup and Equipment Setup)
7. Update materials records. (Material Type Setup)
8. Test and verify the setup.
Below is a quick list of setup areas in MoversSuite Administration that affect Capacity Planning:
MoversSuite Administration > Operations > Capacity Bucket
MoversSuite Administration > Operations > Daily Packing Capacity
MoversSuite Administration > Operations > Capacity Settings
MoversSuite Administration > Operations > Capacity Used Threshold
MoversSuite Administration > Administration > Labor Type Setup
MoversSuite Administration > Personnel > Personnel Setup
MoversSuite Administration > Administration > Equipment Type Setup
MoversSuite Administration > Operations > Equipment
MoversSuite Administration > Customer Service > Material Type Setup
See Capacity Bucket Setup to create the categories - or buckets - that you wish to display within Capacity Planning. They list under the header Bucket (unless you customize the Bucket header.)
Figure 7: Sample Capacity Bucket Setup record
Assign the Bucket Type based on the following Bucket Type options available. See table below for complete descriptions:
|
Type |
Description |
|
Equipment Count Equipment Hourly |
These options make the record available to the following through the Capacity Bucket setting:
Equipment Count counts the person once for the given day. So, if the item is requested once for a given day, then the resource is not available to any other service for the specified day. The Hours Available Daily are still referenced to determine Capacity column data for a bucket.
Equipment Hourly determines capacity based on the number of Hours Available Daily for the resource as specified in the above setup areas.
|
|
Packing Count |
This option makes the record available to Material Type Setup records through the Packing Capacity Bucket option. Packing capacity computes based on the packing counts set on the service.
|
|
Personnel Count Personnel Hourly |
This option makes the record available to the following through the Capacity Bucket setting:
Personnel Count counts the person once for the given day. So, if you utilize Personnel Count for a driver, then once that driver is requested or assigned for a given day, then the driver is not considered available for any other service for that day.
Personnel Hourly bases capacity on the Hours Available Daily within the Personnel Setup records.
|
In the illustration above (Figure 7), the Drivers bucket links to the Personnel Hourly Type. You can assign the bucket type Driver to actual drivers within their Personnel Setup records and to the entire Labor Type as a whole. The application utilizes the Labor Type to determine capacity prior to the dispatch assignments. It then references the capacity values assigned to personnel once a service is assigned.
The Sort Order determines the order in which the bucket displays within the Capacity Planning page. The lower the number, the higher the item displays in the listing. A value of 1 displays at the top. By default, the Sort Order is 0 and the listing is in alphanumeric order based on the Name.
STEP 2: Add Daily Packing Capacity counts for each branch
Use the Daily Packing Capacity Setup to set a Capacity for each supported branch record. The Capacity is the packing total for all Material Type Setup records for the branch on a given day.

Figure 8: Daily Packing Capacity setup
The application considers the packing estimates and actuals set within Update Containers, Packing and Unpacking to evaluate capacity amounts.
STEP 3: Set column visibility and labels
You can adjust which columns are visible and the name of each label through the Capacity Settings.
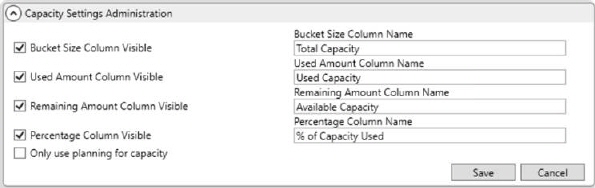
Figure 9: Capacity Settings
Check  which columns you wish to be visible.
Customize column (also called header) names as desired (up to 128 characters).
which columns you wish to be visible.
Customize column (also called header) names as desired (up to 128 characters).
The “Only use planning for capacity” option determines the factors on which capacity will be calculated. If the option is checked, the capacity will be planned as per the default factors. If it is unchecked, the Labor Request and Equipment Request will not be counted as capacity determining factors.
STEP 4: Adjust the Capacity Used Threshold
The Capacity Used Threshold Setup determines the colors and percentages used in the quick reference column labeled % of Capacity Used. Establish whatever percentage level break and corresponding color to customize your table. Percentage levels start from 0 to any high limit you decide for your organization. The purpose of this column is to help illustrate the capacity status.
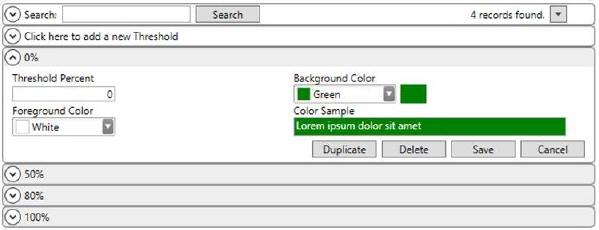
Figure 10: Capacity Used Threshold setup
NOTE: If a Foreground or Background color is chosen from the palette, other than the default color options, the hex code is displayed instead of the color name.
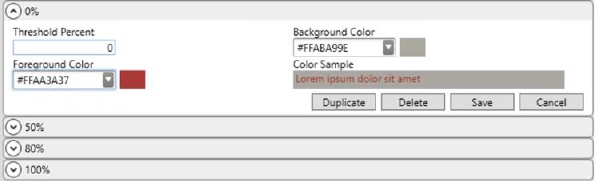
Figure 11: Hex code for selected colors
The application interprets the Threshold Percent as the starting point of the tier. The tier extends from the Threshold Percent specified to that of the next highest record. In the example above (Figure 10), if the capacity falls within a 0 to 49 percent range, then the Capacity Used displays in green with white lettering.

Figure 12: Capacity samples
The Threshold Percent can go to any high limit you want. For example, if you wish to show over-capacity values in different colors, you can continue to go above 100%. Let us say you wish to show red for up to 10% over capacity and black for anything over that. Then you can setup something like the following:

Figure 13: Over limit capacity example
Utilize a color picker, available by clicking on the  button, to choose the
foreground and background colors.
button, to choose the
foreground and background colors.
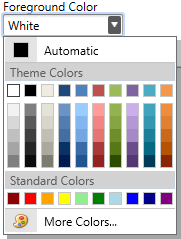
Figure 14: Color picker menu
Once you make a color selection, the Color Sample provides and illustration of your choices for the foreground and background colors.
STEP 5: Update Labor Type and Personnel records
Set the Capacity Bucket for each Labor Type Setup record you wish included in Capacity Planning.
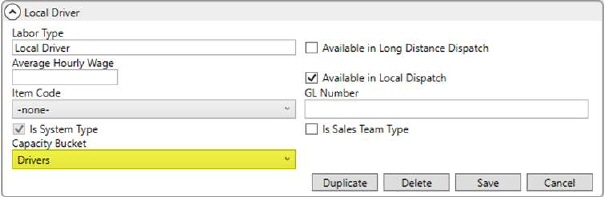
Figure 15: Labor Type Setup
The Labor Type is referenced for the Labor Request specified for a Local Service. The application computes planned labor demand and availability based on the day of the week and service time specified within Add Local Service.
The supported Labor Type must also be assigned to Personnel Setup records (see below).
To be included in Capacity Planning, the Labor Type must have the Available in Local Dispatch flag checked.
Once personnel are assigned to the service through Local Dispatch, then the application looks at the individual hours for each assigned person. For Capacity Planning, the application references the seven Available Hours settings and the Capacity Bucket setting within the Dispatch tab in Personnel Setup.
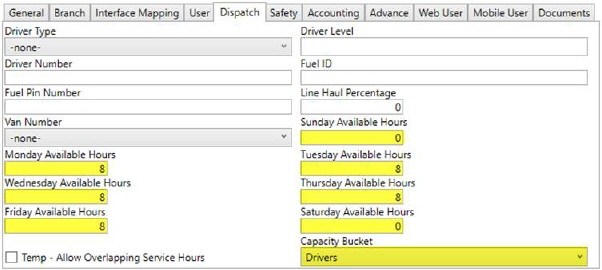
Figure 16: Dispatch tab within Personnel Setup
To be included in Capacity Planning, personnel records must link to a Labor Type Setup record that has the Available in Local Dispatch flag checked and has a Capacity Bucket assigned (see the top part of the step). The record must also indicate a Status of ACTIVE within the General tab within their Personnel Setup record.
Also, a person is only included in the planning totals for their Default Branch set within the Branch tab of their Personnel Setup record
A person is included in planning if their Default Branch set within the Branch tab of their Personnel Setup record matches the branch selected within Capacity Planning. The employee is also included in Capacity Planning if their Default Branch associates to a Dispatching Common View.
Verify that the Default Branch is set accordingly for personnel you wish included in Capacity Planning.
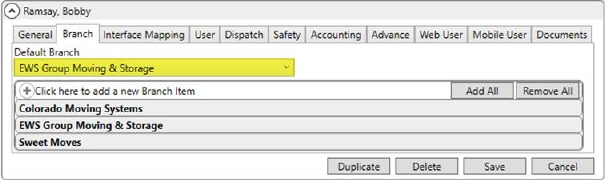
Figure 17: Branch tab in Personnel Setup
STEP 6: Update equipment records
Set the Capacity Bucket and Hours Available Daily on each Equipment Type Setup record you wish included in Capacity Planning.
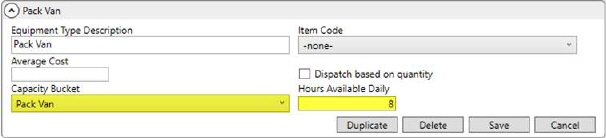
Figure 18: Equipment Type Setup
The type is referenced for Equipment Request specified for a service. The application computes resource demand and availability based on the day of the week and service time specified within Add Local Service.
NOTE: Items with the Dispatch based on quantity
flag set within Equipment
Type Setup are not included in Capacity Planning.
The supported Equipment Type must also be assigned to Equipment Setup records (see below).
Once resources are assigned to the service through Local Dispatch, the application references the Capacity Bucket and Hours Available Daily settings for each Equipment Setup record.

Figure 19: Equipment Setup
To be included in Capacity Planning, the resource must have a Status of Active, be Available for Local Moves, and link to a supported Equipment Type records within the General tab of Equipment Setup.
A resource is included in planning if their Default Branch set within the Branch tab of their Equipment Setup record matches the branch selected within Capacity Planning. The item is also included in Capacity Planning if its Default Branch associates to a Dispatching Common View.
Verify that the Default Branch is set accordingly for all resources you wish included in Capacity Planning.
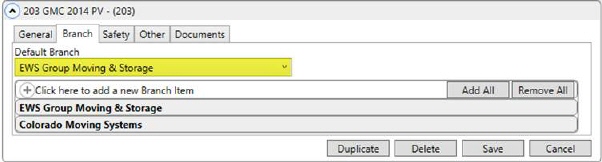
Figure 20: Branch tab within Equipment Setup
STEP 7: Update materials records
Set the Packing Capacity Bucket on each Material Type Setup record you wish included in Capacity Planning.

Figure 21: Material Type Setup
For Capacity Planning, the application references the Packing counts set for the corresponding items within the Update Containers, Packing and Unpacking screen set for the local service request. Estimates are referenced prior to dispatch assignment and actuals referenced once assignments are made.
STEP 8: Test and verify the setup
Open a browser window from your application server and enter the URL to access the Capacity Planning page. This URL is in the following format:
http://[YOUR APPLICATION SERVER]:[PORT]/capacity
Where [YOUR APPLICATION SERVER] is the server hosting MoversSuite and [PORT] is the available port number. This is also referred to as your External IP Address and Forwarding Port. You can view this information through the ApiWebServiceDocs setting within the GlobalSystemOption table. In the example below (Figure 22), the application server is sqlserver and the port is 50000.
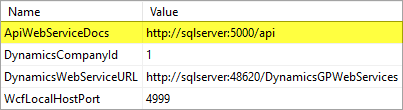
Figure 22: GlobalSystemOption table
Refer to the Capacity Planning topic for additional usage information. For technical reference, read through the Capacity Planning API topic.
If you encounter errors indicating that the service cannot be found or if the API service is not running, then verify that all API services are running on your application server, including the MssApiService and the MssWebApiService for your company.