MoversSuite Administration > Administration > System Wide Options
Use this setup to define various global MoversSuite settings.
Figure 53: System Wide Options
Technical Field Information
|
Field |
Description | |
|
General tab | ||
|
Custom Title |
Entering text in this field instructs MoversSuite to display a message containing the text in the title bar of the MoversSuite application window. The length of this message can be up to 120 characters. The message displays on all stand-alone windows generated through MoversSuite, including MoversSuite Administration, the Document Management Viewer, the Payment Application screen, etc. The format of the title displays as
follows: [APPLICATION NAME] + “-“ + [USERNAME] + “(“ + [CUSTOM TITLE] + “)”
Example: MoversSuite – msuite (custom title text here)
| |
|
Default Country |
Select a country from the provided list (Country Code Setup) to be used as default when exchanging data with third parties. | |
|
Time zone |
Use this dropdown to specify the Database Time zone which will be used for Time zone conversion logic implemented in MoversSuite. | |
|
Service Start Time |
Establish the default service start time (in 24-hour Military Time). If a service is created through Add Local Service without a service time, then this is the default assigned to that service when assignments are made in Local Dispatch and when establishing service times through the Set Service Time function. | |
|
First Day of the Week |
Set the start of the work week for computing the total hours a person works in a given week. This setting drives the WeekHrs calculation within the crew assignment grid within the Dispatch Center tab in Local Dispatch. If the First Day of the Week is Sunday (system default), then the application computes the total hours worked for services a person is assigned to starting on Sunday and going through the following Saturday. | |
|
Auto dispatch services downloaded from van line |
Setting this flag will cause the application to automatically generate dispatch for services downloaded from a van line. See Auto Dispatching for more information. | |
|
Use the Driver Division Option |
Set this flag to instruct the application to reference the Division set for the driver in their Personnel Setup when their Default Branch matches the branch of the Hauling Agent in Agents. See Divisions Setup and Administration for more information. | |
|
Include Special Instructions on Work Ticket |
Check mark this option if you want to add some special instructions along with the other Work Ticket details. | |
|
Only Commission Local Service Crew Based on Work |
Checkmark this flag to only commissions local crew and drivers that are assigned to the Work Ticket associated to the revenue being processed.
NOTE: If commissioning on a revenue associated to Work Ticket and you do not see the person you wish to commission, then verify that their Commission Plan Setup includes the same Item Code and that the Item Code is also linked to the Local Service Type, as well. Eligibility for commissions may also be affected by the Only Commission Local Service Crew Based on Work Ticket setting with System Wide Options. | |
|
Microsoft Outlook Calendar Integration |
This setting controls the functionality behind Microsoft Outlook and related calendar options. See Microsoft Outlook Calendar Integration for usage. The following options are available:
-none- Same as the Turned Off option
Turned Off (No Calendar Access Whatsoever) Select this option will disable the Calendar button in MoversSuite. Users will not be able to access any calendar from within the application.
Full Integration (Any User’s Calendar) Enter this option to allow a user access to the calendar of any user set within the field next to the Calendar button in MoversSuite. When a user presses the Calendar button, a new window will open displaying the calendar of the specified person.
Note: This option requires that users be defined within the Microsoft Exchange Server (the server that driver Microsoft Outlook).
Partial Integration (User’s Calendar Only) Entering this option will enable a user to access their own calendar defined for their local system through the Calendar button; the user can only access their own calendar.
| |
|
Microsoft Outlook Email Integration |
This flag instructs MoversSuite to utilize the Microsoft Outlook mail service when enabled (checked). When enabled and the Use default email service option is checked, MoversSuite opens the Outlook email form for new mail messages generated through MoversSuite and the message is sent using the Outlook service. When this option is disabled (unchecked), MoversSuite may reference its own mail service or it may reference the mail service defined within SMTP Setup. Refer to MoversSuite Email Service Setup and Administration for more information. | |
|
Use default email service (turn off MoversSuite Email) |
Checking this flag instructs the application to use the default mail service that is running on the application server, such as Microsoft Outlook, or the service pointed to through SMTP Setup. Uncheck this flag to turn on MoversSuite Email Service. Email messages generated through the application are sent using the MoversSuite Email Service. | |
|
Other Options section | ||
|
Cash Receipt Receivables Payment Code |
Setting this value assigns a default value to the Payment Code on cash receipt items created in Cash Receipts and processed through Payment Management (refer to Detail Processing and Payment Application). This setting does not affect the Payment Code shown when adding the cash receipt through Payment Application, i.e. it is not a default field setting for the Payment Code. The data values defined within Statement Payment Code Setup are available through this setting. | |
|
Allow users to manually update billing on invoices |
Setting this flag allows users to update the customer and/or customer billing address in the Send Invoice To section of a new or supplemental invoice within the New Complete Invoice screen. If this flag is not set then the billing information is read-only, unless the Remit-To setting references a van line. Refer to Select Customer and New Complete Invoice topics for more information. | |
|
Enable Duplicate Order |
Setting this flag (default) instructs the application to make the New > Duplicate Order option available within all module. Unchecking this option, removes this option from the New menu. Refer to Create Duplicate Order and to Order-Level Functions for more information. | |
|
Check mark this option if you want to let authorized users to restrict a salesperson from seeing orders for any other salesperson.
Make sure that the person responsible for checking this flag has been added with the role of “Sales” with the default checkbox being checked within the Labor Type on their Personnel Setup record under the General tab. | ||
|
Check mark this option if you want to restrict the salespeople from viewing each other's commissions. Only the personnel having manager privileges in Revenue Entry module can access this feature.
Note: To set or remove a manager from the Revenue Entry security module per branch, make sure that you check mark the “Allow Manager Privileges” flag under the Security Profile Detail screen of Security Profile Setup.
Refer to the Hide Commissions From Non Revenue Entry Managers Flag topic for a detailed view of function restrictions with this flag. | ||
|
Checkmark this flag to turn the Sales Commission Hold Management feature on or off. Only the sales commissions generated after checking this flag appear on the On Hold Sales Commissions screen. Any commissions that are generated when this flag is turned off will never appear in the new Sales Commission Hold Management screen. | ||
|
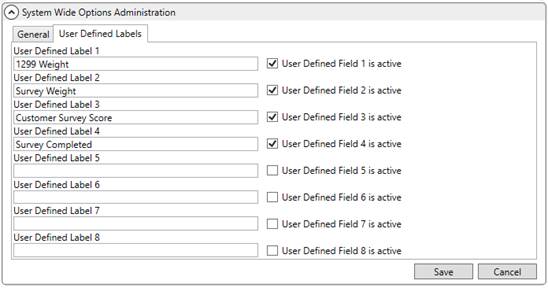
User Defined Labels tab |
| |
|
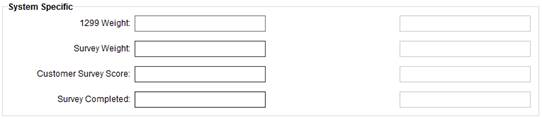
Enter up to 8 custom fields for storing data within the System Specific section within User Defined Fields tab. Fields are tracked in Order History.
Figure 54: User Defined Labels tab
Figure 55: System Specific section within User Defined Fields tab
Field labels entered here can be overwritten by those defined within the Move Type Setup. Refer to the System User Defined Label Override Item section within Move Type Setup for more information. | ||
|
User Defined Label 1 |
Enter the label for the first user defined field (up to 30 characters). In Order History, changes are tracked under the label name entered and UDF-1S, which identifies the field. | |
|
User Defined Field 1 is active |
Set this flag to activate the corresponding Label 1 field and have it visible within the User Defined Fields tab. | |
|
User Defined Label 2 |
Enter the label for the second user defined field (up to 30 characters). In Order History, changes are tracked under the label name entered and UDF-2S, which identifies the field. | |
|
User Defined Field 2 is active |
Set this flag to activate the corresponding Label 2 field and have it visible within the User Defined Fields tab. | |
|
User Defined Label 3 |
Enter the label for the third user defined field (up to 30 characters). In Order History, changes are tracked under the label name entered and UDF-3S, which identifies the field. | |
|
User Defined Field 3 is active |
Set this flag to activate the corresponding Label 3 field and have it visible within the User Defined Fields tab. | |
|
User Defined Label 4 |
Enter the label for the fourth user defined field (up to 30 characters). In Order History, changes are tracked under the label name entered and UDF-4S, which identifies the field. | |
|
User Defined Field 4 is active |
Set this flag to activate the corresponding Label 4 field and have it visible within the User Defined Fields tab. | |
|
User Defined Label 5 |
Enter the label for the fifth user defined field (up to 30 characters). In Order History, changes are tracked under the label name entered and UDF-5S, which identifies the field. | |
|
User Defined Field 5 is active |
Set this flag to activate the corresponding Label 5 field and have it visible within the User Defined Fields tab. | |
|
User Defined Label 6 |
Enter the label for the sixth user defined field (up to 30 characters). In Order History, changes are tracked under the label name entered and UDF-6S, which identifies the field. | |
|
User Defined Field 6 is active |
Set this flag to activate the corresponding Label 6 field and have it visible within the User Defined Fields tab. | |
|
User Defined Label 7 |
Enter the label for the seventh user defined field (up to 30 characters). In Order History, changes are tracked under the label name entered and UDF-7S, which identifies the field. | |
|
User Defined Field 7 is active |
Set this flag to activate the corresponding Label 7 field and have it visible within the User Defined Fields tab. | |
|
User Defined Label 8 |
Enter the label for the eighth user defined field (up to 30 characters). In Order History, changes are tracked under the label name entered and UDF-8S, which identifies the field. | |
|
User Defined Field 8 is active |
Set this flag to activate the corresponding Label 8 field and have it visible within the User Defined Fields tab. | |