The ADP Integration sends punch activity directly from MoversSuite to the ADP payroll system for payroll processing.
To enable this feature, your company must sign up for and enable the MSCrew along with establishing payroll services through ADP.
In addition to the MSCrew, the Add Punches screen in Mobile Crew Time feature can also be used to add the time punches.
PREREQUISITES:
R ADP Integration is an optional, add-on functionality that must be purchased and new licensing provided to your company prior setup. Contact EWS Group to purchase this integration and to obtain the following initial setup information.
R You must have an account established with ADP for each supported terminal (or branch) you wish to track payroll activity through. Contact ADP to get the necessary terminals set up and obtain the following information needed for the steps below:
•SSL Certificate (.pfx file)
•Client ID and Client Secret (ADP login credentials needed to call the ADP token endpoint to receive authentication tokens)
•Name or Identifier for each supported ADP terminal
•Department Code for each employee that you wish to have punch activity recorded for
•Batch Identifier for each MoversSuite user that you wish to send punch activity to ADP
R Have MoversSuite systems set up for MSCrew (for each supported crew you wish to track) along with Mobile Crew Time (available to users you wish to manage and approve punch activity). Refer to MSCrew Setup and Administration for details.
Once the prerequisites are met, you can follow these steps to enable the API Integration (each step is described in detail in the following sections):
1. EWS Group provides initial setup including updating two Global System Option entries to support payroll exporting
2. Assign ADP Terminals to each supported branch record and verify Time Zone settings
3. Add XML Interface for ADP
4. Add XML System record for ADP and establish connection credentials and payroll account mappings
5. Update Personnel Setup records to identify individuals through ADP
6. Update Security Profiles to grant users access to ADP Integration functionality
7. Test and Verify
Before you begin the setup process, you may consider familiarizing yourself with the data that is transmitted to ADP. You can view this information through the ADP Integration Export Content topic.
|
STEP 1: EWS Group performs initial setup including setting Global System Options |
EWS Group is responsible for setting the following Global System Option entries:
|
Option |
Description |
|
EnablePayrollExport |
EWS Group can enable the Export Punches to Payroll functionality, which is the process that allows users to take approved punches for a certain date range and branch and transmit them to ADP. |
|
PayrollXmlInterfaceName |
EWS Group sets this option to “ADP” to set the target of the payroll export to ADP. |
|
STEP 2: Assign ADP Terminal values to support Branch Setup records and verify Time Zone |
|
Setup Area |
Administration Location |
|
Administration > Branch |
For each branch you wish to record punch activity under, you must link that branch to an ADP Terminal. You can assign multiple branches to the same ADP Terminal value. This information is transmitted to ADP along with other punch activity outlined within the ADP Integration Export Content topic.
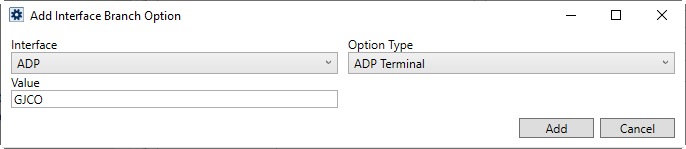
For each supported ADP Terminal, open corresponding Branch Setup records and open the Add Interface Branch Option by Click here to add a new Interface Branch Option.
Figure 6:Add Interface Branch Option example
Link the branch to an ADP Terminal referencing the following field settings.
|
Field |
Description |
|
Interface |
Select the ADP interface defined in Step 1 of these instructions. |
|
Option Type |
Select “ADP Terminal” from the list of values. |
|
Value |
Provide the Terminal Name for the branch from those defined within ADP for your account. |
Note that in Step 3, you can further define what payroll activity is sent to ADP through payroll account mappings. One of the options that you can filter punch activity by is based on branch of service. So, you may want to make a list of all supported branches and corresponding ADP Terminal values prior to moving on to Step 3.
For each branch, verify that the Time Zone is set correctly for services performed under the branch. This information is needed to build the correct timestamp sent to ADP. The Time Zone setting is found on the main Branch Setup record.
|
STEP 3: Add XML Interface for ADP |
|
Setup Area |
Administration Location |
|
Administration > XML Interface |
Add an XML Interface Setup record with Vendor Name set to “ADP”.

Figure 7: XML Interface setup for "ADP"
Van Line and Branch settings are ignored for ADP Integration.
|
STEP 4: Add XML System record for ADP and establish connection credentials and payroll account mappings |
|
Setup Area |
Administration Location |
|
Administration > XML System > General |
In this step you will create an XML System record for ADP, map ADP payroll codes to employees, and establish connection credentials.
Create an XML System Record for ADP
Add an XML System Setup record for the “ADP” interface with the following properties.
|
Option |
Description |
|
Interface |
Select the ADP record defined within Step 1 for XML Interface Setup. |
|
Internal System |
Set these two fields to “ADP.” |
|
External System | |
|
XML System Payroll Account Map |
Use the Add XML System Payroll Account Map dialog to define one or more payroll accounts for each ADP Labor Allocation (employee) you plan to utilize. Refer to the following section for details. |

Figure 8: XML System setup for "ADP"
Map Employees to ADP Payroll Account Codes
For each supported employee you wish to record punch activity for, set up XML System Payroll Account Map records for each. The mappings also allow you to define filters based on service branch and order data, if desired.

Figure 9: Sample XML System Payroll Account Map records
Utilize the Add XML System Payroll Account Map dialog to establish each employee record. These mappings are used to determine the payroll code sent to ADP for an employee. At the most basic level, you can set up payroll employees by just selecting them as the Time Punch Employee and providing the Payroll Acct Code (ADP Department Code) at a minimum. All the service and order selections are there in case you wish to further refine which punch activities qualify to be sent to ADP. For example, if you wish to just send punch information for an employee for a specific branch, then you can select that Branch, select the Time Punch Employee, and provide the Payroll Acct Code. Only qualified records are transmitted to ADP.
The following table provides the key settings needed to support ADP Integration. Refer the Add XML System Payroll Account Map topic for detailed field information.
|
Field |
Description |
|
Ranking |
The Ranking setting allows you to determine the order in which to apply the mapping records. This setting is optional, and you can leave it blank if you with not to apply a specific order in which the mapping records are evaluated to determine the employee and account code to use. If using Ranking, enter a numeric value and increment from there. For example, if you wish to have one mapping determined before another, set the first one to “1” and the second one to evaluate as “2”. |
|
Branch and other service and order data |
If you wish to determine the payroll account code for an employee based on service data, such as the branch of the service, then you can set as many service and order settings as you like. All these settings are optional, so you can just set up an employee by selecting the Time Punch Employee and entering their Payroll Acct Code value. Refer to the Add XML System Payroll Account Map topic for detailed information on the service and order-related fields. |
|
|
Employee Is Lead On Service If you have crew that you wish to report under a specific ADP account code for a specific crew lead, then you can set this flag and enter the account code for the entire crew under that lead within the Payroll Acct Code for Crew Working Under Lead setting. The case for using this flag along with specifying a secondary account code for crew is when a team is contracted out for services. To set this flag, click on
the |
|
Time Punch Employee |
If you wish to specify a payroll account code to use for an employee's time punches (when the other conditions are also met), you may select that employee here. |
|
Payroll Acct Code |
Provide the ADP payroll account number (also referred to as the Labor Allocation Code or Department Code) for the Time Punch Employee (up to 50 characters). This value is sent along with the punch information to determine the employee within the ADP system. |
|
Payroll Acct code for Crew Working Under Lead |
If you wish to assign a particular ADP account code to all crew working under a crew lead on a service, then you can set the Employee Is Lead On Service flag and pick the crew lead in the Time Punch Employee field. Then you can enter a value in this field which will be the ADP account code for all crew working under the lead crewperson. The case for using this flag along with specifying a secondary account code for crew is when a team is contracted out for services. |
If you wish to establish a catch-all account, you can leave all settings blank and provide the generic ADP Labor Allocation Code set as the Payroll Acct Code.
Establish Connection Credentials and Load SSL Certificate
|
Setup Area |
Administration Location |
|
Administration > XML System > Credentials |
The last piece of this step is to set valid credentials and an SSL certificate for connecting to ADP.
From the XML System Setup for the ADP interface, open the Credentials tab.

Figure 10: Sample XML System Credentials for "ADP"
Next, click on Load SSL Certificate. This opens an Explorer window where you can navigate your system to locate and select the certificate file (.pfx). Once selected, press Open to finish loading the certificate into MoversSuite. This signed certificate from ADP is encrypted and stored in MoversSuite. When a new certificate is needed, click on Remove SSL Certificate and Credentials and the load the new one.
Reference the Cert Last Updated field to see the date and time that the certificate was last loaded into MoversSuite.
Set credentials as shown below. These settings are needed to call the ADP token endpoint to receive authentication tokens.
|
Field |
Administration Location |
|
User ID |
Client ID provided by ADP (up to 100 characters) |
|
Password |
Client Secret provided by ADP (no size restriction) |
|
STEP 5: Update Personnel Setup records to identify individuals through ADP |
|
Setup Area |
Administration Location |
|
Personnel > Personnel > Interface Mapping |
Each employee that you wish to track punch activity and send that information to ADP must have their Badge Identifier linked to their Personnel Setup record. This is done by locating and opening the employee Personnel Setup record and establishing an ADP interface record within the Interface Mapping tab.

Figure 11: Interface Mapping within Personnel Setup
Once you add the Interface entry for ADP for an employee, you can press Credentials and enter their Badge Identifier as the User Name. Leave the Password blank.

Figure 12: ADP Interface Credentials dialog
Summary of the field settings within the ADP Interface Credentials dialog are shown in the following table.
|
Field |
Value |
|
User Name |
Enter the Badge Identifier provided by ADP for the employee. |
|
Password |
The password is currently not needed at this time. |
|
STEP 6: Update Security Profiles to grant users access to ADP Integration functionality |
|
Setup Area |
Administration Location |
|
Personnel > Security Profile |
Update Security Profile Setup records to grant user access to ADP Integration functionality. For each profile that you wish to grant user access to, add a Security Profile Detail for each branch you wish to users to access.

Figure 13: Example Security Profile Detail entry
The Branch setting determines which branches the user can access through the Export Punches to Payroll screen. So, if you wish to have a user access six different branches, then you must create a profile for the “ADP Integration” Security Module for all six branches.
Further, the Access Type determines what functionality is available for that branch. If you wish to grant users access to the ability to edit crew punch times and transmit punch activity to ADP, then set Access Type to “Full.” Users with “Read Only” access can only view punch activity.
The following table describes the settings in Security Profile Setup to support ADP Integration.
|
Field |
Value |
|
Security Module |
Select the “ADP Integration” module from the list of options available through Security Modules. |
|
Branch |
Select the branch that you wish to make available to users of this profile within the Export Punches to Payroll screen. |
|
Access Type |
Set to “Full” to grant users access to all functionality, including the ability to edit punch entries and transmit records to ADP. Set to “Read Only” to only allow the person the ability to view punch information. |
|
|
Allow Manager Privileges This setting is not referenced by ADP Integration functionality. |
|
|
All users have access to the Export Punches to Payroll screen available through the Accounting Tools Menu. However, only users with branch access to the “ADP Integration” Security Module can view data and transmit punch data to ADP. |
Refer to Security Modules and Security Profile Setup for more information.
|
STEP 7: Test and Verify |
Once all the steps are complete, you can test and verify the results:
1. Punch activity generated through MSCrew can be approved through the Mobile Crew Time screen.
2. Approved time is available through the Export Punches to Payroll screen, which is available through the Accounting Tools Menu.
3. If the data looks good in the Export Punches to Payroll screen, press Transmit Batch to send the data to ADP.
4. Verify that no errors show in the transmit results and all anticipated punches no longer show on the screen.
5. Lastly, log into your ADP account and view timecards for each employee and verify that each is correct based on what was submitted from the MSCrew app through what was transmitted.
Any errors encountered while sending punches to ADP appear in the Export Punches to Payroll dialog. You can view a list of anticipated errors through the ADP Integration Common Errors topic.

 until the
  appears.

