These instructions detail how to enter payment information into MoversSuite to process payment now:
1. Open the Credit Card/Bank Payment screen.
2. Complete the secure hosted payments page.
3. Complete prompt after successful payment processing or canceling the process.
4. Email, Print, or Void receipt.
5. Cash Receipt is generated.
NOTE: The payment can generate for an order and/or for a customer; however, you can generate a payment without either order or customer. To open the Credit Card/Bank Payment screen without the Order Number or Customer set, you must first open an order and then navigate to the Contents Screen (from the module menu in the upper left corner), then you can select the Credit Card/Bank Payment option from the Accounting Tools Menu. Doing so clears all settings and allows you to process the payment for one of the branches to which you can access.
STEP 1: Open the Credit Card/Bank Payment screen
The main screen of this process is the Credit Card/Bank Payment screen, and it is available in these locations within MoversSuite:
• Accounting Tools Menu > Credit Card/Bank Payment
• AR Credit & Collections > right-click on AR Detail record
• Long Distance Dispatch > Current Driver Activity
• Long Distance Dispatch > Orders
When opening the Credit Card/Bank Payment screen on an order, the application automatically includes the order information and customer. The order data is available when you have the order selected within MoversSuite, including records viewed through Local Dispatch, Order Information, Revenue Entry, AR Credit & Collections and elsewhere.
NOTE: If you wish not to include order/customer data within the Credit Card/Bank Payment screen, then open it from the Contents Screen.
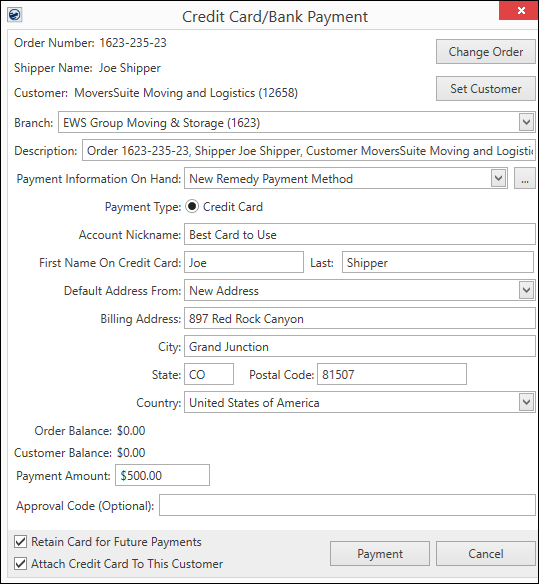
Attach Credit Card To This Customer is active depending on the payment processor chosen in the Payment Information On Hand Field. If not active, there will be an opportunity to save the card information for future use on a Payments Page.

Figure 1: Credit Card/Bank Payment screen
Complete the Credit Card/Bank Payment fields and functions according to details explained within the Credit Card/Bank Payment.
STEP 2: Complete the payment page.
When you press Payment from the Credit Card/Bank Payment screen, MoversSuite opens a secure hosted payments page which connects you with your merchant service provider.
The exact format of the page will be determined by the electronic merchant service provider chosen within the Payment On Hand field on the Credit Card/Bank Payment screen.
• For Remedy, the secure hosted payment page is called Remedy Payment Page. Complete the payment information and click Pay Now to process the transaction (Figure 2).
• For CSI Pay, the page is called Secure Payment Form. Enter bank or credit card information and send the request to the provider by pressing Charge Credit Card or Charge Account (Figure 3).
Note: Time-sensitive security tokens messaged between MoversSuite and the service provider may time out if this form is not completed in set limit, such as 10 minutes. In such case, an error message displays, and you may need to cancel and resend the payment.
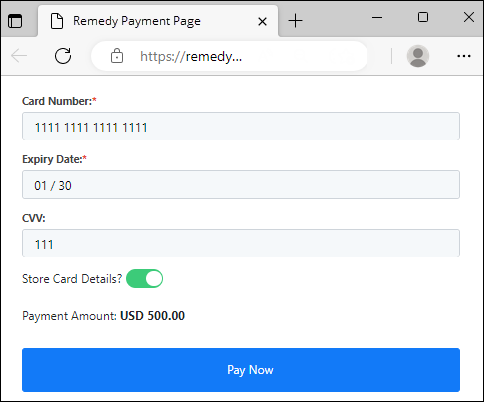
Figure 2: Secure hosted payment page for Remedy Payments
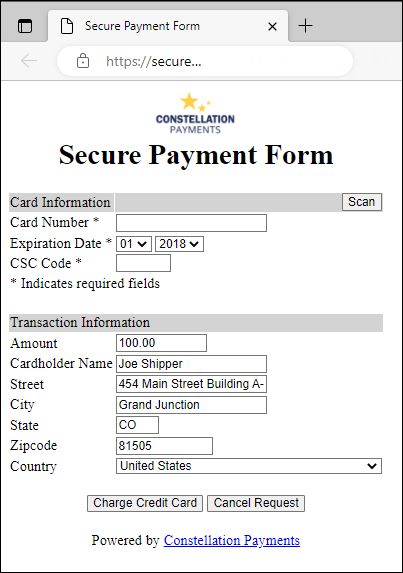
Figure 3: The secure payment page for CSI Pay
STEP 3: Complete prompt after successful payment processing or canceling the process.
This is a MoversSuite generated screen. It appears once MoversSuite contacts the payment processor. The “web browser window/tab” is referring to the secure hosted payment page, i.e., Remedy Payment Page or the Secure Payment Form from Step 2. Read the message: Click me after the payment has succeeded or been cancelled.
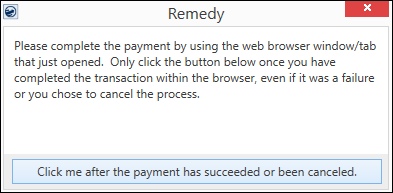
Figure 4: Prompt that appears when a payment or cancel is being processed on a separate web browser page.
Once the payment processes or is cancelled, press Click me after the payment has succeeded or been canceled button.
|
|
The web form generates using your default web browser application, such as Microsoft Edge, Google Chrome, or Firefox, etc. Contact EWS Group Support if you need to have the form generated by MoversSuite itself using internal embedded .NET WebBrowser control. |
If errors return to the Secure Payment Form or Remedy Payment Page, attempt to correct them prior to closing the page. Errors appear at the top of the page.
NOTE: Remedy has a processing rule that if the same transaction (same card and same amount) is re-submitted within 1200 seconds (20 minutes), then the second one or any others within that 20-minute window) will get rejected as a duplicate. This is to prevent people from clicking the payment button twice or hitting the back button and re-submitting twice.
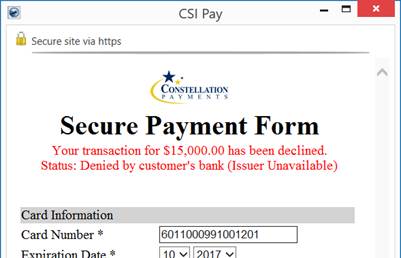
Figure 5: Secure Payment Form with error
If errors persist, you may need to have the person you are processing the payment for contact the merchant service provider to resolve the issue. Once resolved, the merchant service may provide an approval code to allow the payment to process. Reference the Electronic Payment Reprocessing topic for more information.
STEP 4: Email, Print, or Void receipt
The application produces either an Electronic Payment Failure or an Electronic Payment Success screen depending on whether the transaction was successfully processed or not.
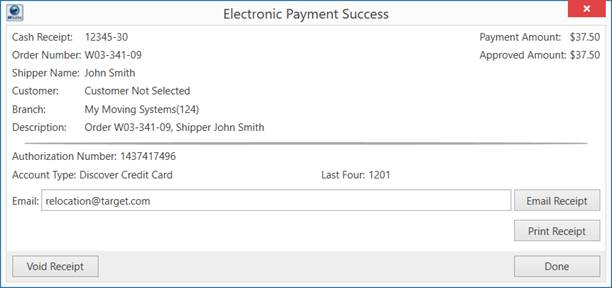
Figure 6: Electronic Payment Success screen
From the Electronic Payment Success screen, options include the ability to void, email, and/or print the receipt.
•To Email: The Email field captures the email set for the order. Additionally, you can include one or more email addresses separated by a semi-colon and press the Email Receipt button. This opens a new email message that you can review prior to sending out. This message includes recipients, subject, and body filled-in automatically along with the receipt attached as a PDF document.
•To Print: View the receipt generated by the payment through Print Receipt. The document viewed is the same receipt report that generates through Cash Receipts.
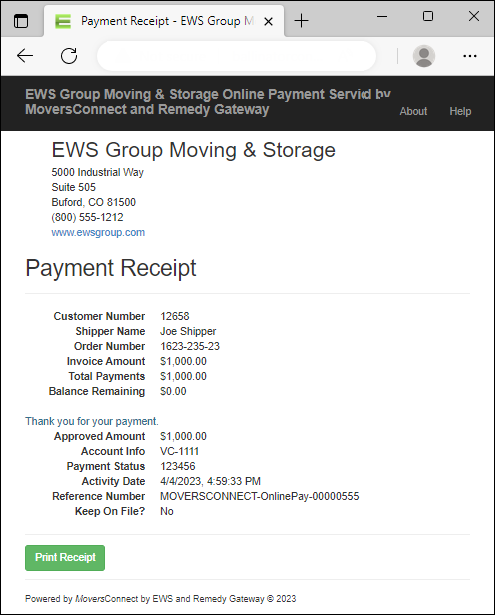
Figure 7: Electronic Payment Receipt
•To Void: You also have the option to void a receipt from the Electronic Payments screens. The Void Receipt option is available through various places including through Cash Receipts and through the Electronic Payment Success dialog.
STEP 5: Cash Receipt is generated.
Whether or not errors exist, MoversSuite creates a cash receipt for the payment. The cash receipt links to a batch titled “Electronic Payments” that also includes the branch of the payment. In the illustration below (Figure 8), receipt 12345-23 links to a batch payment for electronic payments under branch 124. MoversSuite creates one Electronic Payment batch per branch per day, unless a payment is created after a batch is “In Process” within Payment Management. In this case, an additional batch for the same branch is created. Electronic payment batches are always for a single provider type. So, if you have both CSI-Pay and Remedy Electronic Merchants, you get separate batches for each provider type.
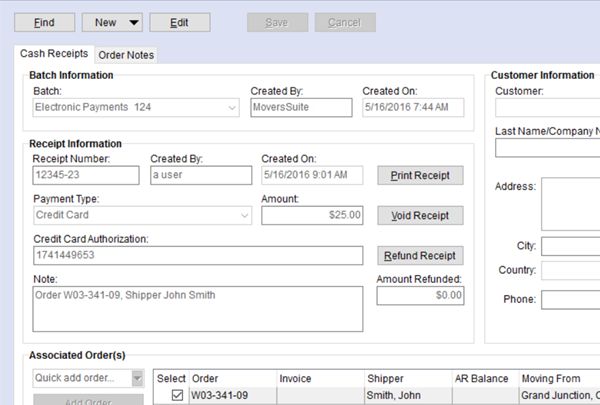
Figure 8: Cash Receipts module
From Cash Receipts, you can print, void, and make full or partial refund for the payment.
From Payment Management, you process the batch as they would other payments.
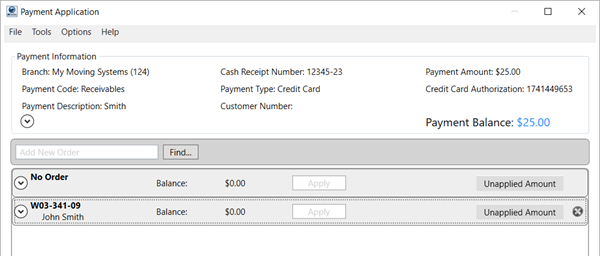
Figure 9: Payment Application
RELATED TOPICS:
Electronic Payment Reprocessing
Electronic Payment Void Receipt