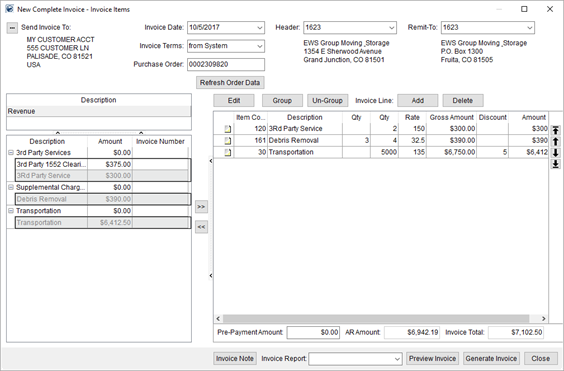
The New Complete Invoice screen provides you with the ability to generate an invoice based on order revenue from sources such as that created through the Transactions tab and imported from Local Services, from Quote records, from various Rating Import items, and more. You also have the ability to create ad hoc line items, create groups of line items, and arrange the groups and items as desired.
Access to the screen is through the New Complete and New Supplemental buttons within the Summary tab and within the Invoice Management screen. New Complete generates an invoice that includes all new revenue items automatically, whereas New Supplemental produces an invoice that includes revenue not already included on an active invoice.

Figure 2: New Complete Invoice screen
The screen is divided into several sections, described below.
Invoice Header
Use this section to set the billing and remittance data along with the date and terms of the invoice.

Figure 3: Header section
Invoice Revenue Source
This section lists the items that can display on the invoice based on what is generated through Quotes, Rating Sends, Revenue (example below), and TechMate Imports. Additionally, when invoicing through Claims, additional sources of Receivables and Handling Revenue are also available.
Selecting a source populates the
grid below with the available details. Select one or more items and use the  and
and  buttons to move the revenue items to and
from the Invoice Items listing.
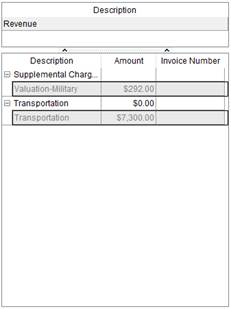
Figure 4: Invoice revenue source selector
You can select multiple records from the source listing and add or remove them from the invoice. To select multiple items individually, press and hold the CTRL. To select a range of records, press and hold the SHIFT key and click the starting and ending records of the range.
Invoice Items
This section provides you with all the line items and groups that display on the invoice. Use the up and down arrows to move items or groups up or down in the list. Add revenue items and groups using the buttons above the grid and view totals for the line items below.
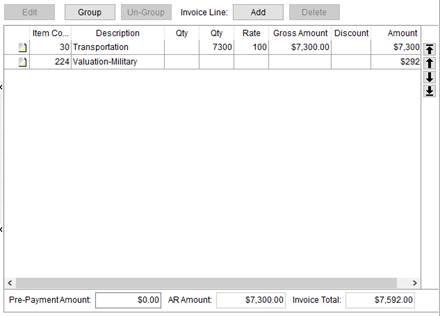
Figure 5: Invoice line items
Invoice Generation
Use this section to create an invoice note that displays on the output report, select a report from those defined within Report Setup, and view and generate the invoice. You can choose between SF1113 Laser, Custom Invoice, and Revenue Invoice etc.

Figure 6: Invoice generation functions
Preview Invoice and Generate Invoice both produce a report visible through the Report Viewer. Once generated, the source items are linked to the invoice. Options are available from the Summary tab that allow you to create a supplemental invoice of all items not associated to an active invoice, copy and invoice, or void one. Note: You can also create an invoice with Claims items through the Summary (Claims) tab.
Generated invoices are visible within the Invoice section of
the Summary tab. From this tab, you
can view a report of the invoice, copy the invoice, or void it.
Invoice Drafts
If you attempt to close without generating an invoice, you are prompted to save a draft of the invoice.
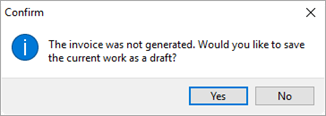
Figure 7: Invoice draft confirmation
If you proceed with saving the draft (Yes), then the next time you press New Complete or New Supplemental, the application prompts you to request whether you wish to resume working on the draft or not.
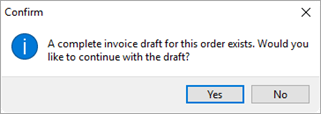
Figure 8: Draft exists prompt
Choose Yes to open the draft within the New Complete Invoice screen. Choosing No, discards the draft and opens the New Complete Invoice screen.
Only one draft is stored by MoversSuite for a single order regardless of the number of customers attached to revenue items. Also, drafts do not display in the Invoicing grid within the Summary tab. If you receive a draft notice for an invoice that you did not create, you are prevented from working on it or discarding it. Note: A user that is a manager within Revenue Entry can override a draft invoice. Refer to the “Revenue Entry” listing within Security Profile Setup for more information.
An invoice cannot be edited by two people at the same time. If you attempt to open an invoice that is being edited by another person, then you receive a warning with the person’s named followed by, “ is currently working on an invoice draft for this order.” Refer to Invoice Lock for details.
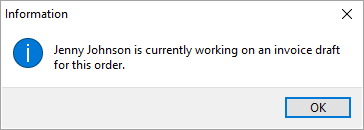
Figure 9: Multiple user access warning
If changes are made to data that affects what displays on the invoice, such as changes to the shipper name and address, then you can use the Refresh Order Data feature to update data behind a draft invoice. For example, if you noticed that the address was incorrect while building an invoice, you can save it as a draft, make the address correction, open the draft invoice, and Refresh Order Data to pull in the address information. Note: Copy invoice does not refresh data. So, if you copy an invoice, you may find it useful to always perform the Refresh Order Data function.
Multiple Customer Invoices
If you attempt to generate an invoice when one or more items you have on the newer invoice also exist on a generated invoice, then the application prompts you to void the previous invoice or invoices.
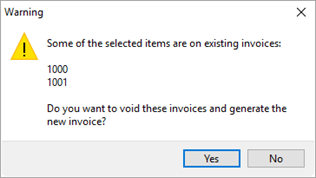
Figure 10: Existing items warning
Pressing Yes voids the existing invoice or invoices and allows you generate the new invoice. Pressing No closes the generation process and leaves the new invoice open within the New Complete Invoice screen, where you can close out and save it as a draft, if desired. Note: You can void generated invoices through the Summary tab.
If revenue for multiple customers exists for an order, then you are prompted to select a customer to base the new or supplemental invoice on through the Select Invoice Customer screen.
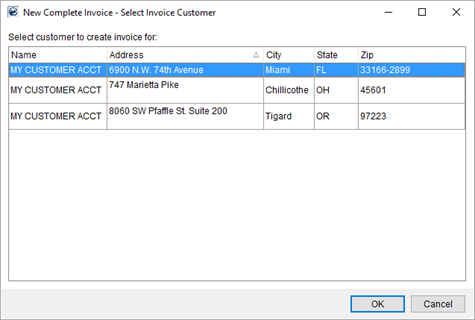
Figure 11: Select Invoice Customer dialog
Technical Field and Function Information
The following table displays the fields and functions available within New Complete Invoice and New Supplemental Invoice screens.
|
Field/Function |
Description |
|
Send Invoice To |
View the customer name and address that appear on the
generated invoice. Optionally change the customer or billing address
through the Select
Customer screen available through the
NOTE: You can only change the customer if the Remit-To links to a van line or if the Allow users to manually update billing on invoices flag is set within the System Wide Options.
|
|
Invoice Date |
This is the date of the invoice and will also be used to compute the late payment date assigned through the Invoice Terms. |
|
Header |
Select a branch or van line to reference for the heading information to display at the top of the invoice. Branches available within this field are those with an Address Type defined in their Branch Setup and manage van lines through the Van Line Setup (available van lines must have a valid address associated to them to appear as an option within this setting). |
|
Remit-To |
Select a branch or van line as the location where the recipient should send the payment. Branches available within this field are those with an Address Type defined in their Branch Setup and manage van lines through the Van Line Setup (available van lines must have a valid address associated to them to appear as an option within this setting).
NOTE: You can only change the customer set for the Send Invoice To field if the Remit-To links to a van line or if the Allow users to manually update billing on invoices flag is set within the System Wide Options.
|
|
Invoice Terms |
Choose the terms that will display on the invoice as one of the following:
None The due date and the payment after the due date will not appear on the invoices.
from customer This setting will pull and display any terms from Microsoft Dynamics GP that have been defined for the customer selected through Send Invoice To.
from System This setting causes the application to compute the terms based on values set within Invoice Terms Setup (based on the branch assigned as the Header).
|
|
Purchase Order |
Update or set a purchase order that displays on the invoice. The application defaults the Purchase Order to what is set on the order for the Purchase Order Number within the Billing Information tab. Updates to this setting only affect what display on this specific invoice, i.e. your changes here do not reflect on the order. |
|
|
Refresh Order Data This function allows you to pull in the latest data of an order that may affect what displays on the invoice. For example, if you find out that the shipper name or address changed while you are working on an invoice, you can save the invoice as a draft, make or confirm changes for the order, re-open the invoice as a draft, and bring in any changes using the Refresh Order Data option. Note: The Copy invoice function does not pull in the latest information. View the Refresh topic for details on what is copied during a Refresh Order Data. |
|
Source Description |
Select a source of revenue to import. Once a selection is made, the grid below will populate with items from the source. Note: Sources for invoicing in Revenue Entry differ from those in Claims. For invoicing through Revenue Entry (see Summary), the following sources will be available:
Quotes Accepted quotes appear as sources with a title of “Quote” followed by the actual quote number. Two right-click options are available for quotes that allow you to import the quote it appears within the Quote tab.
Import as Quoted Choose this option to import items as they appear on the quote, including any groups that may be in effect.
Import Items as Quoted Choose this option to import items as they appear on the quote without any groupings.
Rating Sends Van line rating sends will appear with a title of “Rating” followed by the date and time of the import. The Amount of the send is the total dollar amount billed to the customer (not the distributed amount), i.e. the amount the moving company will invoice the van line for.
Revenue The actual revenue items generated within MoversSuite appear with a title of “Revenue” for the source. These are the only sources tied to an accounts receivable.
TechMate Import Estimates from TechMate appear with a title of “TechMate” followed by the date and time that the record was imported into MoversSuite.
Figure 12: Source listing
For invoicing through Claims (see Summary (Claims)), the following sources will be available:
Receivables These sources are created through Receivables.
Handling Revenue These sources are created by transactions defined within the Revenue tab in the Handling Revenue/Expenses pane in Claims (see Add Handling Revenue).
|
|
Source Items |
Select items belonging to the source to include on the
invoice. Press the right-arrow button Selected items will appear grayed-out and a user will not be able to reselect them.
Figure 13: Source item selection menu
The application only allows one invoice item for revenue associated to a particular Item Code; duplicate line items tied to an actual transaction are not allowed. Additionally, the application will merge revenue items that contain the same service code (Item Code) together for all transactions for which the Invoice Flag is set (at either the Item Code level or Revenue Group level).
Invoice Note Specify up to 1,024 characters for a note that will appear below the associated line item. The first 45 characters of this note are included in the EDIInvoice view (Military EDI Invoice Integration).
EDI Code Set an identifier for the line item to link rating information needed for EDI providers (from the list defined within EDI Customer Setup). |
|
|
Edit This function opens the data entry screen corresponding to the type of invoice item the user has selected. Changing data through this function affects the transactions data. The following screens can be accessed through this Edit feature (all in Edit mode):
Note: Users can double-click an invoice item record to evoke the View functionality.
|
|
|
Group Opens the Group Options dialog allowing the user to group one or more invoice items. Use the group option to allow related items to display under one, shared invoice listing. A practical use of this logic is to lump commissions, along with standard transportation charges, into one group titled “Transportation” or to group all materials, such as containers, packing and unpacking (CPU), together to avoiding a confusing invoice. Invoice groups will automatically be created for revenue groups that have the Invoice Flag set and for those items that are linked to an Invoice Group |
|
|
Un-Group This function removes the selected grouping without prompting the user to confirm the request. |
|
|
Add Opens the Add Invoice Line Item screen where a user can create an ad hoc line on the invoice. |
|
|
Delete Removes the selected ad hoc line item without prompting the user to confirm the request. |
|
Invoice Items |
This section lists the items and groups that will appear on the invoice. The order in which they display on the screen is how the items will appear on the generated invoice. A user can move a selected entry by using the arrow keys appearing on the right. The following item move options are available:
Moves the selected record to the top of the listing.
Moves the selected records up one record in the listing.
Moves the selected record down one record in the listing.
Moves the selected record to the bottom of the listing.
Selecting a source populates the grid below with the
available details. Select one or more items and use the
You can select multiple records from the source or items listing and add or remove them from the invoice. To select multiple items individually, press and hold the CTRL. To select a range of records, press and hold the SHIFT key and click the starting and ending records of the range.
You can also utilize a right-click option allowing you to sort invoice items based on their description. Choosing Re-order Invoice Lines by Description, sorts all groups and items (not items within a group) in alphanumeric order based on their description.
Figure 14: Right-click option within Invoice Items section
|
|
Sales Tax |
Sales Tax options are available when Sales Tax Integration functionality is enabled. A Calculate option appears or the tax amount is calculated automatically, depending on your system setup.
If errors are encountered, then you can view the errors
through the Sales Tax Error
dialog by clicking the
The final tax amount shows in the box and displays on the standard invoice reports.
Refer to Sales Tax Integration for more information on this feature.
|
|
Pre-Payment Amount |
Enter the dollar amount received for items being invoiced. This amount is deducted from the Invoice Total and the Amount Due that display on the invoice. This amount does not generate transactions. |
|
AR Amount |
This field displays the dollar amount of items associated to accounts receivables. |
|
Invoice Total |
The total dollar amount of all items listed on the invoice, less any Pre-Payment Amount. This amount is reflected on the invoice as Amount Due. |
|
|
Invoice Note This function opens the Invoice Notes dialog allowing a user to provide a message for the item on the printed invoice. |
|
Invoice Report |
Select a report to render the invoice with from the list of those defined in Report Setup. To appear as an option within this field the report must have be assigned to a Report System Location of “Revenue Entry Invoices.” |
|
|
Preview Invoice This function creates a draft of the invoice and opens a Report Viewer window with the rendering of the Invoice Report document containing all related information for the invoice. The invoice number will be listed as “Draft.” This function falls under the Report Viewer Options. |
|
|
Generate Invoice This function generates the invoice document and opens a Report Viewer window dipslaying the finalized invoice. This function falls under the Report Viewer Options. |
|
|
Close This function closes the screen. The user will receive a prompt requesting to save a non-generated invoice as a draft (Yes) or to discard it (No). The saved draft will be available the next time the user opens the New Complete Invoice screen for the same customer.
Figure 15: Save draft confirmation dialog
|
RELATED TOPICS:
Military EDI Invoice Integration