Keyboard Shortcut: Alt+A+P
Utilize the Credit Card/Bank Payment screen to process a single payment, pay an invoice and establish the payment method for the order and/or customer, or reprocess a payment with a provided Approval Code. Refer to the Electronic and Online Payments for additional use information.
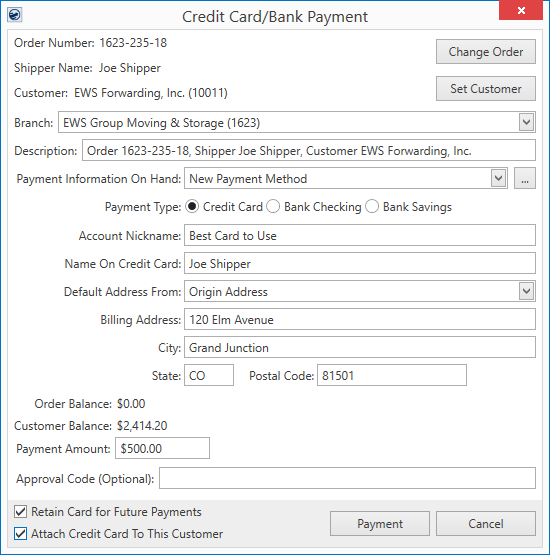
Figure 11: Credit Card/Bank Payment screen
Access to this screen is through the following:
•Accounting Tools Menu > Credit Card/Bank Payment
•AR Credit & Collections > AR Detail > Credit Card/Bank Payment (right-click option)
•Long Distance Dispatch > Current Driver Activity > Credit Card/Bank Payment (right-click option)
•Long Distance Dispatch > Orders > Credit Card/Bank Payment (right-click option)
NOTE: If you access the Credit Card/Bank Payment screen from the Contents Screen all order and customer default settings are not set.
See Electronic and Online Payments Setup for information on accessing this screen.
Technical Field and Function Information
The following table describes the fields and functions available within the Credit Card/Bank Payment screen. Refer to the Electronic and Online Payments for additional use information.
|
Field/Function |
Description |
|
NOTES: •You can use this screen without specifying an order or customer. If you wish to not have defaults set for the order and customer, then open this screen from the Contents Screen. •Setting the order and/or customer on the payment populate the payment description, name on card, address, and balance information as well. •All text entry fields are 255 characters or larger in length.
| |
|
Order Number |
If the payment associates to an order, then the Order Number of that record displays. |
|
|
Change Order Use this function to assign an order to the payment. Pressing Change Order opens the Find screen allowing you to search and locate the appropriate order. |
|
Shipper Name |
The name on the order associated to this payment displays. The Shipper Name pulls from the name set on the Name, Address, Phone tab. |
|
Customer |
If the payment associates to a customer, then the customer assigned to the order displays. Alternately, you can use the Set Customer function to change the customer on the payment and, optionally, update the customer on the actual order as well. If you wish the payment information be retained for future payments associated to this customer, then check the Attach Credit Card to this Customer flag (below). |
|
|
Set Customer This function opens the Customer Find screen allowing you to open select a different customer on the payment and, optionally, update the customer on the order as well. |
|
Branch |
Select the branch that you want this payment processed under. A cash receipt generates for this branch and is available for processing within Cash Receipts and Payment Management under the title of “Electronic Payment” followed by the branch number. This branch defaults to the branch assigned to the order, if specified. Alternately, a different branch can be selected from the list. This list includes branches available to the merchant service provider (through Electronic Merchant Setup) and those that the user can access (through Security Profile Setup records assigned to the Cash Receipts module). |
|
Description |
This is the description for the electronic payment. By default, the application builds this description from the Order Number, Shipper Name, and Customer assigned to the payment. You can overwrite the default and enter your own description. This description follows the transaction through payment processing on to Cash Receipts (as a Note on the receipt) so please make sure that the information it contains makes it easy to locate this record. |
|
Payment Information On Hand |
Select the type of payment you wish to use to process this payment. By default, this field is set to “New Payment Method,” however you can select from a list of payments retained for the shipper or customer. To retain payment information for future use, check the Retain Card for Future Payments option (below).
Press the ellipses button to access the screen Payment Method Management, from which you can manage the active status of a payment, set a nickname, and attach/remove a customer from the payment. NOTE: Changes to the payment information through this screen are not logged as activity for a Recurring Payments. If you wish to change this data and have a record of it, access the Payment Method Management screen through the AutoPay Setup (Recurring Billing) tab. |
|
Payment Type |
The application sets up the Secure Payment Form based on the type selected here (accessed by pressing Payment). Select the payment type as one of the following:
Credit Card Process a credit card for the payment. The Secure Payment Form prompts for the Card Number, Expiration Date, and CSC Code (security code).
Note: To ensure a secure payment, CSC code is compulsory while entering the Credit Card Info.
Bank Checking Process a bank checking account for the payment. The Secure Payment Form prompts for the Account Number and Routing Number of this checking account.
Bank Savings Process a bank savings account for the payment. The Secure Payment Form prompts for the Account Number and Routing Number of this savings account.
The Payment Type options available are dependent on what is selected for the service provider within the Electronic Merchant Setup. |
|
Account Nickname |
Update or set a nickname for the payment method (up to 40 characters). The nickname allows the method to be differentiated from other methods, making it easier to identify through the Payment Information on Hand setting and when selecting a payment for storage billing through the Payment Method Management screen or through the Payment Method selector within the Payment Setup tab. |
|
Name On Credit Card Name On Bank Account |
Provide the name on credit card or the name on the bank account that the payment processes under. |
|
Default Address From |
Select the address type you wish to reference to populate the billing address. Options from this menu include “New Address,” which you specify if you wish to enter the billing address manually, and from a list of addresses populated for the order and customer records. For example, if you wish to populate the billing address from the Moving From address on the order (from Name, Address, Phone), then choose the “Origin Address” option and the billing address updates accordingly. Address types only list in this menu if there is an actual address assigned to the specific entry. For example, “Destination Address” only appears if the order has the Moving To address set (Name, Address, Phone). Also available to select from are any Extra Stops on the order. Customer address types pull from Microsoft Dynamics GP. The list under their billing source, e.g. PRIMARY, SECONDARY, etc. |
|
Billing Address |
The Billing Address is the address that the credit card/bank account itself is billing to. When a merchant provides this information as part of the electronic transaction, then this additional information is used to reduce fraud through the Address Verification Service provided by the card networks. This information then reduces the fee the merchant gets charged on this transaction. At a minimum, supply the zip code. Use the Default Address From setting to fill-in data for the billing address automatically from the order or customer associated to the payment. Alternately, choose “New Address” to enter the billing address by hand. The Billing Address populates the corresponding address referenced within the Secure Payment Form. NOTE: The option to update the billing address is available through the Secure Payment Form, as well. |
|
Order Balance |
The amount of open revenue associated to the order on the payment displays. This amount pulls from data managed within Microsoft Dynamics GP through the Data Warehouse (refer to Data Warehouse Refresh for more information). This information is provided as a reference only. |
|
Customer Balance |
The amount of open revenue associated to the customer on the payment displays. This amount pulls from data managed within Microsoft Dynamics GP through the Data Warehouse (refer to Data Warehouse Refresh for more information). This information is provided as a reference only. |
|
Payment Amount |
Provide the amount you want to process for this payment. |
|
Approval Code (Optional) |
If a payment was denied or if the merchant service provider requests it through the Secure Payment Form, then have the card holder or account holder contact the merchant service provider to obtain an authorization code to grant the completion of the payment. Once this code is received, enter it within this field and continue with the payment attempt. |
|
|
Retain Card for Future Payments Check this flag to instruct the application to reference this credit card or bank information for future payments. On future payment attempts for this order or customer, the payments provided are available as options within the Payment Information On Hand setting within this screen and with the Payment Method setting the Payment Setup tab (for recurring online payments). NOTE: MoversSuite does not store any credit card or bank account information and relies on encrypted tokens to reference the information through secure channels from the merchant service provider. |
|
|
Attach Credit Card to this Customer Check this flag if you wish to associate the payment information referenced for this transaction with the customer for future payments. If checked, the payment information is available for payments associated to the customer (set above). |
|
|
Payment Press Payment to continue within processing the payment. This function opens the Secure Payment Form, which connects MoversSuite to the merchant service provider.
IMPORTANT: Pressing Payment generates a cash receipt for this payment. Therefore, if you cancel out of the subsequent Secure Payment Form screen, then the cash receipt is voided, i.e. uses (or wastes) a cash receipt number.
|
|
|
Cancel Cancel the payment request and close out of this screen. |