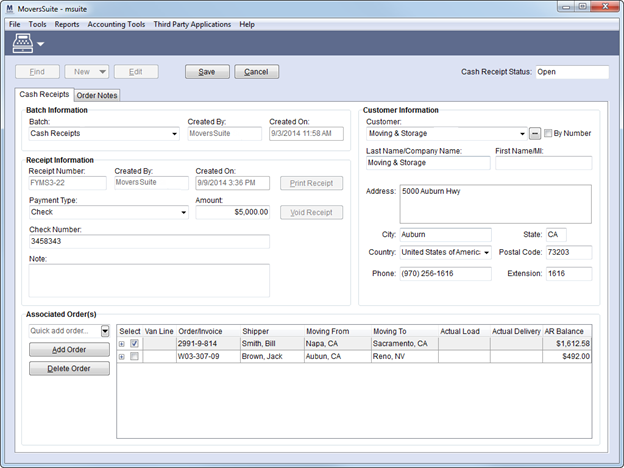
Cash Receipts provides a quick and efficient means of entering receipts for all company sales transactions including walk-in material sales, storage, local own authority and international moves. It provides a mechanism to associate orders that feed directly into Payment Management allowing order-related accounting transactions processing and posting.
Access Cash Receipts from the Contents Screen or through the Contents Menu.
Figure 1: Cash Receipts
The Cash Receipt module allows a user to define a new batch and to add individual receipts to a batch.
Technical Field and Function Information
The following table contains the fields and functions available within Cash Receipts.
|
Field/Function |
Description | ||
|
|
Find (Alt+F) Opens the Find dialog allowing the user to select a receipt to display. | ||
|
|
New Use this drop-down menu to create a new cash receipt or cash receipt batch. New Cash Receipt (Alt+N) Use this function to open the Cash Receipts tab for entry of a new cash receipt associated to the open batch; users will have the option of selecting a different, open batch.
New Batch Opens the New Cash Receipt Batch dialog where a user can select a branch and enter a new of the new batch before proceeding to a blank Cash Receipts tab.
| ||
|
|
Edit (Alt+E) Opens an open cash receipt for updating. Fields that can be edited depend on what status the receipt and batch are in, in general: A batch can be edited up until it has a Batch Status of “In Process,” “Posted,” or “Voided.” A receipt can be edited as long as the batch can be edited and the receipt has a Cash Receipt Status of “Open.” The Amount on a receipt cannot be changed if the receipt has been printed. Refer to Cash Receipt Status or see Batch Status for more information on Batch Management through Payment Management). | ||
|
|
Save (Alt+S) Saves changes made to the open receipt or batch. | ||
|
|
Cancel (Alt+C) Cancels and discards changes made to a receipt or batch. | ||
|
Cash Receipt Status |
Current status assigned to the receipt displays. Refer to Cash Receipt Status for more information. | ||
|
Batch Information |
| ||
|
Batch |
Users can view or select (new cash receipts only) the batch that the receipt record is associated to. Users can create a new batch through the New Cash Receipt Batch screen. | ||
|
Created By |
This field displays the name of user that created the batch. | ||
|
Created On |
This field displays the date that the user created the batch. | ||
|
Receipt Information |
| ||
|
Receipt Number |
This field displays the unique receipt number auto-generated based on the branch and batch assigned to the receipt (see Cash Receipt Numbers Setup for details). | ||
|
Created By |
The user that created the receipt displays in this field. | ||
|
Created On |
The creation date of the receipt displays in this field. | ||
|
|
Print Receipt (Alt+P) This function falls under the Report Viewer Options and opens a Report Viewer window displaying a payment receipt for the record. The document used to display the receipt links to Report Setup with a System Location of “Cash Receipt.” See Report System Location for more information. | ||
|
Payment Type |
Select a value from the list of those defined within Cash Receipt Payment Type Setup. The selection made here controls the label that displays on the memo field below the Payment Type. | ||
|
Payment Type (memo) |
Enter a memo to be associated with the selected Payment Type (up to 20 characters). Selecting a Payment Type automatically sets the label for the field below (the memo field). Use this field to store the specifics of the payment, such as entering the authorization data for a Payment Type of “Credit Card.” | ||
|
Amount |
Enter the dollar amount of the cash receipt. | ||
|
|
Void Receipt (Alt+V) Users can void an open receipt, which places the receipt in a Cash Receipt Status of “Voided” and remove the link between the receipt and the batch. This function opens the Void Cash Receipt screen prompting the user to enter an explanation of the void, which appears as an accounting note associate to the record. Users can void a batch through Payment Management if the Batch Status is “System” and the batch has no receipts are attached.
Note: Voiding ALL receipts of a batch automatically voids the batch itself.
| ||
|
Note |
Enter an accounting note to be associated with this receipt. See Accounting Note for more information. This field also contains the transaction reference information established when an electronic payment is generated. Refer to Electronic Payments and to Online Payments for more information. | ||
|
Customer Information |
| ||
|
Use this section to link a customer to a cash receipt. When a Customer is selected, the Associated Order(s) listing displays all orders with a balance for that customer; you can select/unselect these orders. Additionally, all data listed for the customer can be edited, i.e. you can change the Last Name/Company Name of the selected customer. | |||
|
Customer |
Select the customer you want linked to this cash receipt. Begin typing the name of the customer you desire or use the “By Number” option to select by the Customer Number. The drop-down selector includes Name, Number, and Status for the account as set within Microsoft Dynamics GP. Alternately select use the Customer Find ( | ||
|
Last Name/Company Name |
Enter the customer name or last name of the contact associated to the receipt (up to 26 characters). | ||
|
First Name/MI |
Enter the first name of the contact associated to the customer (up to 16 characters). | ||
|
Address |
Enter the physical or mailing address of the customer contact (3 lines up to 256 characters). | ||
|
City |
Enter the city of the customer contact (up to 26 characters). | ||
|
State |
Enter the state of the customer contact (up to 2 characters). | ||
|
Country |
Select the country of the customer contact from the defined list. | ||
|
Postal Code |
Enter the zip code of the customer address (up to 10 characters). | ||
|
Phone |
Enter the phone number of the customer contact (up to 26 characters). | ||
|
Extension |
Enter the phone extension of the customer contact (up to 26 characters). | ||
|
Associated Order(s) |
| ||
|
Use this section to link orders to the cash receipt. Orders associated to a cash receipt appear within Payment Management and can have payments applied to related transasctions open for the orders. Selecting a Customer populates this section with all customer orders with a positive transaction balance (AR Balance). Use the Select option to choose the orders you want associated. Only those orders selected appear when the receipt is saved.
| |||
|
|
Quick Find and Order History (Alt+Q) This function provides the users two options: (1) a quick find feature that produces a list of order numbers based on what the user enters beginning with three characters; and (2) the ability of a user to see and access their order history. See Quick Find for more information. Selecting an order will associate it to the receipt and make it visible within the adjacent data grid. | ||
|
|
Add Order (Alt+A) Opens the Find Order screen allowing a user to select an order to be associated to the open receipt.
Note: Users can select more than one record at a time within the selection grid of the Find. Use CTRL + Click to select records individually or use SHIFT + Click to select a range of records. All selected records will be associated to the receipt.
All orders associated to the receipt will be checked for transactions processed for them and be applied accordingly when the batch is processed in Payment Management. When the application processes a batch in Payment Management, it will check all transactions for orders associated to the receipt for related payments and apply them accordingly. | ||
|
|
Delete Order (Alt+D) This function removes the selected order from association to the receipt without prompting the user to confirm the request. | ||
|
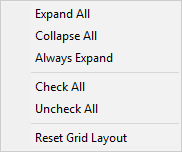
Right-Click Options The following options are available through a right-click menu within the Assocaite Order(s) data grid.
Figure 2: Right-click menu in Associated Order(s)
Expand All When
grouping is in effect, this option opens all expandable items, denoted
with a plus sign (
Collapse All When
grouping is in effect, this option closes all expandable items, denoted
with a minus sign (
Always Expand When this option is turned on, the grid automatically opens all expandable items listed. This setting is saved for each user session and available each time the AR Collections Inquiry screen is accessed.
Check All This option places a check in the Select column for all transactions in the grid, i.e. includes them all as part of the receipt. Refer to the Select field description (below) for more information).
Uncheck All This option removes the check in the Select column for all transactions in the grid, i.e. removes them from the receipt. Refer to the Select field description (below) for more information).
Reset Grid Layout Choose this option to restore all grid settings back to their application defaults. Any customization done to the grid is lost.
| |||
|
|
Select Select items to be linked to the receipt and/or Customer
by placing a check in the box ( Items listed for the orders appear as AR items within Payment Management and can be affected by payment applies. Selecting a Customer will filter the list of associated orders to those that are linked to the particular customer. | ||
|
Order |
The Order Number of the associated order displays within this field. | ||
|
Invoice |
If generated transaction are associated to the AR Balance amount, then the Invoice Number linked to a particular transaction is available within this column. If the revenue is not tied directly to an invoice, then the column displays, “Other Revenue.” | ||
|
Shipper |
The name of the shipper taken from the Last Name/Company Name and First Name/MI fields set within Name, Address, Phone display in this field. | ||
|
AR Balance |
The amount of open revenue needing to be applied displays in this column. | ||
|
Moving From |
This field displays the City and State set within the Moving From section within Name, Address, Phone. | ||
|
Moving To |
This field displays the City and State set within the Moving To section within Name, Address, Phone. | ||
|
Actual Load |
The Load Dates of the Actual tab set with Move Information display in this field. | ||
|
Actual Deliver |
The Delivery Dates of the Actual tab set with Move Information display in this field. | ||
|
Van Line |
This field displays any van line association that may exist for the order and/or revenue. | ||
Once a receipt is associated to a batch, the batch and all related receipts will be available within Payment Management for further processing. MoversSuite allows van line deposits imported directly into Payment Management. For all other receivables, a batch can be created as needed and can be based on branch, company, clearing house, credit card type, bank account, date, etc.; each cash receipt batch will be processed under a specific posting account. See to the Cash Receipts Apply Process for more information.
|
Note |
|
See Order Notes for details on the other Cash Receipts tab. |
|
Tip |
|
To see all open receipts associated to a batch view the Deposit Statement report. |
RELATED TOPICS:


 ) to locate the appropriate record.


 ).
). ).
).
 )
for the orders you want associated to this cash receipt record. Only
selected orders display after the record is saved.
)
for the orders you want associated to this cash receipt record. Only
selected orders display after the record is saved.