Command Buttons and Hot Keys are used throughout Vans in all forms. The table below reviews most of the more commonly used command buttons with brief explanations of their functions and alternate Hot Key definitions.
Commands
Button |
Function & Hot Key |
F2 |
This will display a lookup if you are in a field that has a lookup |
F3 |
This will display a screen that will allow you to toggle on/off the tab stop for the current field. |
F4 |
This will display the full list of selection available if you are in a field that contains a drop down list. |
F6 |
This will drill down to the underlying maintenance screen for the field you are currently in. This is only available if 'F6 Maint' appears in the botton right of the status bar at the bottom of the current screen. |
F7 |
Performs a spelling and grammar check in the current text field. Requires Microsoft Word to be installed. |
Alt + Letter |
May screens have tabs or buttons where a letter in the name is underlined. By pressing the Alt key along with the underlined letter, the system will take you directly to that tab or button. |
Alt + é or ê |
Many screens have grids that display multiple records. By pressing the Alt key along with the up or down arrow, you can move up or down a line within the grid. |
Alt + End |
This will take you to the last line of the grid. |
Alt + Home |
This will take you to the first line of the grid. |
Dates |
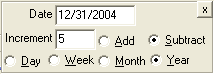
Throughout Vans dates can be entered in the following manner: •Click on the dropdown arrow to the right of the date field to select a calendar, then select your date from here. •Type in the full date with or without the slashes. •Type in just the day (ie, 7) and the system will assume you mean the 7th of the current month/year. •Type in just the month and day (ie, 107) and the system will assume you mean January 7 of the current year. •Press the down arrow key to move the date down 1 day. •Press the up arrow key to move the date up 1 day. •t or T will set the date to today's date. •+/- will increment the date up/down 1 day. •w or W toggles the +/- increment to be week instead of a day. •m or M toggles the +/- increment to be a month instead of a day. •y or Y toggles the +/- increment to be a year instead of a day. •d or D toggles the +/- increment back to be by day. •o or O sets back to the original date. •i or I will display the following screen that allows you to adjust the values: •Combinations can be entered, such as 'tm+' would put in today's date, and then increment forward 1 month. Notes: If in December and you enter in a date WITHOUT the year, the system will default the year to the NEXT year. If in January and you enter in a date WITHOUT the year, the system will default the year to the PRIOR year. The week, month, and year toggles will only be in place until the form is closed. Once the form is reopened, the increment is reset back to day. |
Times |
Throughout Vans times can be entered in the following manner:
•Click on the up/down arrow to the right of the time to adjust up or down in 15 minute increments. •Press the up/down arrow key to the right of the time to adjust up or down in 15 minute increments. •Type in the date in military time (ie, 1400) and the system will convert to standard time (02:00 PM). •Type in just the Hour (ie, 9) and the system will set the time to the appropriate hour, based on when your day starts. 9 would become 09:00 AM, and 6 would become 06:00 PM if your day starts at 8 AM. •Type in the Hour plus A or P to note AM or PM (ie 6a will become 06:00 AM, and 7p will become 07:00 PM) |

Note: if you place the mouse on top of a button, the system will display a description of what the button does, along with the Hot Keys that can be used to execute the button without using the mouse.
Toolbar Command Buttons
Button |
Function & Hot Key |
|
Exit Vans |
|
Toggles the display of the menu on/off. |
|
Undo (Ctrl+Z) allows the user to undo the last action. |
|
Cut (Ctrl+X) moves the highlighted text to the clipboard. |
|
Copy (Ctrl+C) copies the highlighted text to the clipboard. |
|
Paste (Ctrl+V) inserts text or objects from the clipboard into the selected area. |
|
Spelling and Grammar (F7) Performs a spelling and grammar check in the current text field. Requires Microsoft Word to be installed. |


Command Buttons and Hotkeys
Button |
Function & Hot Key |
|
Exit Form (Ctrl+F4) Save change to current record and close form. Save is confirmed before window is closed. |
|
Save (Ctrl+S) Save changes to current record. This button is only enabled when changes have been made. |
|
Print Report (Ctrl+P) Print the current form or report. |
|
Print Preview (Ctrl+F2) View the current form or report. |
|
Browse First (Shift+F5) Display the first record. |
|
Browse Previous (Shift+F6) Display the previous record. |
|
Browse Next (Shift+F7) Display the next record. |
|
Browse Last (Shift+F8) Display the last record. |
|
New Record (Ctrl+N) Add a new record. This button is only enabled when there is already an existing record. |
|
Delete Record (Ctrl+D) Delete the currently displayed record. Delete is confirmed before proceeding. |
|
Cancel Changes (Ctrl+F12) Cancel all unsaved work in progress on current record. Screen is cleared. No warning or confirmation is given. |
|
Change ID (Ctrl+H) changes the identification for the currently displayed record. |
|
Copy from Existing (Ctrl+Y) copied field entries from an existing record to the new record. This button is enabled after starting to add a new record. |
|
Refresh (Ctrl+F5) Update to currently saved information. |
|
Print Window (Ctrl+W) Print a screen image of the current window. |
|
Displays application help |
|
Memo (Memos Exist) (Ctrl+O) Open Memo Screen for current record. |
|
Memo (No Memos Exist) (Ctrl+O) Open Memo Screen for current record. |
|
Lookup (F2) Display a choice of existing records. The hot key works for main lookup no matter where focus is on the form. These can be sorted by simply clicking the on a column heading. To sort files in reverse order, click the column heading once more. |
|
Lookup Exact (F2) display a choice of existing records under a given prompt. These can be sorted by simply clicking the on a column heading. To sort files in reverse order, click the column heading once more. |
|
Lookup with multiple options (F2) When there are multiple key fields setup for a specific file (meaning that there are multiple fields that can be used to find the same record) the Extended Lookup icon will be displayed in place of the |
|
Secondary Lookup (Shift+F2) In some cases you may be adding data into a file which is based on data that must exist in another file. When this happens, you will still have the main lookup option as normal, and that lookup will display all records that were previously added in the file that you are currently working on, but you will also have the Alternate lookup option available. The Alternate Lookup allows you to search the 'Alternate' file for the parent data so that you can add a new record based on the information from that parent file. |
|
Secondary Lookup with Options (Shift+F2) Same as the secondary lookup, except this one has options on how you lookup the data which can be accessed by right-clicking on the button or pressing Ctrl+Shift+F2. |
|
Copy From (Ctrl+Y) Copies fields from an existing record into a new record. |
|
Map Button Opens up the default browser to “Yahoo Maps” with the selected address shown. |
|
Save User Settings (Ctrl+U). If the current screen allows customizations (column order for example) to be saved by user, then this button must be selected after the customizations have been made to make sure the screen will load the same way the next time it is launched. |
|
Reset User Settings (Ctrl+R). If the current screen allows settings to be customized by user, this button will delete those customizations and reset the screen to its default configuration. |


Note: Information in reference to command buttons that are unique to a specific screen can be found under the help file for that scrren.