
These instructions are for the enabling and supporting the use of the TechMate Manual Process, the process that uses the Third Party Applications Menu for exports to and imports from TechMate.
PREREQUISTES: Established account with TechMate. Additionally, you will need the following items:
•The TechMate executable (TechMateIntegration.exe).
•List of carton and distribution codes from TechMate to identify supported items in MoversSuite, such as the code of “Dishpack,” which is mapped to a MoversSuite Item Code via XML Item Code Setup.
•Login credentials for each MoversSuite user you wish to grant the ability to import/export.
STEPS:
1. Establish a TechMate vendor within XML Interface Setup.
2. Add system record for TechMate within XML System Setup.
3. Add supported items within XML Item Code Setup.
4. Add supported types within Note Type Setup.
5. Add TechMate credentials to supported employees through their Personnel Setup record.
6. Update sales Personnel Setup records to have them included in imports/exports
7. Update the ThirdParty folder with configuration files and executables.
STEP 1: Add a TechMate Vendor to XML Interface
Setup Area: MoversSuite Administration > Administration > XML Interface
Create a single TechMate record within XML Interface Setup. Details for completing the table are in the technical table below the image.
Figure 14: XML Interface Setup record
|
Field |
Value | ||||||||||||||||||||||||
|
Vendor Name |
TechMate | ||||||||||||||||||||||||
|
Click here to add a new Van Line Item |
Click to add one or more Van Line Items using the table below to complete this setup. The Is Vanline Brand checkbox is automatically set.
| ||||||||||||||||||||||||
|
Click here to add a new Branch Item |
Branch: Add each branch that has leads to be uploaded to TechMate. Branches listing in the dropdown are managed within Branch Setup. | ||||||||||||||||||||||||
|
Authority Type: choose an option. The option chosen will not affect the integration or process. | |||||||||||||||||||||||||
|
External Code: This can be left blank. (Note: This field is not currently in use.) |
Click Save to save the new record or to save the updates.
By default, you can import items for all branches. Optionally, if you wish to restrict this to certain branches, then add branches to the list of Branch Item records. Once you add branches, you can only import from TechMate items associated to branches in the list. NOTE: Manage branches through Branch Setup.
This step supports the automated upload process.
STEP 2: Add an XML System Setup record for the TechMate Vendor
Setup Area: MoversSuite Administration > Administration > XML System
Create a single record within XML System Setup using the value shown in the table below the image.
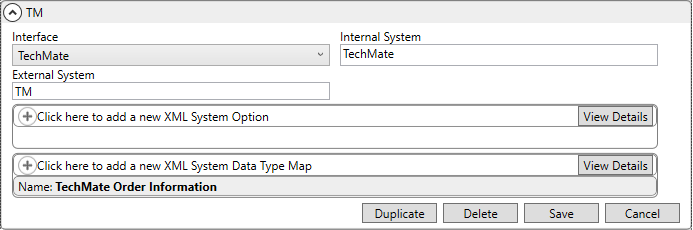
Figure 15: XML System Setup record
Establish the following values for the system record:
|
Field |
Value |
|
Interface |
Select TechMate |
|
Internal System |
TechMate |
|
External System |
TM |
Additionally, create a single XML System Data Type Map record by clicking Click here to add a new XML System Data Type Map. The Add XML System Data Type Map screen appears and complete this screen as shown and indicated below:

Figure 16: Add XML System Data Type Map dialog
Specify the following attributes to the data type mapping for TechMate:
|
Field |
Value |
|
Xml System Data Type |
Select Order Information |
|
Name |
TechMate Order Information |
|
Clear previous XML errors before reprocessing |
[check this option] |
STEP 3: Define supported Item Codes for Revenue Import
Setup Area: MoversSuite Administration > Administration > XML Item Code
For each supported TechMate carton code, define an XML Item Code Setup record. Set the XML Item Code to one of the supported codes listed within the TechMate Supported Carton and Distribution Codes topic and link it to a MoversSuite a Material Type or Item Code. In the example below, the TechMate Carton Code of “Carton, 1.5” is set within the XML Item Code field and it links to the Material Type of “1.5 Cubic Feet”, which is defined in MoversSuite through the Material Type Setup.
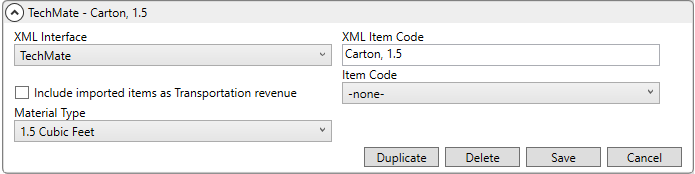
Figure 17: XML Item Code Setup sample for a carton code
Each supported code must be mapped to a Material Type or to an Item Code to avoid missing data when bringing in revenue through a Revenue Import.
If you wish the carton codes to link to Containers, Packing and Unpacking (CPU) items, then link the XML Item Code record to a Material Type. In the example above, the Material Type of “1.5 Cubic Feet” maps to a Material Type Setup record that contains the necessary Item Code mappings for each container type.
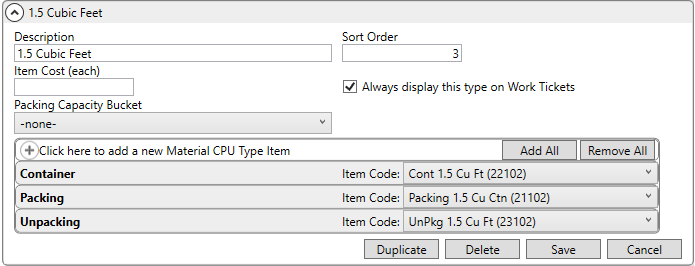
Figure 18: Material Type Setup record
Optionally, you can also link directly to an Item Code as in the example below. Avoid setting both the Item Code and Material Type when defining these records.
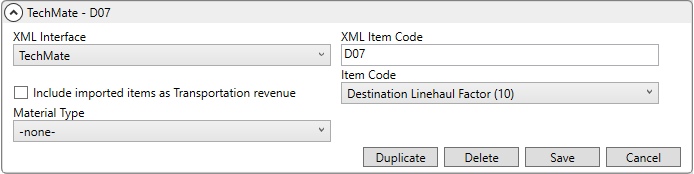
Figure 19: XML Item Code record for a distribution code
NOTE: Typically, carton codes link to Material Type values and distribution codes link to Item Code values directly. You can refer to each supported type through the TechMate Supported Carton and Distribution Codes topic.
Reference the Material Type Setup and the TechMate Supported Carton and Distribution Codes topics when defining the XML Item Code Setup records.
STEP 4: Add Supported Note Types
Setup Area: MoversSuite Administration > Customer Service > Note Type
There are three different types of notes that are needed for the TechMate Integration. Create a Note Type for each one needed using Note Type Setup. Each needed Note Type record is shown below:
1. TechMate Customer Note:

Figure 20: Note Type Setup
Enter the following for the note shown above:
|
Note Type |
Van Line Code |
|
TechMate Customer Note |
TMCustomer |
2. TechMate Estimate Note:

Enter the following for the note shown above:
|
Note Type |
Van Line Code |
|
TechMate Estimate Note |
TMEstimate |
3. TechMate Survey Note:

Enter the following for the note shown above:
|
Note Type |
Van Line Code |
|
TechMate Survey Note |
TMSurvey |
STEP 5: Update Personnel Setup records for Estimators
Setup Area: MoversSuite Administration > Personnel > Personnel’s record > Interface Mapping tab
Each estimator that needs to log into TechMate from within the MoversSuite application must have their credentials defined within Personnel Setup. Set these credentials for the TechMate interface through the Interface Mappings tab on the Personnel record.
Choose Click here to add credentials for an Interface and then choose TechMate from the dropdown. Be sure to updated Personnel records for each estimator.

Figure 21: Personnel Setup > Interface Mapping
Then you can click on the Credentials button to supply their specific TechMate login credentials. Note that the User Name is associated to the estimator’s login identifier within TechMate. These credentials are passed to the TechMate application when the evoked through the Accounting Tools Menu.

Figure 22: Credentials dialog for TechMate
STEP 6: Update Personnel Setup records for Salespeople
Setup Area: MoversSuite Administration > Personnel > Personnel
If you wish to import and export identifiers for salespeople, then for each you must set their User ID within the Interface Mappings on their Personnel Setup record.

Figure 23: Personnel Setup > Interface Mapping
The User ID within the Add Employee Interface Mapping must match the Salesperson ID in TechMate.

Figure 24: Add Employee Interface Mapping
Set the values on the Employee Interface Mapping for salespeople as indicated in the following table.
|
Field |
Value |
|
Interface |
TechMate |
|
User ID |
Salesperson identifier from TechMate |
|
Labor Type |
Sales |
|
Branch |
Optionally select which branch you wish this salesperson to shown on orders imported or exported to TechMate. |
|
Use as default when Branch not defined |
Optionally set this flag to indicate a default record. |
STEP 7: Configure TechMate Application and Third Party Menu
NOTE: Step 7 in these TechMate Manual Integration Setup instructions is different from the Step 7 in the instructions for TechMate Automated Integration Setup.
There should be a ThirdParty folder within the MoversSuite application directory. Add this folder, if it is missing, and place the configuration file and executable program for the TechMate application within this folder.

Figure 25: Sample Windows Explorer view
The ThirdParty folder typically resides in the following location on your application server:
C:\Program Files (x86)\Movers Suite\ThirdParty
Refer to the TechMate Integration Configuration File topic for specifics on the configuration file and executable loaded into the ThirdParty folder. Additionally, import folders for TechMate files must also be defined. Details are also described within the TechMate Integration Configuration File topic.
Update the config.xml file found within the ThirdParty folder to run the TechMate application in the following two modes.
Config.xml:
|
MenuItem |
ApplicationName |
|
Import from TechMate |
TechMateIntegration.exe –import |
|
Export to TechMate |
TechMateIntegration.exe -export |
NOTE: The above assumes that the TechMateIntegration.exe file exists in the ThirdParty folder along with corresponding XML configuration files.
Below is a sample file
running the TechMate application.
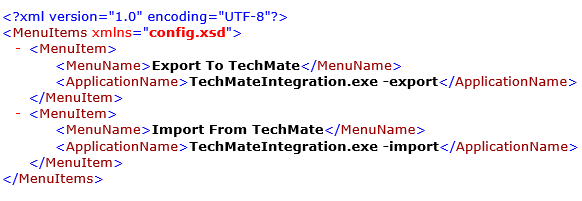
These two entries will show up as menu options within the Third Party Applications Menu. The TechMate Manual Process uses this menu for this process.

Figure 26: Third Party Applications menu
It is recommended that this process is tested to ensure it works properly.
RELATED INFORMATION
TechMate Moving from Manual to Automated Setup