This step allows you to select a file along with selecting the parameters needed to establish records within MoversSuite.
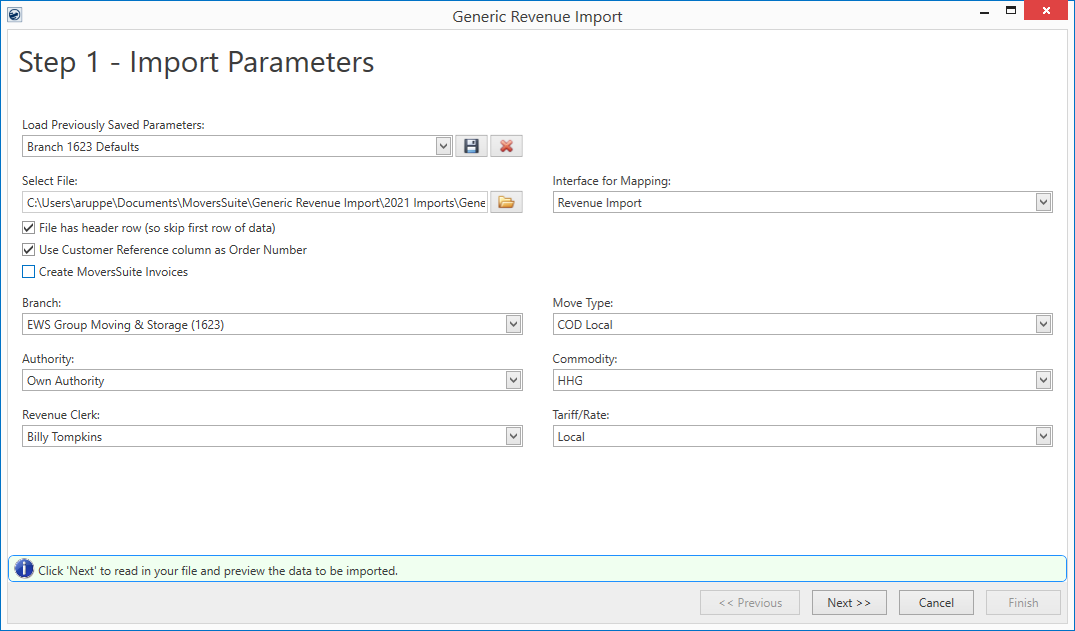
Figure 2: Generic Revenue Import - Step 1
Errors and warnings that appear in this screen show on the
field in error with an  or
or  for a warning. There is also a message
at the bottom of the screen with the error description.
for a warning. There is also a message
at the bottom of the screen with the error description.

Progress indicators and import status also appear at the bottom of the screen.


When working in this screen, the state of the bottom navigation buttons allows you to move from one step to the next. If errors exist that prevent you from moving to the next screen, then the Next button is disabled. Optionally, in an error state, you can navigate to the previous screen and make corrections as needed and then proceed again through the steps.
At certain points in the process, if you Cancel, then certain functions, such as transaction generation, may not occur. You will be prompted in such cases to confirm the cancellation.
Load Previously Saved Parameters
Use this feature to store all settings for future use. Select
from existing parameters by pressing  .
Save the parameters through the dialog by pressing
.
Save the parameters through the dialog by pressing  . If you wish to delete the parameters, then
press
. If you wish to delete the parameters, then
press  . Reference the Save Parameters For
Future Imports topic for more information on this function.
. Reference the Save Parameters For
Future Imports topic for more information on this function.
NOTE:
You can save parameters for each import file type, warehouse, branch settings, etc.
Select File
Press  to
choose a file through the Open dialog.
The prompt only allows you choose one of the supported types (see Generic Revenue Import
File). If your import file contains a header row, then make sure to check
the File has header row box, so that this line is not processed.
to
choose a file through the Open dialog.
The prompt only allows you choose one of the supported types (see Generic Revenue Import
File). If your import file contains a header row, then make sure to check
the File has header row box, so that this line is not processed.
NOTE:
Once you have referenced a file for an import, the location of the file is saved. Therefore, the next time you wish to open a file, the Open dialog automatically opens to that directory.
The following is a list of parameters required to process an import file. These parameters are saved through the Save Parameters For Future Imports function.
|
Parameters |
Description |
|
| |
|
|
File has header row Check this box if the import file contains a header row and you wish the application to skip processing the first row. |
|
Interface for Mapping |
Select the appropriate interface for the import from the records defined within XML Interface Setup. This setting determines what items can be imported along with determining whether salespeople are commissionable for these items. |
|
| |
|
|
Use Customer Reference column as Order Number When this flag is checked, the application assumes that the import file contains a Customer Reference column and that this data contains a MoversSuite Order Number. If unchecked, then the application references the Invoice No column for the MoversSuite Order Number. When checked, an Order Number must be supplied for each detail entry. If a matching order is found in MoversSuite, then the revenue and invoice (optional) are added to the existing order. Otherwise, if no match is found on the Order Number, then a new order is added to MoversSuite. Also, when checked, the Create MoversSuite Invoices option is available (see the next description).
|
|
| |
|
|
Create MoversSuite Invoices Available when the Use Customer Reference column as Order Number flag is checked, this option instructs the application to build a new invoice in MoversSuite for the detail items associated to the order. This new invoice will be added to MoversSuite with the Invoice Number associated to what is included in the import file for the Invoice No column. This new invoice is added to those associated to the customer and order references also specified from the import file. The Invoice Number (Invoice No) must be unique in MoversSuite, i.e. no duplicates allowed. Each imported invoice will show as an open invoice within the Invoicing section of the Summary tab and can be referenced as a Cash Receipts item for the order and can be imported into Payment Management.
|
|
IMPORTANT: The following four fields are needed to generating GL for accounting transactions associated to the imported items. These fields must be set appropriately for the given interface. If not set correctly, mapping errors will occur on subsequent steps. | |
|
Branch |
Select the revenue/AR branch you wish to generate transaction for all imported items under. The Branch setting determines what other parameters may be available. Choose a branch from those defined within Branch Setup. The list of branches available to you are those that are defined for you within your Security Profile Setup record. |
|
Move Type |
Select a type from those defined within Move Type Setup. This parameter shows as the Type of Move set within the Move Information tab. |
|
Authority |
Select a type from those defined within Authority Setup. This parameter shows as the Authority set within the Move Information tab. |
|
Commodity |
Select a type from those defined within Commodity Setup. This parameter shows as the Commodity set within the Move Information tab. |
|
NOTE: The following two fields are needed to allow you to view the transaction information within the Revenue Entry module. | |
|
Revenue Clerk |
Choose the clerk assignment from the list of personnel available. The people available through this option are those active employees with a Labor Type of “Revenue Clerk” within their Personnel Setup. |
|
Tariff/Rate |
Select a plan from the list of those defined within Rate Plan Setup. |
|
Division |
If your company has Divisions, then you can set define which division you wish to have transactions generate under with this setting. This setting is only visible if Divisions is enabled. |


