Given below is a list of setup areas that need to be configured for a successful Equus Integration, along with a recommended order. These steps can be used to download and upload orders to/from Equus AssignmentPro.
|
Important |
|
Errors will occur during upload and download processes if setup is incomplete and/or inaccurate. Contact Equus for the most accurate list of supported codes and information. |
PREREQUISTES:
•You, or your vendors, are currently established and using Equus AssignmentPro.
•Contact EWS Group to initiate Equus Integration setup and manage MoversConnect settings for your organization.
•Obtain private and public keys from Equus for each supported vendor. These keys are utilized in STEP 3: Add an XML System record (below).
STEPS:
1. Verify that EWS Group has provided your company the Equus Upload module.
2. Establish an Equus record within XML Interface Setup.
3. Add an XML System Setup record to support the Order Information data exchange. Use this setup to generate RSA Keys from within XML System Setup and email key information to Equus for creating a connection with MoversSuite.
4. Map storage requirements through the Storage Requirement Setup to external codes for Equus.
5. Map supported Note Type Setup records.
6. Verify that Country Code Setup contains the correct Van Line Country Code values.
|
Notes |
|
Equus Integration utilizes MoversConnect to communicate between MoversSuite and Equus AssignmentPro. Setup in addition to the items listed is required. Please contact MoversSuite Professional Services for setup details. |
|
Your company must be set up with Equus for integration with Equus AssignmentPro. |
|
Equus AssignmentPro can utilize the Pass Thru Connector to gather information from an outside service and push the lead into MoversSuite. This requires additional setup and considerations. Refer to Pass Thru Connector Setup and Administration. |
STEP 1: Verify Equus Upload Module is Available
Contact EWS Group and confirm that the version of MoversSuite that you are on has the Equus Upload module enabled. Please note that there is no specific security setup needed to enable users to access Equus functionality. Refer to Security Modules for more information.
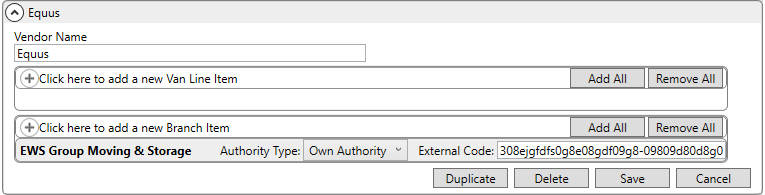
STEP 2: Add an XML Interface record
Setup Area: XML Interface Setup
Establish a record within XML Interface Setup for Equus. Set the Vendor Name to “Equus.” Additionally, for each supported agent (branch) that you wish to receive Equus leads, assign the appropriate External Code provided by Equus.
Figure 2: XML Interface Setup
STEP 3: Add an XML System record
Setup Area: XML System Setup
Create a system record for the Equus Interface. Set the Internal System and External System values to “Equus Service Order.”
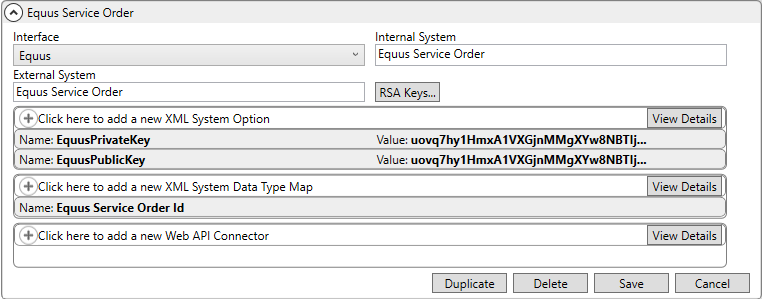
Figure 3: XML System Setup
For this record, add two XML System Option values. These keys are provided by Equus.
|
XML System Option |
Value |
|
EquusPrivateKey |
Private key provided by Equus. |
|
EquusPublicKey |
Private key provided by Equus. |
Create a single XML System Data Type Map value:
|
Data Type Map Setting |
Value |
|
Xml System Data Type |
Order Information |
|
Name |
Equus Service Order Id |
|
Clear previous XML errors before processing |
Checked |
Generate RSA Keys
Click the RSA Keys button to pop open the RSA Keys dialog in order to generate a public key that needs to be provide to Equus for electronic correspondence. Press the Generate RSA Keys button to generate the Public Key. This key is used to verify your company identity for sending uploads to Equus.
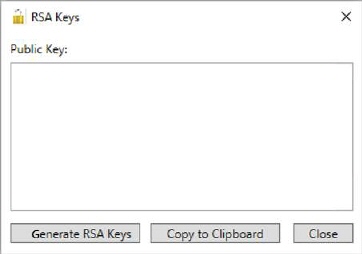
Figure 4: RSA Keys
If the key has already been generated, you can use the Regenerate RSA Keys button in order to generate a fresh key.
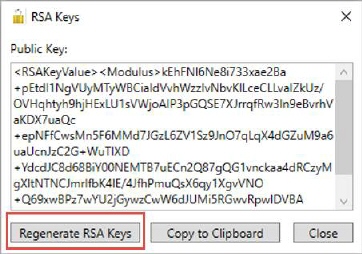
Figure 5: RSA Keys
Use the Copy to Clipboard function to select the key and to paste it into correspondence with Equus.
STEP 4: Map Storage Requirements
Setup Area: Storage Requirement Setup
Update Storage Requirement Setup records to map Upload Code values for each supported type.

Figure 6: Storage Requirements Setup
To define a supported type, update Storage Requirement Setup records to include Upload Code values as documented in the following table. Please note that you can have multiples of each type, i.e. you can assign “SIT” to the Upload Code of multiple records.
|
Upload Code |
|
SIT |
|
Perm Storage |
|
Hold On Truck |
STEP 5: Map Note Type Setup records
Setup Area: Note Type Setup
Verify that Note Type Setup records are defined for each supported type.

Figure 7: Note Type Setup
The following Note Types must exist on your system.
|
Note Type |
Van Line Country Code |
|
Equus Special Instructions |
Equus |
|
Equus Order Cancellation |
EquusCancl |
|
Equus Order Uploaded |
EquusUploa |
NOTES:
“Equus” notes are created when a download includes special instructions.
“EquusCancl” notes are created when a download cancels an order.
“EquusUploa” notes are created when an order is successfully uploaded to Equus AssignmentPro.
STEP 6: Verify Country Code Setup records
Setup Area: Country Code Setup
Verify that Country Code Setup records are defined for each supported country. The Van Line Country Code must be set to the valid ISO 3166 Alpha-3 code, i.e. “USA” for the United States of America.

Figure 8: Country Code Setup
Each country that is to be reference on addresses uploaded to Equus AssignmentPro must be validated.
Verify that the countries which will be set on addresses that will be uploaded to Equus AssignmentPro have a valid ISO 3166 Alpha-3 code set on their Van Line Country Code field. For example:
|
Country Name |
Van Line Country Code |
|
Canada |
CAN |
|
Mexica |
MEX |
|
United States of America |
USA |
RELATED TOPICS: