This section describes the steps necessary to setup Container Tracking functionality for your company needs.
The following is a list of steps to establish Container Tracking on your system and provide security access to personnel for its functionality. This list of steps is followed by detailed information on each step.
1. Add Container Type Setup records.
2. Add Container Status Setup records.
3. Add Ownership Setup records.
4. Add Container Setup records.
5. Update Warehouse Setup records.
6. Update Security Profile Setup records.
STEP 1: Add Container Types
Establish the general category of containers your company provides within Container Type Setup.
Figure 24: Container Type Setup
These records provide the basic information for actual containers created through Container Setup.
Container Types are also utilized when locating records through the Find Container(s) By and are visible within Container Management.
STEP 2: Add Container Status Records
Create options to indicate the state of the container within Container Status Setup in addition to the two provided options of Assigned and Empty (NOTE: Two default options are provided that are not visible when adding records).

Figure 25: Container Status Setup
That status values assist in locating records through the Find Container(s) By and are visible within Container Management.
A default is established for each Container Setup records, which can be updated through a right-click option within the Container Management screen.
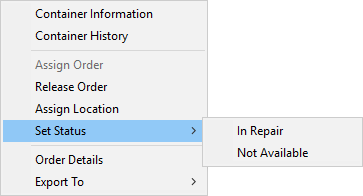
Figure 26: Right-click menu within Container Management
STEP 3: Add Container Ownership Records
You can provide options on the ownership of a container by creating Ownership Setup records. Examples of ownership can include agent, customer, vendor, a specific company name, or other type to indicate which entity may oversee or manage certain aspects of the container.

Figure 27: Ownership Setup record
These options can assist in locating a container through the Find Container(s) By.
Assign a default owner to records within Container Setup.
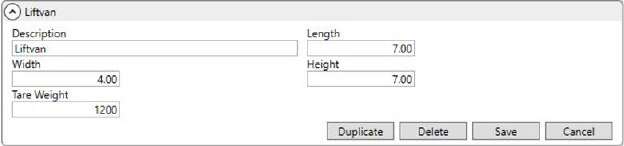
STEP 4: Add Container Records
Add containers that you wish to manage through MoversSuite within Container Setup. The records are assignable to orders through the Assign Order screen, which is available through a right-click menu from within Container Management.

Figure 28: Container Setup
The information established for a Container Setup record is available through the Container Management screen and through the Find Container(s) By feature.
Records are branch-specific based on the Branch setting. Only containers with a branch assignment matching that of the order can be assigned to the order.
Selecting a Container Type pulls in data for the Length, Width, Height, and Tare Weight. Once set, you can update each of these settings for the specific record. Changes made affect only the Container Setup record and do not affect any associated Container Type Setup record.
Choose a Container Status from those defined within Container Status Setup. The Container Status updates to reflect the current state of the container. So, if a MoversSuite user updates this setting through a right-click option of Set Status from within Container Management, then the value they selected does reflect in this field.
The Active flag indicates whether the record shows through Container Management (checked) or not (unchecked) by default. This option assists in filtering of the main working grid. Optionally, you can choose to filter by Inactive or Both (Active and Inactive) containers through the Find Container(s) By feature.
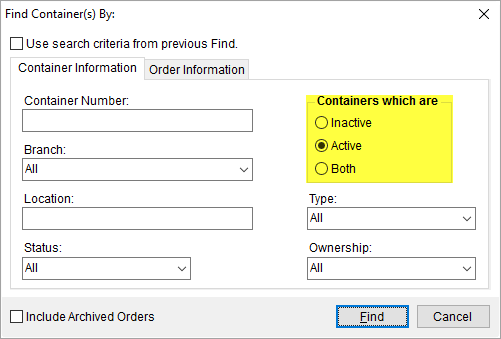
Figure 29: Find Container(s) By
NOTE: The Active flag does not affect assignment. You can assign an order to a container whether it is active or not.
The Current Location and Order are read-only and allow you to see the current container assignment without opening MoversSuite.
STEP 5: Update Warehouse Records
Establish warehouse and warehouse locations referenced through Container Management within the Warehouse Setup.
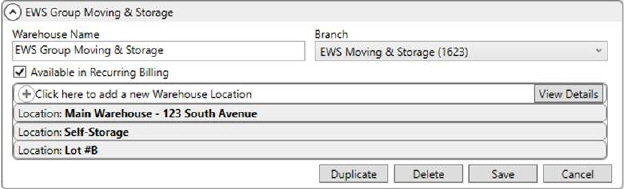
Figure 30: Warehouse Setup
Warehouse and warehouse locations are assigned to an order through both Assign Order and Assign Location features.
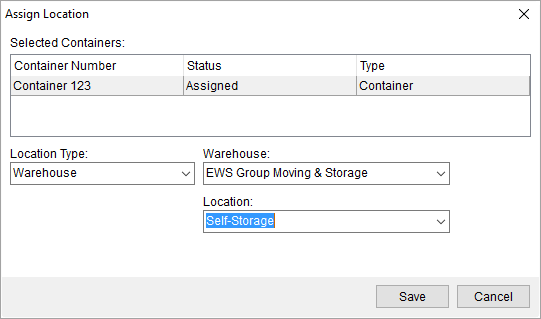
Figure 31: Assign Location
STEP 6: Update Personnel Security Access
Grant personnel access to Container Management functionality by establishing Security Profile Setup entries for the Container Tracking Security Module.

Figure 32: Security Profile Setup
The Container Tracking module is branch specific, therefore you must add an entry for each Branch you wish personnel to access.
Access Type of Full grants personnel the ability to assign orders and locations through Container Management in addition to reporting functions available to Read Only users.
Access Type of Read Only allows personnel to only view information within Container Management. These employees can export grid data through the right-click Export To option. Additionally, they can view information and history of a container through the Container Information screen.
A person can only view containers for which they have access to through Security Profile Setup. So, if a container is assigned to branch 123 and a person does not have security access to this branch, as defined within the Branch tab within their Personnel Setup record, then the container does not even appear within the Container Management screen.
The Container Tracking button is not available within the Move Information tab if a user does not have access to the Container Tracking module for the branch assigned to the order.
If a person has at least one Security Profile Setup record, whether it is Full or Read Only, they can access the Container Management option through the Tools Menu.