This topic provides the setup needed to support Comdata Integration. This information is part of a larger setup package that includes items covered within the Driver Advances Basic Setup topic.
Utilize the following steps to enable the Comdata Integration. This includes making available the Comdata Advance/Payment Processing screen that allows personnel to transmit advances to Comdata.
PREREQUISITE:
Comdata Integration is optional, add-on functionality that must be purchased and new licensing provided to your company prior setup. Contact EWS Group to purchase this integration and to obtain the following initial setup information. Additionally, you will need to have on hand the following information provided to your organization by Comdata:
•Username and password for logging into Comdata via a web service
•Username and password for your company’s Comdata account
•Your company number for Comdata
•URL to connect to the Comdata web service
•Account number, ID, and Card Number for each employee that you wish to process advances for
1. Define a Comdata interface within XML Interface Setup
2. Establish a Comdata system within the XML System Option
3. Setup an Advance Banking Provider Setup record for Comdata
4. Link Branch Setup records to Comdata
5. Assign Comdata account information to each Personnel Setup supported record.
Additionally, if you wish to create advances from commissions for employees, then follow the instructions outlined within the Comdata Advances From Commissions Setup topic.
Each step is detailed in the remaining section. Once these steps are complete, finish setup through what is documented within the Driver Advances Basic Setup topic.
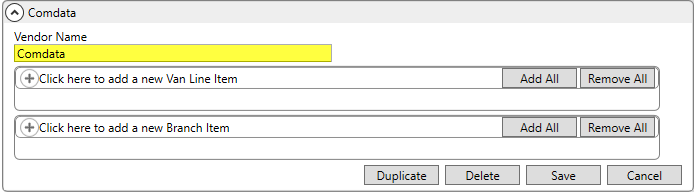
STEP 1: Add an XML Interface Setup record
Setup area: MoversSuite Administration > Administration > XML Interface
Create a single XML Interface Setup record with the Vendor Name set to “Comdata.” This record is referenced by XML System Setup records.
Figure 26: Comdata XML Interface Setup example
STEP 2: Setup an XML System Setup record
Setup area: MoversSuite Administration > Administration > XML System
Create a single XML System Setup record setting the options indicated in the table below.
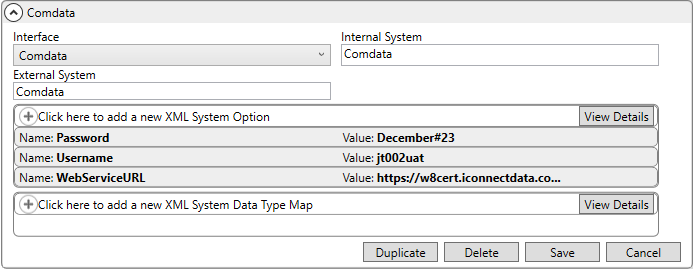
Figure 27: Sample XML System Setup for Comdata
|
Field |
Value |
|
Interface |
Select Comdata from the list of those defined within XML Interface Setup |
|
Internal System |
Set to “Comdata” |
|
External System |
Set to “Comdata” |
|
Name |
Value |
|
Add three XML System Option records with the following values: | |
|
WebServiceURL |
Enter the fully-qualified URL to the Comdata web service. |
|
Password |
Enter the credentials provided by Comdata that allows a process to access the Comdata web service referenced as the WebServiceURL also set within this record. MoversSuite uses this information to communicate through the web service for advance transmittals. The Username and Password are documented within the WSSE TOKEN CREDENTIALS section of the Credentials tab from the Microsoft Excel spreadsheet provided by Comdata. |
|
Username | |
Refer to the XML System Setup topic for additional information on the settings available.
STEP 3: Setup an Advance Banking Service Provider record
Setup area: MoversSuite Administration > Administration > Advance Banking Provider
Create a single Advance Banking Provider Setup record setting the options indicated in the table below.
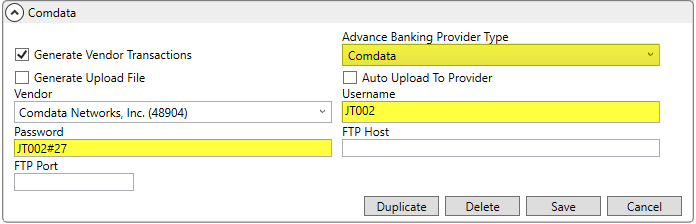
Figure 28: Example Advance Banking Service Provider record
|
Field |
Value |
|
Advance Banking Provider Type |
Select Comdata from the list of those available for your system. The type is defined at the system level by EWS Group. |
|
Username |
Provide the credentials used to login to your company’s Comdata account. This information is needed to update your company records for transmitted advances. The Username is referenced again to link supported branches to Comdata (see Step 5). The Username and Password are documented within the NETWORK CREDENTIALS section of the Credentials tab from the Microsoft Excel spreadsheet provided by Comdata. |
|
Password |
STEP 4: Setup an Advance Banking Service Provider record
Setup area: MoversSuite Administration > Administration > Advance Banking Provider
Create a single Advance Banking Provider Setup record setting the options indicated in the table below.
Figure 29: Example Advance Banking Service Provider record
|
Field |
Value |
|
Advance Banking Provider Type |
Select Comdata from the list of those available for your system. The type is defined at the system level by EWS Group. |
|
Username |
Provide the credentials used to login to your company’s Comdata account. This information is needed to update your company records for transmitted advances. The Username is referenced again to link supported branches to Comdata (see Step 5). The Username and Password are documented within the NETWORK CREDENTIALS section of the Credentials tab from the Microsoft Excel spreadsheet provided by Comdata. |
|
Password |
NOTE: Once your company switches to process advances through Comdata, then all other Advance Banking Provider Setup records are ignored. In other words, you can transmit for a single provider, either Comdata only or for T-Chek only, you cannot process for both Comdata and T-Chek simultaneously.
The application ignores the Auto Upload To Provider, FTP Host, and FTP Port settings within the Advance Banking Provider Setup screen for Comdata Integration.
You can also choose to create an AP Invoice to send to the Vendor by setting the Generate Vendor Transactions and corresponding Vendor setting. Refer to Advance Banking Provider Setup for more information.
Refer to Driver Advances Basic Setup for related information on using this setup.
STEP 5: Update Branch Setup records that support Comdata
Setup area: MoversSuite Administration > Administration > Branch
Set the Advance Company Number to your company Comdata Company Number for all Branch Setup records you wish to process Comdata advance through.
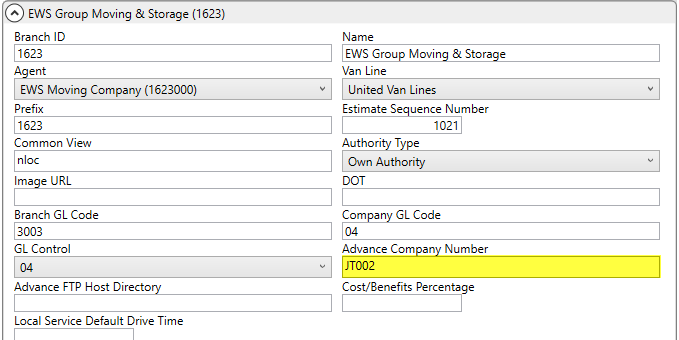
Figure 30: Example Branch Setup record
STEP 6: Update Personnel Setup records
Setup area: MoversSuite Administration > Personnel > Personnel
Link personnel to their Comdata record for advances through Personnel Setup. The information outlined in the table below is needed to assign advances to the correct account. Establish an Advance User Account record through the Advance tab within Personnel Setup.
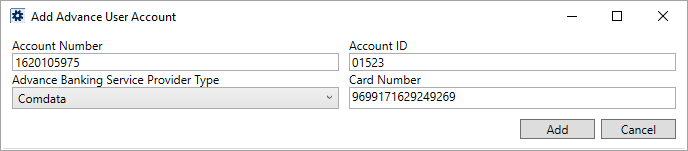
Figure 31: Add Advance User Account example
Create a single Add Advance User Account record for each supported employee with values outlined in the table below.
|
Field |
Value |
|
Account Number |
Provide the Comdata account number assigned to the employee. NOTE: More than one employee can reference the same Account Number. |
|
Account ID |
Provide the Comdata identifier assigned to the employee. |
|
Advance Banking Service Provider Type |
Select Comdata from the list of those available for your system. The type is defined at the system level by EWS Group. |
|
Card Number |
Enter the card number issued to the employee through Comdata. |
Refer to the Add Advance User Account topic for additional field description information.
Verify that a single Advance User Account is established. If your company is switching from a different third-party provider to Comdata, then remove all other Advance User Account records.
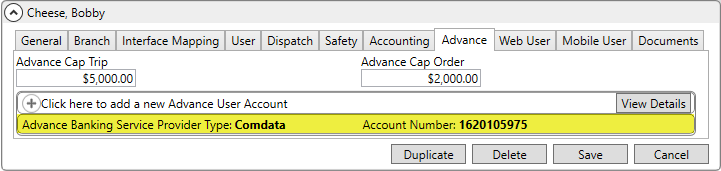
Figure 32: Advance tab in Personnel Setup
Optionally, if you wish to create advances from commissions for employees, then follow the instructions outlined within the Comdata Advances From Commissions Setup topic.
Also, if desired, set the Advance Cap Trip and Advance Cap Order values for the employee.
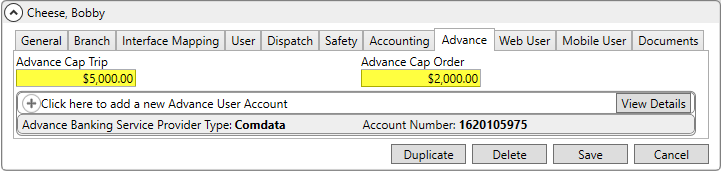
Figure 33: Sample Advance tab in Personnel Setup
While in Personnel Setup, verify that Default Branch set within the Branch tab references a supported branch (established within Step 5).
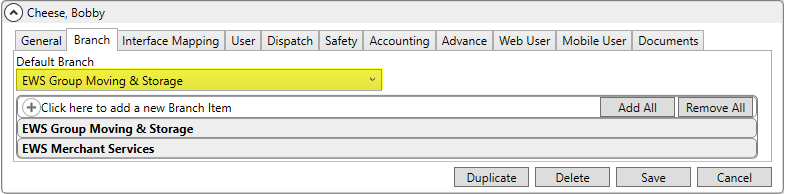
Figure 34: Sample Branch tab in Personnel Setup
You can also verify that the Vendor is set for the employee through the Accounting tab. The Vendor is referenced when the advance is made in Advance Management.
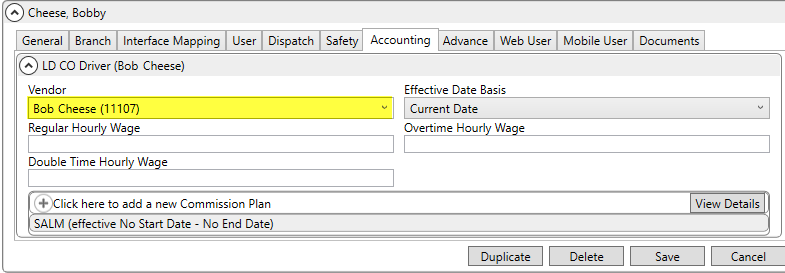
Figure 35: Sample Accounting tab in Personnel Setup
Refer to the Commissionable Employees topic for additional field description information.
Once this step and those outlined within Driver Advances Basic Setup are complete, you can test the process by issuing and processing an advance. Refer to Driver Advances for details.