
This topic provides instructions to allow MoversSuite to exchange data with AtlasNet.
PREREQUISITES:
•You must have connectors established for both MoversConnect and VendorConnect. Please contact our Sales Team for more information.
•Atlas must know all the agencies that are part of your network. These are the agencies that you will be able to send and receive documents from. Contact the EWS Group Support Team with a list of agent numbers and corresponding branch IDs that are in your network. EWS Group will then establish these records for you within MoversConnect and then you will reference them when defining a VendorConnect record within Step 4 (below).
•Once the Support Team confirms with you that everything is set up, contact Atlas through their Service Desk and request a single Atlas Portal API Key. Note that you only need on key for both download and uploads.
SETUP:
Utilize the following steps to enable documents to exchange between MoversSuite and AtlasNet. Details on each step following this brief listing.
1. Set up an External API Key to the provided Atlas key using External API Setup
2. Add/Update XML Interface Setup to reference External Code of “A”
3. Add/Update XML System Setup record that include XML System Data Type maps for both the download and upload processes (if using)
4. Add VendorConnect Setup record for “Atlas Documents”
5. Add/Update Document Type Setup records to reference External Codes supported by Atlas
6. Define automatic download and update rules within Document (Auto-Download) Setup and optionally within Document (Auto-Upload) Setup
Looking to disable the auto-upload to AtlasNet?
View the How to disable documents from automatically uploading? topic for details.
STEP 1: Setup External API Key
MoversSuite Administration > Administration > External API Key
Define an External API Setup record with a Type Of Key set to “Atlas Portal API Keys”.
Then add a single External API Key with the API Key Value referencing the key provided to your organization by Atlas.

Figure 53: API Key With Some Effective Date dialog
The Effective Date defaults to the current system date. However, if you wish to enable the AtlasNet Document Integration immediately, then we recommend that you set the date to the previous day, i.e., change “04/05/2024” to “04/04/2024.”
When you add the record with the appropriate key, the key value is obfuscated when you edit this setup. If you entered an incorrect API Key Value, then add a new record with the correct key value. The application uses the most recently added record.
STEP 2: Update XML Interface Setup
MoversSuite Administration > Administration > XML Interface
Verify that a vendor is set up within XML Interface Setup with a Van Line Item of the Atlas Van Line interface (defined within Van Line Setup) with an External Code of “A”.

Figure 54: XML Interface Setup
STEP 3: Update XML System Setup
MoversSuite Administration > Administration > XML System
You will need to have one XML System Setup record with the Internal System and External System fields set to “AtlasSuds”.
To support document exchanges from AtlasNet, you will also need the following:
XML System Option with a Name of “DocumentServiceUrl” referencing a Value of “https://azapi.atlasworldgroup.com”.

Figure 55: XML System Option dialog
To support document downloads from AtlasNet, you will need the following:
Xml System Data Type of “Document Notification” with a Name of “AtlasNET Document Download” with “Clear previous XML errors before reprocessing” flag checked.

Figure 56: XML System Data Type Map dialog
To support document uploads from AtlasNet, you will need the following:
Xml System Data Type of “Documents” with a Name of “AtlasNET Document Upload” with “Clear previous XML errors before reprocessing” flag checked.

Figure 57: XML System Data Type Map dialog
NOTE: Setting the data type for the upload enables the “Send to Atlas…” right-click option within the Document Management Viewer (on qualifying Atlas orders).
Optional Setup Step:
By default, when files import from a disparate system, the user associated with importing the file is named “External Application.” This name appears in the Document Management Viewer and is associated with the document for its entire life. Optionally, you can create a new user within Personnel Setup with a Last Name that matches the “AtlasNet Document Download”. When set up and document import from Atlas, this will be the name of the user that imported the file.
STEP 4: Update VendorConnect
MoversSuite Administration > MoversConnect > VendorConnect
Establish a VendorConnect record for Atlas Documents within VendorConnect Setup. Notice “Atlas Documents” is available as an option in the yellow area showing what VendorConnect options are currently available. Choose Click here to add a new VendorConnect, which is located at the bottom of the yellow area.
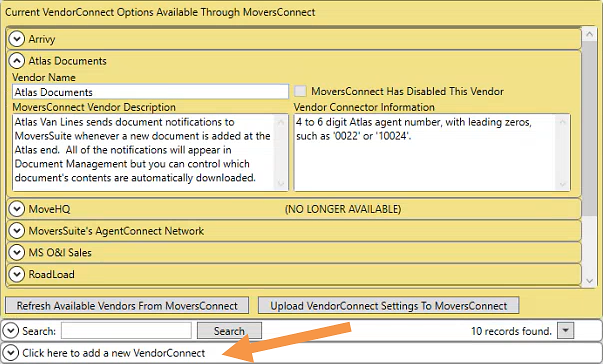
Figure 58: VendorConnect Setup
From the New VendorConnect screen, under VendorConnect Vendor choose “Atlas Documents.” For XmlSystem Data Type Map, choose “Atlas – Documents”.
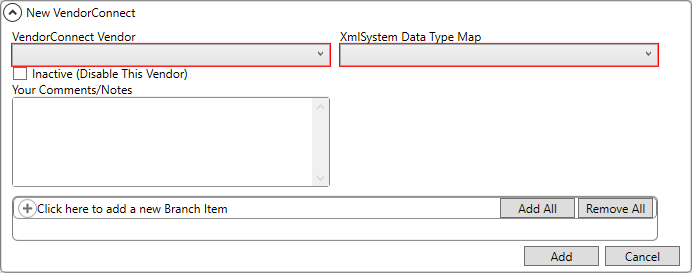
Figure 59: New VendorConnect dialog
Add Branch Items for each branch that you wish to exchange Atlas documents with. Enter the corresponding Atlas Agency Number for each record as the External Code.
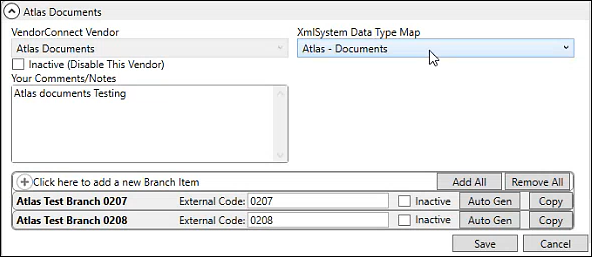
Figure 60: Saved VendorConnect dialog with Branch Item assignments
STEP 5: Update Document Type records
MoversSuite Administration > Document Management > Document Type
Documents supported for the AtlasNet Document Integration must be mapped to MoversSuite Document Types in order to categorize the downloaded files correctly and to assist in defining which documents automatically download or upload (see Step 6).
Add/Update Document Type Setup records to reference supported Atlas document types. Link the supported type to the Atlas Van Lines as an Interface Item with the External Code set to exactly match that of the supported Atlas document type (listed within the AtlasNet Document Type List topic).

Figure 61: Document Type Setup record
STEP 6: Establish auto-download and auto-upload rules
MoversSuite Administration > Document Management > Document (Auto-Download)
MoversSuite Administration > Document Management > Document (Auto-Upload)
Auto-Download Document Contents
By default, Atlas sends notifications for each document for all orders within your agency group. These notifications show in the Document Management Viewer just as any other document would appear. However, the contents of the document are not downloaded. If there are certain document types that you wish to have the contents downloaded automatically for, then you can set up rules within Document (Auto-Download) Setup to identify these documents. For example, if you always wish for invoices to show up, you can create a rule that simply specifies that all documents of the invoice type automatically have content downloaded for them. Another case for automatically downloading the document content is if it will also be sent to the MSCrew application (refer to the Show In MSCrew App setting within Document Type Setup).
The example below illustrates a complex Auto-Download Condition based on Document Types, Branches, and Shipment Types, and Haul Modes.
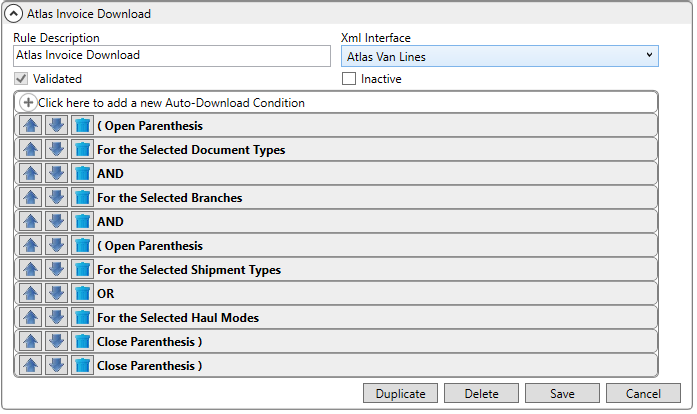
Figure 62: Sample Document (Auto-Download) Setup record
Select Xml Interface of “Atlas Van Lines” for each condition record you define.
Refer to the Document (Auto-Download) Setup to establish these rules to automatically download document contents when importing from AtlasNet.
Auto-Upload Documents
By default, no documents are automatically sent to AtlasNet. Users can manually send documents through the “Send to Atlas…” right-click option available through the Document Management Viewer. However, if you desire for a certain type of document to be sent to AtlasNet and shared with affiliated agencies, then you must define rules within Document (Auto-Upload) Setup. Define rules in the same manner as noted for downloading document content. For example, if you wish to automatically send all BOLs for a select set of branches, then you could define an Auto-Upload Condition that looks similar to the following.
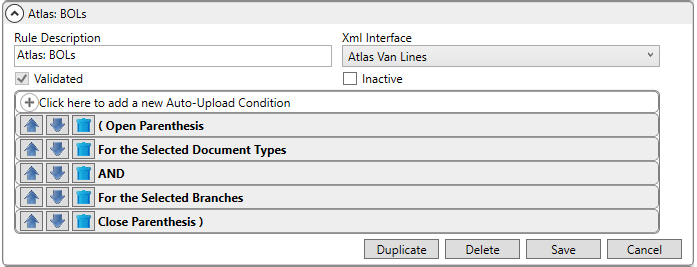
Figure 63: Sample Auto-Upload Condition
Where the Selected Document Types may appear as follows.

Figure 64: Example Selected Document Types record
NOTE: The Document (Auto-Upload) Setup contains an additional rule for Van Lines. This rule allows you to control which van lines can upload documents to AtlasNet. For example, if you are an Allied agent and do not want northAmerican documents to upload, you could add a condition like the following to the other conditions.

Figure 65: Sample Van Line Item condition
Select Xml Interface of “Atlas Van Lines” for each condition record you define.
Looking to disable the auto-upload to AtlasNet?
View the How to disable documents from automatically uploading? topic for details.
Document (Auto-Download) Setup
How to disable documents from automatically uploading?