
This section provides information on setting up and administrating Electronic and Online Payments functionality for Remedy Payments, which will be referred to as Remedy within these instructions.
The following general steps are needed to establish Electronic and Online Payments on your system (followed by details on each step).
PREREQUISITE: MoversConnect
1. Contact EWS Group and initiate the request for Online Payments.
2. Setup an account with Remedy Payments.
3. Add/verify that the correct Cash Receipt Payment Type records are established.
4. Add a Note Type for Online Payments within Note Type Setup.
5. Create Electronic Merchant Setup record within Electronic Merchant Setup (Remedy).
6. Verify and update System Email Setup records.
7. Update Personnel Setup records
8. Setup MoversSuite orders for Online Payments.
PREREQUISITE: MoversConnect
Remedy Payments requires a connection to MoversConnect. If you do not already have access to MoversConnect, log a case with the Help Desk and they will assist you.
Open a ticket through the support portal indicating that you wish to setup Online Payments with Remedy. The portal is available through the Help Desk Login option from the ewsgroup.com website.
STEP 2: Setup a Remedy account
Contact the payment processor and request a payment processing account. Contact information is available through the remedypayments.com. In your correspondence with Remedy, indicate that you are working to establish an account through EWS Group.
Once approved, the EWS Support Team will receive the Public Key and a Private Key, which are codes, to use in Step 5.
STEP 3: Add/verify Payment Types for Cash Receipts
To successfully process cash receipts as electronic payments, the following must exist in your system. Verify that the following item is established within the Cash Receipt Payment Type Setup:
|
Description |
Field Text |
|
Credit Card |
Credit Card Authorization |
STEP 4: Add an Order Note Type for Online Payments
The application creates order notes for Online Payments related transactions (credit card payments, refunds, etc.). You specify the Note Type for these Notes within the Order Note Type setting within the General tab. You can select from a list of existing types or add one through the Note Type Setup.
Figure 87: Note Type Setup
STEP 5: Complete Electronic Merchant Setup
With the assistance of our Support Team, use the Electronic Merchant Setup (Remedy) to create a Remedy record within MoversSuite Administration.
NOTE: Determine how many Merchant Setups to be built for a customer based on where the money for electronic and online payments is deposited. If each branch or subcompany has different bank accts, each gets is own setup and gateway. If multiple subcompanies or branches use the same, each of those goes to the one gateway.

Figure 88: Example of the Electronic Merchant Setup for Remedy
1. From Electronic Merchant Setup, click Click here to add a new Electronic Merchant.
2. Continue to set information using detailed instructions found within Electronic Merchant Setup (Remedy).
STEP 6: Verify and update System Email Setup records
Update the text of messages received by your customers for Recurring Billing and Storage and Electronic and Online Payments for through the System Email Setup.

Figure 89: System Email Setup
In the default message below, a customer receives an email with the Email Subject and Email Message specified. You can update this information as needed. For example, you can choose to display invoice terms and specific contact information.

Figure 90: System Email Setup record
|
|
The method by which emails is configurable. Refer to the Database Mail Setup topic for additional information. Additionally, this utility must be setup and running to utilize the email notifications through the Setup Credit Card/Bank Online Payment screen. |
Refer to System Email Setup for more information.
STEP 7: Update Personnel records
Update Personnel Setup and Security Profile Setup records so that personnel you wish to access Electronic and Online Payments have appropriate privileges.
Electronic Payment Management Security Module
Once Electronic and Online Payments is enabled on your system, all users can access the following through the Electronic Payments Menu:
Credit Card/Bank Payment or Authorization
Setup Credit Card/Bank Online Payment
They can also access the Capture New Payment Method screen through the AutoPay Setup (Recurring Billing) tab, as well.
However, these users can only add records for branches to which they are assigned to the Electronic Payment Management module. Therefore, assign the Electronic Payment Management module to each profile for each branch that you wish people to be able to add records through the following:
Credit Card/Bank Payment or Authorization
Setup Credit Card/Bank Online Payment
Additionally, assignment to this module grants access to the Payment Method Management screen, which allows them to update the payment status and nickname of a payment method assigned to a Billing Record. This module must be assigned to each branch that you wish people to access. Set the Access Type to Full. The Allow Manager Privileges flag has no effect.

Figure 91: Add Security Profile Detail dialog
Recurring Billing Setup Security Module
Since the Payment Method Management screen is accessed through a Billing Record, personnel must also have Full access to the Recurring Billing Setup module as well. This module is not branch specific, therefore a single profile record is all that is needed to access the functionality.
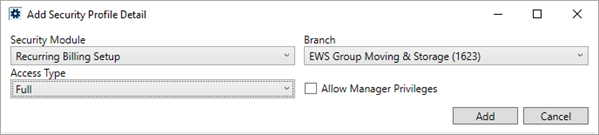
Figure 92: Add Security Profile Detail dialog
Cash Receipts Security Module
Since Electronic Payments generate Cash Receipts batches and utilize other Cash Receipts functions, each person you wish to process payments must have Full access to the Cash Receipts module for each supported branch. Additionally, set the Allow Manager Privileges flag to allow employees to refund and void Electronic Payments.
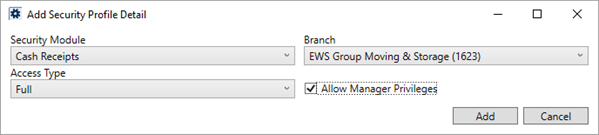
Figure 93: Add Security Profile Detail dialog
|
|
For this step, the Cash Receipts module must be properly established. Refer to Cash Receipts and Cash Receipt Payment Type Setup topics to know how to setup Cash Receipts on your system. |
Report Profile Records
To generate Cash Receipts, update Report Profile Setup records to assign personnel to the report linked to the Print Receipt button. This corresponds to the Report Setup record with a System Location of Cash Receipts.

Figure 94: Report Setup
To generate invoices for Recurring Billing and Storage, update Report Profile Setup records to assign personnel to the report linked to the View Invoices button within Recurring Billing Management. This corresponds to the Report Setup record with a System Location of Recurring Billing Invoice.

Figure 95: Report Setup
STEP 8: Setup MoversSuite orders for Online Payments
Once all administrative settings are made, update orders to support Electronic Payments and Online Payments and process payments and/or capture payment information to verify connectivity. Verify Browser Security Settings and refer to the Electronic Payments and Online Payments topics for usage information.
Refer to the Electronic Payments Errors topic for a list of common errors and resolutions.

