
MoversSuite integrates with AtlasNet allowing documents to transfer through MoversConnect. Essentially, every time a document gets added to Atlas, Atlas sends a message to MoversSuite that says this document is on this order, this is the doc type, and these are the Agents that need to know about it since they are they the Agents that are on the order. We get the message and send the message to the Agents setup within MoversSuite Administration to receive the documents.
IMPORTANT: This is not a one step process. This takes the completing of steps by the Agent/the MoversSuite Customer, by our Support Team, and Atlas. It will take the coordination of each party to do their part and it is most efficient if the steps proceed in the following order:
A. Agent/Customer:
•Log a case within the Help Desk to have the Atlas Download turned on. On this case, be sure to include all your Atlas Agency Numbers and the Branch IDs associated to them.
•Setup your Atlas Document Types within Document Type Setup using AtlasNet document type names within the External Code field: Refer to AtlasNet Document Type Setup for instructions specific to this integration. Refer to AtlasNet Document Type List for the exact name of the document types.
•Setup for instructions specific to this integration. Refer Setup your document download rules within Document (Auto-Download) Setup.
B. EWS Support Team:
After Agent/Customer has submitted a case with the agency numbers and Branch Ids associated to them, the Support Team can then setup MoversConnect and VendorConnect. Once completed, the Support Team will let the Agent/Customer know to proceed with the next step, Step C.
C. Agent/Customer:
•After the Support Team has notified you to proceed, after the MoversConnect Setup and VendorConnect Setup are completed, the customer is to contact the Atlas Help Desk to get the Atlas Portal API Key by contacting: servicedesk@atlasworldgroup.com. Note that only one key is used regardless of how many branches are setup for the Company.
•Notify the Support Team of this API Key.
D. Agent/Customer:
•Once the above criteria have been met, the Agent/Customer can proceed with the following instructions to complete setup areas within MoversSuite Administration. This is the list of setup areas that need to be configured, and the recommended order. Details of each step follow this list:
1. Setup External API Key using External API Setup
2. Update XML Interface Setup
3. Add XML System Setup record
4. Add VendorConnect Setup record
STEP 1: Setup External API Key
MoversSuite Administration > Administration > External API Key
Only one External API Key is used, regardless of the number of Atlas Agency Codes for this company’s setup. From MoversSuite Administration > Administration > External API Key > choose Click here to add a new External API Key.

From the New External API Key screen, choose Atlas Portal API Keys from the dropdown.

Choose Click here to add a new API Key With Some Effective Date.

From the Add API Key With Some Effective Date screen, enter the API Key Value (the Atlas Portal API Key that was given to you by Atlas). While the key is being entered, the entire key is viewable. Once this screen is exited, only a partial view is shown. This is to provide security and protect the exact key number being used. The Effective Date is set automatically by MoversSuite.

If it is possible that an incorrect API Key was entered, enter the API Key Value again under this same Atlas Portal Key record. The key with the most recent effective date and time will be the key used. Should an attempt be made to enter another External API Key, a warning will show.
STEP 2: Update XML Interface Setup
MoversSuite Administration > Administration > XML Interface
If your company has an existing Atlas interface under XML Interface, use that record to set the Van Line Item to have the External Code to A, as shown in the image below. If you do not have an Atlas XML Interface Setup record, create one using XML Interface Setup and setting the Van Line Item > External Code to A.

Figure 53: XML Interface Setup
STEP 3: Update XML System Setup
MoversSuite Administration > Administration > XML System
From XML System Setup > AtlasSUDS record, add:
•a new XML System Option
•a new XML System Data Type Map.
To add a new XML System Option, from XML System Setup, choose Click here to add a new XML System Option.
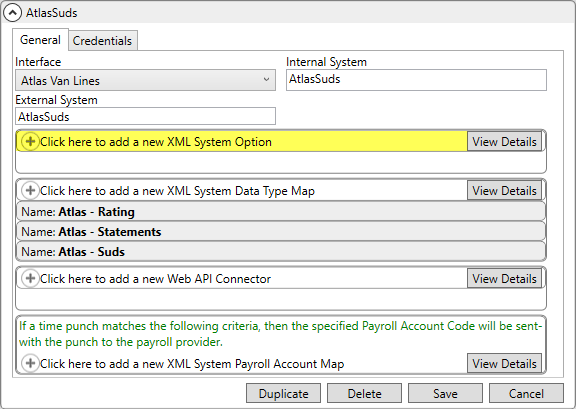
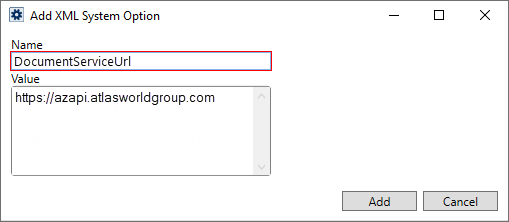
Under Name, enter DocumentServiceUrl, as shown in image below. For Value, enter the URL, which is https://azapi.atlasworldgroup.com. Click Add.
Now click here to add a new XML System Data Type Map.
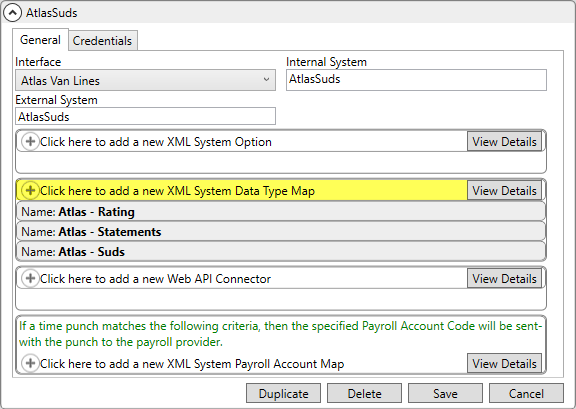
On the Add XML System Data Type screen, choose “Document Notification” and “Atlas – Documents” as shown below. NOTE: For XML System Data Type, be sure to use “Document Notification” and not “Document.” Click Add.

Click Save on the AtlasSuds record.
STEP 4: Update VendorConnect
MoversSuite Administration > MoversConnect > VendorConnect
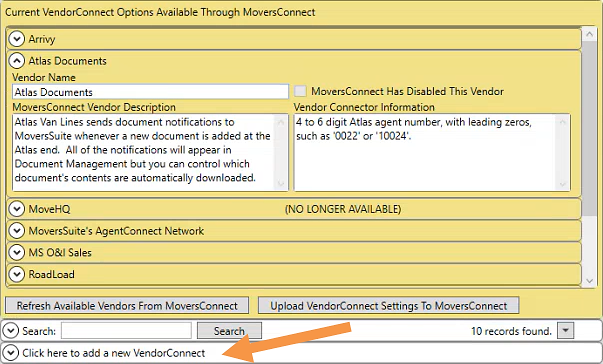
Establish a VendorConnect record for Atlas Documents within VendorConnect Setup. Notice “Atlas Documents” is available as an option in the yellow area showing what VendorConnect options are currently available. Choose Click here to add a new VendorConnect, which is located at the bottom of the yellow area.
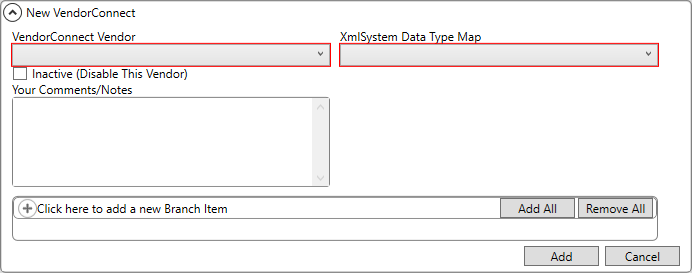
From the New VendorConnect screen, under VendorConnect Vendor choose “Atlas Documents.” For XmlSystem Data Type Map, choose “Atlas – Documents”. Add a Branch Item by clicking Click here to add a new Branch Item. Choose a Branch from the dropdown and set the External Code as the Atlas Agency Number. Add all branches that are to have the AtlasNet Download under the one Atlas API Portal Key. Usually, this will be all the Branches owned by your company.
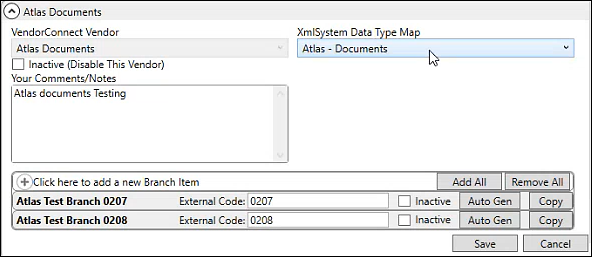
In the VendorConnect record below, there are two branches. For simplicity, the name of the Branch is the Atlas Agency Code; however, it is the number with External Code field that must be set using that branch’s Atlas Agency Code. Click Save.
Document (Auto-Download) Setup