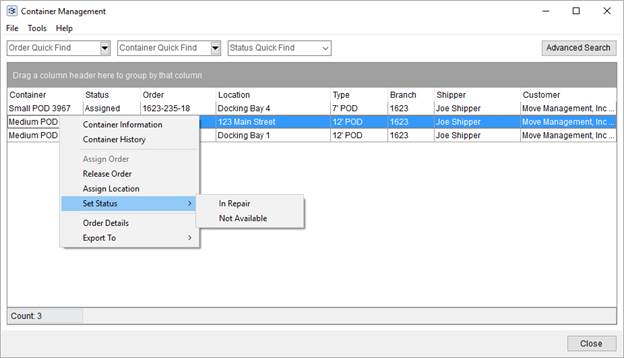
The Container Management screen allows you to view and manage containers within MoversSuite. This includes the ability to assign and release containers from orders, modify the status of container, create reports of container tracking, and more.
Figure 2: Container Management screen
Accessing Container Management
The Container Management screen is available through the Tools Menu.
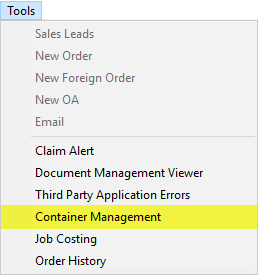
Figure 3: Sample Tools Menu
It is also available on an order through the Container Tracking button on the Move Information tab.
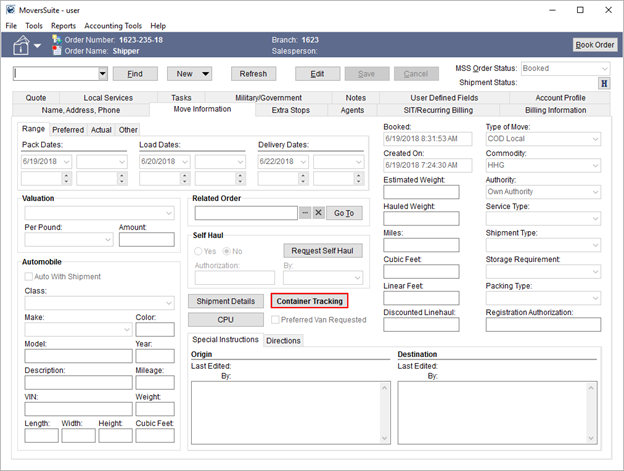
Figure 4: Move Information tab in Order Information
If you open the Container Management screen through the Tools Menu, then no order-specific assignments display. However, if open the screen through the Container Tracking button on the Move Information tab, then all active order assignments display.
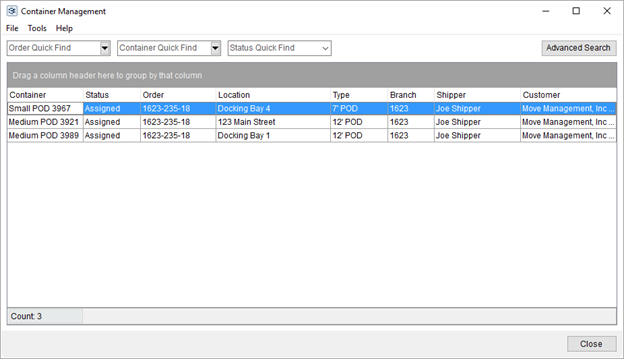
Figure 5: Container Management
The Container Management screen is also its own stand-alone application. Therefore, it can be run through its own executable within the MoversSuite installation folder. It lists under the name of Container.exe.

Figure 6: Partial list of MoversSuite executable programs
The Container Management screen also remains open after you close out of MoversSuite.
Using Container Tracking
If you open the Container Management screen through the Container Tracking option within the Move Information tab, then all active containers assigned to the order display. Select one or more records within the grid and choose an option through a right-click menu to make assignments, remove assignments, etc. for the selected record or records. NOTE: Select multiple records by holding down the CTRL key and clicking on records individually or by holding down the Shift key and clicking on a range of values.
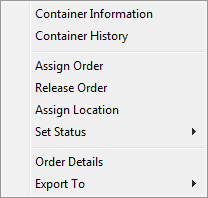
Figure 7: Container Management right-click options
The key functions are within the middle section, which include Assign Order, Release, Order, Assign Location, and Set Status. Assign Order allows you to assign one or more containers to an order. Use the Find or Quick Find to retrieve the order and then set the Location Type.
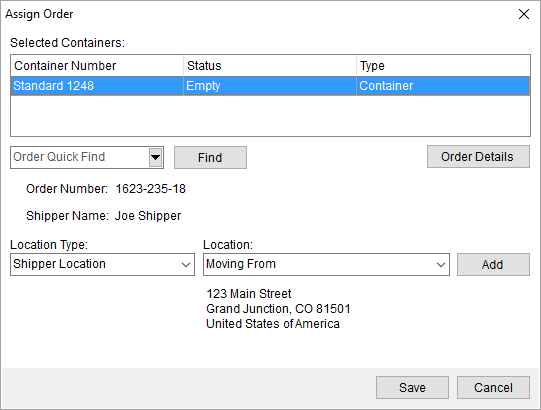
Figure 8: Assign Order
Once the Location Type is set, the Location or Warehouse option is available. For the Warehouse type, you have an option of selecting a Warehouse and a Location, which is location associated to the warehouse record.
Once you make your selections and the address looks correct, press Save to keep the assignment.
The Assign Location option allows you to update the location of an assigned container. As with Assign Order, you must select a Location Type and then choose a Location or Warehouse/Location.
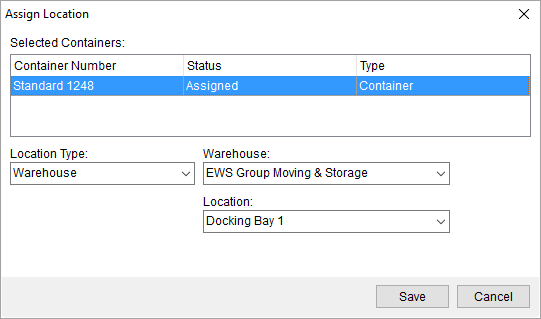
Figure 9: Assign Location
The Release Order option removes the container assignment from the order. You receive a confirmation prompt when you choose this option.
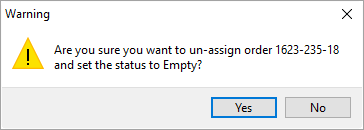
Figure 10: Release Order confirmation prompt
Anytime an assignment is made, the Status is set to Assigned. Likewise, anytime the container is released, the Status reverts to Empty. These are both system-defined values. Your company can define additional Status values within Container Status Setup, which you can use to fit your needs. For example, if it is important that you know when a container is in for repairs, you may want to notify users of this state and offer an In Repair status. Personnel can utilize the Set Status option to choose one of your custom status values.
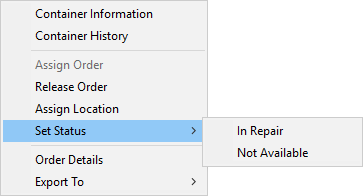
Figure 11: Right-click options from within Container Management
The Container Information and Container History options both open the same Container Information dialog, they each reference a different tab within Container Information. This read-only information provides additional details not listed in the data grid.
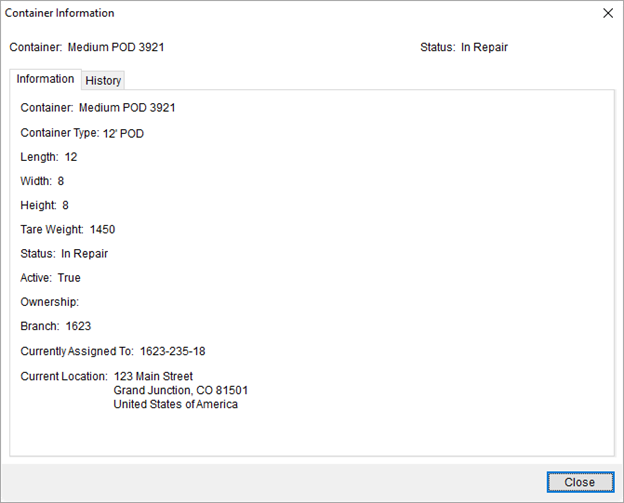
Figure 12: Container Information screen
Container Tracking Reporting
There are no standard reports provided by MoversSuite that contain Container Tracking details. However, you can adjust the grid data as needed and utilize either Export To option to create reports or exportable data.
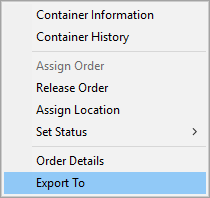
Figure 13: Right-click options from within Container Management
Below is a sample of HTML data evoked through the Export To option.
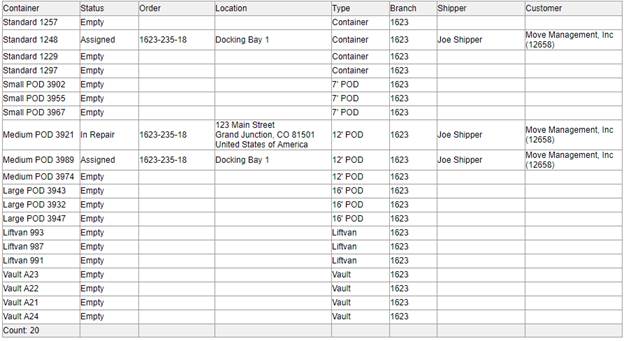
Figure 14: Sample HTML export
Searching Container Tracking Information
You can utilize one of the three Quick Find to filter all containers available to you (based on branch security access).
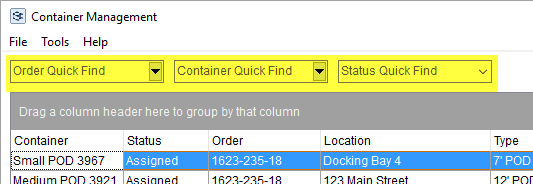
Figure 15: Quick Find options within Container Management
Quick search options include the ability to view all containers assigned to an order, to filter by name of the container, or to filter by status. You can enter text to search for and after three characters, the application automatically produces a menu of matches. Choose the list of matches using your mouse or by using the arrow keys and pressing Enter.
You can also use wildcard characters in the Quick Find fields. For example, if you wish to filter all containers that have POD in their name, then you can use the % character followed by POD.
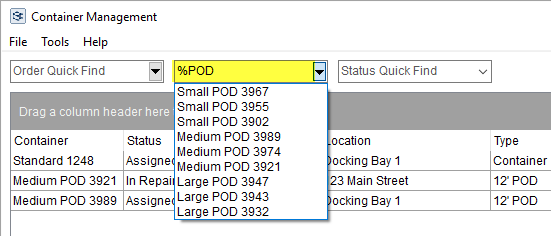
Figure 16: Container Management
Refer to the Quick Find topic for more information.
The Status Quick Find lists all available status values. Simply select the one you wish to filter by.
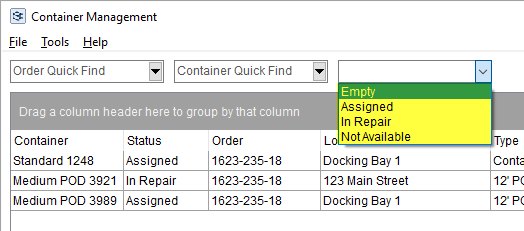
Figure 17: Container Management
A more powerful filtering option is available to you through the Find Container(s) By feature, which you can open through the Advanced Search option.
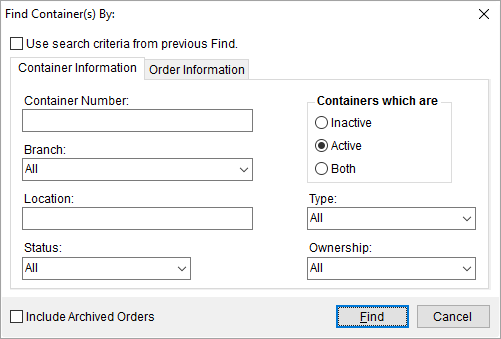
Figure 18: Find Container(s) By
This Find allows you to start with all active and available containers and allows you to filter by entering or selecting values in one or more fields from two different tabs. The fields available to you are documented in the following topics:
Container Information Search Criteria
Order Information Search Criteria
Enter the data you wish to filter by and press Find to evoke the search. The dialog closes and the results display within the main grid of the Container Management screen.
If you wish to view all active containers, simply press Find without entering any criteria.
Technical Field and Function Information
The following table describes the fields and functions available within Container Management.
|
Field/Function |
Description |
|
Toolbar |
|
|
File |
File (Alt+F) The File Menu within this screen provides an Exit option. You can also close the application by pressing the X within the upper righthand corner of the window. |
|
Tools |
Tools (Alt+T) The Tools menu provides the following two options:
Calculator Opens the default calculator application from your local computer.
Calendar Opens the default mail application available on your local computer, i.e. Outlook.
|
|
Help |
Help (Alt+H) Opens the Help Menu where you can access the current Online Help, MoversSuite feedback site, etc. |
|
Searching Tools |
|
|
The three following Quick Find settings allow you to populate the data grid with container information based on the order assignment, the container number, or container status. Only containers and orders to which you have branch access display. So, if you only have access to Branch AAA, then only order or containers that link to Branch AAA display. | |
|
|
Order Quick Find This Quick Find allows you to retrieve container records based on recent order history or by entering part of or all of an Order Number. Only containers currently assigned to the selected order display within the grid. View the Quick Find topic for more information on using this feature. |
|
|
Container Quick Find This Quick Find allows you to retrieve container records based on a specific container number. This option compares what is entered to all or part of the actual Container Number to populate the data grid. NOTE: Container Number is set within the Container Setup. View the Quick Find topic for more information on using this feature. |
|
|
Status Quick Find View containers by the status assigned to them by selecting one from the drop-down menu. The list of options available include Assigned, Empty, and any custom values established within Container Status Setup. |
|
|
Advanced Search This opens the Find Container(s) By dialog from which you can utilize search criteria from multiple fields to filter from the list of available containers. You can also search for a specific Order Number, as well. This Find includes the following criteria: Container Information Search Criteria Order Information Search Criteria
|
|
Data Grid |
|
|
Right-Click Options The following right-click options are available within the data grid of this screen.
Container Information Opens the Container Information dialog displaying the container data within the Information tab. This data includes container number, container type, dimensions, status, and current assignments.
Container History Opens the Container Information dialog on the History tab which displays a record of changes affecting the container, including assignment changes and the name of the user performing the change.
Assign Order Opens the Assign Order dialog allowing you to search and assign an order to the selected container. You can select multiple containers and assign them to a specific order. NOTE: Select multiple records by holding down the CTRL key and clicking on records individually or by holding down the Shift key and clicking on a range of values.
Release Order Removes the order assignment for the selected container. When this option is selected, a confirmation dialog appears asking you to confirm the request. This option is only available on a single container, i.e. you cannot select a range of containers and choose this option.
Assign Location Use this function to change a location for a container with an order already assigned to it through the Assign Location dialog. This option is available only for an assigned container and is only available if all selected containers link to the same order.
Set Status Assign a Status value to the container from the list of those defined within Container Status Setup. Of note, the application automatically sets the Status of Assigned or Empty when either Assign Order or Release Order is performed.
Order Details View key information on the order assigned to the container through the Order Details screen.
Export To Export the contents of the grid to view and manage through an external application, such as Microsoft Excel. Refer to the Export To topic for details. NOTE: This option is also available through the History tab within Container Information.
| |
|
Container |
This column displays the record identifier set for the container, defined as the Container Number within Container Setup. |
|
Status |
The current state of the container displays. The Status is set to Assigned or Empty automatically when either Assign Order or Release Order is performed. Optionally, you can choose a custom status through the right-click option of Set Status. |
|
Order |
Displayed in this column is the Order Number currently assigned to the container. Change or remove the order on one or more containers using the Assign Order or Release Order options available through a right-click menu. |
|
Location |
The first line of the address location assigned to the container displays. Hover over the entry to view the entire contents of the address (address lines, city, state, postal code, and country). Change the location on one or more containers using the Assign Order or Assign Location options available through a right-click menu. |
|
Type |
The category associated to the container displays. The Type is set for the container through Container Setup. |
|
Branch |
Displayed in the column is the branch assigned to the container. The Branch is assigned to a container through Container Setup. |
|
Shipper |
The shipper name set for the order through Name, Address, Phone displays. The application pulls this information from the First Name/MI and Last Name/Company Name set within the Name, Address, Phone tab. |
|
Customer |
The name of the customer followed by the customer identifier within parenthesis displays. The Customer is set for an order through the Billing Information tab. |
|
|
Count The count of containers displayed in the grid appears at the bottom left of the grid. |
|
|
Close Press this button to close the screen. |