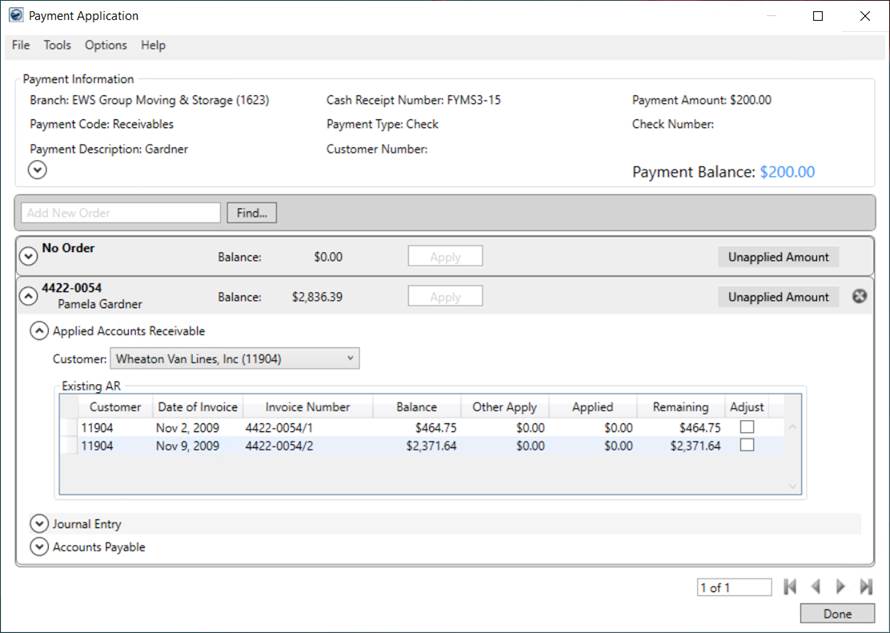
This screen comes up when a user presses Apply from Detail Processing in Payment Management and allows you to apply batch payments received by your organization to receivables to MoversSuite orders. It also provides the ability to create adjustments, apply to payables, and allocation money as unapplied.
You can also access this screen in Add New Payment mode by pressing Add from Detail Processing tab and allows you to create a detail statement line or cash receipt entry.
Moreover, while applying the payments, you can view payments made from other payments, even if the payment is from a different batch, receipt, or order through the “Other Apply” column. This will help you recognize payments that could potentially be made on the same order and document and that can cause errors when importing and posting through Microsoft Dynamics GP.
Figure 13: Payment Application screen
Using this Screen
Use this screen to apply payments received for one or more orders in the batch. Payments are processed at the Order Level, Invoice Level, and/or Service Code Level. Each is described in the following sections.
At any level, the application can automatically apply by simply clicking the Adjust field of a record or by clicking the Apply button, where available. The application applies the specified amount to the oldest transactions first and then moves through the list: oldest to newest.
Use the navigation at the bottom right of the screen to navigate between batch payments. The Payment Information at the top of the screen assists you in knowing which payment you’re on and how much remains to be applied.
Orders can be added or removed from any payment. Orders listed for a payment display in the order in which they were added to the payment, with the most recently added orders appearing at the top of the payment.
Users also have two options to reset work done within the Payment Application screen. The first is to “Reset Payment” which is available through a right-click in the Existing AR section. This resets any apply amount or adjustments made for the selected order.
The other reset option resets everything done (applies, adjustments, etc.) for the entire payment (including all orders). This option is available through the “Reset Payment” option found in the Tools menu.
Apply at the Order Level
Applying at the Order Level is ideally suited for situations where the Payment Balance matches the Balance on the order and when the payment is for a move and there is no need to track what was paid at the Service Code Level.

Figure 14: Order Level bar
Click in the Apply field to have MoversSuite auto-apply amount available to the order.

Figure 15: Order Level bar with Apply amount
You can also click in the Apply field at any time to enter a different amount.
MoversSuite applies the amount entered to accounting documents (transactions) associated to the order beginning in the order the documents were created, oldest documents first. Only transactions with a balance display for the order.
You can add or remove orders to the payment. Click in the And New Order field (ALT+Q) and beginning typing the order you wish to add or press Find (CTRL+F) for a more advanced search.

Figure 16: Add New Order
Optionally, remove an order from a payment by pressing the
Remove Order button ( ). A dialog appears
to confirm the request.
). A dialog appears
to confirm the request.
Unapplied Amount
Anticipated use of setting an Unapplied Amount is for a pre-payment on an order (no revenue associated) and cash sale on a “No Order” for boxes, weight tickets, etc. The amount entered here is considered unapplied Account Receivables (AR).
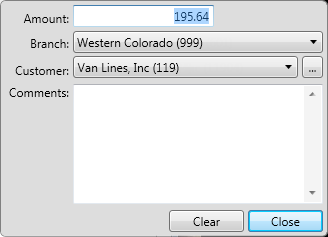
Figure 17: Unapplied Amount drop-down menu
Apply at the Invoice Level
Revenue received from a van line and invoiced items such as recurring storage apply at the Invoice Level. The items with an open balance for the selected Customer display within the Applied Accounts Receivable section.
Apply to these items by clicking in the Applied column.
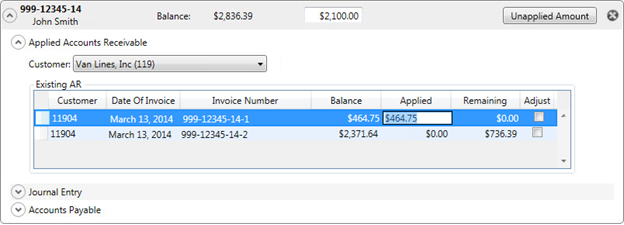
Figure 18: Payment information for an order
|
Note |
|
If a payment is missed and subsequent payments are applied at the Order Level, then the first missed payment would show incorrectly as being paid; it would also be difficult to identify the missed payment when applied at the Order Level. |
Each line item is comprised of one or more services. You can also double-click an item to view these services and adjust at the Service Code Level through the Apply by Service dialog.
Apply at the Service Code Level
Applying at this level allows you to see which services have been paid or not. If a van line, for example, pays your company an amount that differs from what is posted, then applying at the Service Code Level allows you to see where the difference is.
Apply at the Service Code Level by double-clicking a line item. This opens the Apply by Service dialog. Additionally, the “Show Apply by Service Code Window” option is available through a right-click menu and through the Tools menu.
Users have the option here to set the Applied and Adjusted amounts. Clicking in the Applied field, the application automatically sets the amount available based on the service Balance; this amount can be modified.
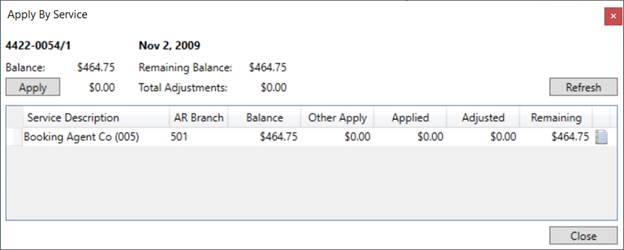
Figure 19: Apply by Service dialog
Adjustments at the Service Code Level
Adjustments made at the Service Code Level remove revenue from the system. A downward adjustment reduces AR and revenue. Commissions on revenue most likely need to be adjusted when applying at this level.
Enter the negative (downward) adjustment amount in the Adjusted field. This removes the amount from revenue for the specified service.
Adjustments do not affect the Payment Balance.
Add New Payment
In Add New Payment mode you can add a statement detail line or cash receipt entry to a batch. To access the Payment Application screen in Add New Payment mode, press Add from the Detail Processing tab.
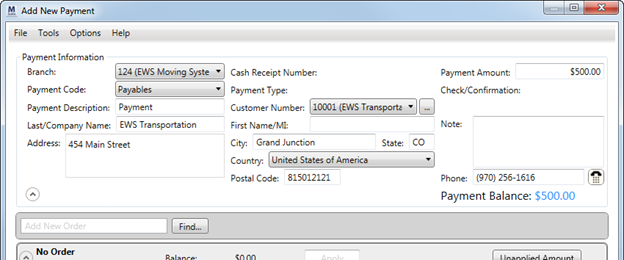
Figure 21: Payment Application in Add New Payment mode
As with the standard Payment Application screen you can associate the payment to orders, set payment information, create journal entries and payables, and more. Please see Create New Batch for related information.
Field and Function Descriptions
Payment Application contains the fields and functions described in the table below.
|
Field/Function |
Description | ||||||||||
|
Keyboard Shortcuts Access field and functions available on this screen through keyboard shortcuts accessible through the Alt and Ctrl keys. See Keyboard Navigation in Payment Application and Keyboard Shortcuts for Payment Application for a quick references to these keyboard shortcut.
Alt Key Pressing Alt activates hotkeys and makes them visible on the screen. Press any of the visible hotkeys to access the particular field or function. For example, press Alt then the letter “Q” (Alt+Q) places you on the Add New Order line. The Alt button also makes the menu at the top of the screen active. Press the sequence of Alt, “T”, and “A” (Atl+T+A) to open the Apply by Service dialog. You can also access particular orders on the payment. For example, to access the third order in on the payment, press Alt followed by the number “3” (Alt+3). Once an individual order is open an additional level of hotkeys appear. For example, pressing Alt+3+C places the cursor on the Customer field within the third order record.
Ctrl Key Use the Ctrl key to access additional functions quickly. The Find, for example, is evoked by pressing and holding the Ctrl key and then pressing the letter “F” (Ctrl+F). Use the Ctrl plus one of the four arrow keys to navigate between batch payments (see the Payment Batch Navigation section below for more information).
All keyboard shortcuts are listed next to the corresponding field or function. Refer to the Keyboard Shortcuts topic for more information. | |||||||||||
|
|
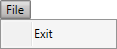
File (Alt+F) The File menu contains the following option:
Exit (Alt+F+X) Close out of the screen and return the Detail Processing screen.
| ||||||||||
|
|
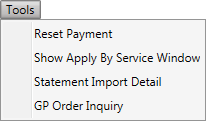
Tools (Alt+T) The Tools menu provides the following options:
Reset Payment (Alt+T+R) Use this option to unapply all payments and adjustments for all orders associated to this payment. Any payments and adjustments made to this payment are removed. To reset a single order, right click within the Existing AR section of the order and choose “Reset Order.”
Show Apply by Service Window (Alt+T+A) Apply at the Service Code Level: Use this option to apply the payment by services codes associated to the selected item in Existing AR.
Statement Import Detail (Alt+T+S) View data for the statement through the Statement Import Detail dialog. This screen displays the original and unapplied amount for all service codes associated to the payment. Use the Statement Import Detail function to view processing details for the entire payment record. A user can continue to work in this screen while the Statement Import Detail screen is open; further, as a user moves from one payment to another the data within the dialog will reflect the payment currently opened within this screen.
GP Order Inquiry (Alt+T+G) Opens the Dynamics GP Order Inquiry window to view transactions in Microsoft Dynamics GP for this order.
| ||||||||||
|
|
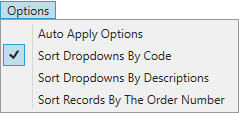
Options (Alt+O) By default, dropdown menus in this screen display items by their description. Users have a choice of keeping this sort option or choosing to sort by Code (item identifier). This feature pertains to dropdown menus that contain both the description and code, such as the Customer and Service Code fields.
Auto Apply Options Select this item to view and adjust Import Auto Apply Options.
Sort Dropdowns by Code (Alt+ O+C) Choose this option to have the application display items in dropdown menus by an identifier (code).
Sort Dropdowns by Descriptions (Alt+O+D) Set this flag to list dropdown menu items by their description (default).
Sort Records by the Order Number (Ascending) (Alt+O+R) Check this option to list the records associated to the payment in ascending order by the Order Number. If this option is not checked, which is the default, then the records list in the order in which they were added to the payment, with the most recently added records listed at the top.
| ||||||||||
|
|
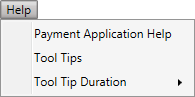
Help (Alt+H)
Payment Application Help (Alt+H+P or F1) Opens the Payment Application topic in the Online Help. Pressing the F1 key opens the Online Help, as well.
Tool Tips (Alt+H+T) Check this option to have the application display tool tips when the mouse hovers over certain areas on the screen. Help can be found for most fields and functions within this screen.
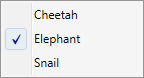
Tool Tip Duration (Alt+H) Control the amount of time the tool tip displays on the screen by selecting one of the following options:
Cheetah (Alt+H+D+C) Tool tip is active approximately 9 seconds
Elephant (Alt+H+D+E) Tool tip is active approximately 23 seconds
Snail (Alt+H+D+S) Tool tip is active approximately 60 seconds
| ||||||||||
|
Payment Information | |||||||||||
|
This section provides details for the payment including the branch affected, the amount of the payment, and the amount remaining to be applied (Payment Balance). | |||||||||||
|
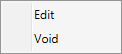
Right-click options for this section The following right-click options are available within the Payment Information section:
Edit Opens the Payment Information section for editing the batch; the ability to edit a batch is dependent on its batch status (see Batch Status).
Void Selecting this option puts the batch in a status of “Voided.” You will receive a Void Cash Receipt dialog prompting you to confirm the request and provide a reason for voiding the receipt.
| |||||||||||
|
Branch |
Branch being affected by this payment. The branch is set when the payment batch is created (through Cash Receipts or through Detail Processing) and cannot be changed. This branch is the default branch for any selections made within in this screen for this payment. For example, clicking in the Branch field for a Journal Entry, the application defaults to the branch of the payment. | ||||||||||
|
Cash Receipt Number |
The identifier for the Cash Receipts item associated to the payment. | ||||||||||
|
Payment Amount |
Total dollar amount of the payment. | ||||||||||
|
Payment Code |
The code assigned to the payment (defined through Statement Payment Code Setup). For items generated through Cash Receipts, the Payment Code here defaults to what is defined within the Cash Receipt Receivables Payment Code field through the System Wide Options. | ||||||||||
|
Payment Type (memo) |
For cash receipts, this is the cash receipt payment type (defined within Cash Receipt Payment Type Setup). The Payment Type is informational only and, when set, a corresponding memo field displays allowing related input, i.e. Payment Type of “Check” may have a corresponding “Check Number” field. | ||||||||||
|
Payment Description |
This is a detailed text description of the batch (up to 128 characters). This description is generally the name of organization associated to the payment, such as the shipper, customer, or vendor. | ||||||||||
|
Customer Number |
Customer associated to the payment batch. Setting the customer affects what is available for Existing AR associated to orders linked to the payment. Use the drop-down menu to select from the list of recently accessed customers, Customer Quick Find, or use the Customer Find to lookup customers up by name and/or number. Address information, such as Last/Company Name, First Name/MI, Address, etc. default to the customer selected in this field. Access additional name and address information through If the payment is from a known customer, select that The identifier for the customer set for the Cash Receipts item displays. | ||||||||||
|
|
Customer Find Uses this function to select a customer by searching by name and/or number utilizing the Customer Find. | ||||||||||
|
|
Additional Data Press the expand (downward chevron) button ( | ||||||||||
|
Last/Company Name |
Customer or contact name associated to the payment (up to 26 characters). | ||||||||||
|
First Name/MI |
First name of the contact person associated to the payment (up to 16 characters). | ||||||||||
|
Note |
This is an informational only accounting note linked to the receipt. Refer to Accounting Note for more information. | ||||||||||
|
Address |
Physical or mailing address for the customer or contact person (3 lines up 256 characters each). | ||||||||||
|
City |
City associated to the customer or contact person (up to 26 characters). | ||||||||||
|
State |
State associated to the customer or contact person (up to 2 characters). | ||||||||||
|
Country |
Country associated to the customer or contact person. Select a country from the provided list (Country Code Setup). | ||||||||||
|
Postal Code |
Postal code for the customer or contact person (up to 10 characters). | ||||||||||
|
Phone ( |
Phone and extension for the customer or contact person
(up to 52 characters). Use the phone control ( | ||||||||||
|
Payment Balance |
The amount of the payment remaining to be applied displays. Payment Balance computes as the Unapplied Amount less Unapplied Cash less any GL account allocations less any AP Vendor transactions. The entire payment amount is applied when the Payment Balance is zero.
Note: The dollar amount appears blue when an amount remains to be applied (“$2,391.25”), green when zero (“$0.00”), and red when negative (“($1,250.25)”).
| ||||||||||
|
Order Level |
| ||||||||||
|
Use this section to apply at the Order Level. Click in the Apply field to have the application auto apply to the order (or “No Order”) record beginning with the oldest documents first. The application applies until the order is fully-applied (zero balance on the order) or until the Payment Balance is zero, whichever occurs first.
The Payment Balance displays the amount remaining to be applied/allocated. Allocate to MoversSuite order (Order Number and shipper name display) or to the “No Order” entry when the apply/allocation does not affect a MoversSuite order.
Use the “No Order” level to set unapplied AR using the Unapplied Amount field for prepayment on an order (no order revenue available) and for cash sales for items such boxes and weight tickets, etc. Each order or “No Order” record contain the following sections (each of which are described below):
Journal Entry Account Payable (for payments affecting a cash account)
When one of these sections is collapsed and contains data, then a summary of the details entered for the item display. For example, the sample data below indicates that there is 1 applied record in the amount of $14.88 to the AR titled “Other Revenue.”
Orders listed for a payment display in the order in which they were added to the payment, with the most recently added orders appearing at the bottom of the payment. | |||||||||||
|
Order Number |
The Order Number associated to the payment displays. All items and adjustments belong to this order record. | ||||||||||
|
Shipper |
The name of the shipper as set through Last Name/Company Name field in Name, Address, Phone displays below the Order Number. | ||||||||||
|
Balance |
The open amount for all AR for this order (or “No Order”) displays. The Balance computes as the total Account Receivables with a balances for all Customer(s) set for the order. | ||||||||||
|
Apply |
Click in this field to apply an amount at the Order Level. The system computes an amount that includes all open items associated to the order and applies what is available (computed as the lesser of Balance for the order and the Payment Balance) and applies beginning with the oldest documents first. The computed amount can be modified. | ||||||||||
|
|
Unapplied Amount For an order, enter a positive pre-payment or over-payment amount. For “No Order”, use this field to record items such as cash sales, boxes, weight tickets, etc. as a positive amount. Unapplied AR is applied later in Microsoft Dynamics GP (and ultimately results in an AR Credit Memo or AR Cash Receipt). Enter chargebacks as a negative amount in this field. This results in an AR Debit Memo in Microsoft Dynamics GP. Clicking in the Unapplied Amount field opens the following menu and fills in the Amount field with the amount available (defaults to what is set for the Payment Balance).
Figure 22: Unapplied Amount menu
Amount Enter the dollar amount to be unapplied for this order or “No Order” record. This field defaults to the amount available to apply (Payment Balance). The amount can be updated.
Branch Select the appropriate branch to record the unapplied amount under. If the payment is a cash receipt and is associated to an order, the Branch defaults to the branch set for the order. Otherwise, the Branch here defaults to that of the payment.
Division If your system has Divisions enabled, a drop-down menu is available allowing you to select the division affected by the unapplied transaction. The Division defaults in the same manner as the Branch.
Customer Select the customer that is affected by the unapplied AR for this branch and order. Use the list of recently selected customers from the drop-down menu, the Customer Quick Find, or Customer Find to locate and select a record.
Comments Provide any comments needed to document this unapplied amount entry. These comments show in Microsoft Dynamics GP.
Restores the menu back to its original state.
Closes the menu. Changes made are saved as they are entered.
| ||||||||||
|
|
Remove Order Remove the order from the payment. Doing so removes any payment applies, GL allocations, unapplied amounts, etc. for this order to be discarded (as if never entered). | ||||||||||
|
Applied Account Receivables |
| ||||||||||
|
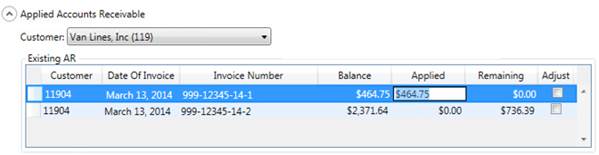
Use this section to apply at the Invoice Level on items with an open balance for selected customer(s). Options here allow you to select a customer and then choose which AR items need to be applied to.
| |||||||||||
|
Customer (Alt+C) |
Select the customer to which you want to apply AR for. Only those customers with open AR for the particular order can be selected.
NOTE: Customers are defined in Microsoft Dynamics or through Customer Setup and assigned to an order within Billing Information (Revenue Entry).
| ||||||||||
|
|
Customer Find Available for the “No Order” record, this function opens the Customer Find dialog allowing to search for a customer by Customer Name and/or Customer Number. | ||||||||||
|
Existing AR |
| ||||||||||
|
Listed in this section is all open AR for the selected Branch, Order Number, and Customer. Use this section to apply at the Line Item Level or Service Code Level. Apply at the Line Item Level by selecting an item and clicking in the corresponding Applied field. Apply at the Service Code Level by selecting an item and accessing the Apply by Service dialog available through one of the following methods: •Double-click the item •Right-Click and select “Show Apply by Service Window” •Select “Show Apply by Service Window” from the Tools menu
| |||||||||||
|
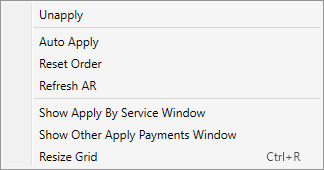
Right-click options for this section The following right-click options are available with the Existing AR data grid:
Additionally, hotkeys are available once the right-click options are visible. The first letter of each option is the option’s hotkey, e.g. “U” for Unapply.
Unapply (U) Resets the Applied amount to $0.00.
Auto Apply (A) Apply payments and charges beginning with the oldest documents (transactions) in the grid and move up the list until the amount has been fully applied or the Payment Balance reaches zero.
Reset Order (R) Reset all payments and adjustments made for this record only. Use the “Reset Payment” option (available through the Tools menu) to reset all payments within this screen.
Refresh AR (F) Refresh clears any amount(s) applied and adjustments made to the order and refreshes the data in this grid with the latest information from Microsoft Dynamics GP for the specific customer being viewed. Use this option only when data has changed in Dynamics GP and you need the updated data reflected in this payment.
Show Apply by Service Window (S) Opens the Apply by Service dialog allowing you to apply based on the particular service codes associated to an invoiced item.
Show Other Apply Payments Window Opens the Other Applied Payments dialog allowing you to view information on where payments come from on the currently selected record.
Resize Grid (Ctrl+R) Select this option to have the application readjust this data grid so that the entire grid is visible. This is a helpful feature when there are multiple AR records and you want to view them all without having to scroll through the data.
| |||||||||||
|
|
The first column in the grid displays an error, warning, or information icon. The message corresponding to the icon is visible at the bottom of the screen or when the mouse hovers over the icon. | ||||||||||
|
Customer |
The identifier established for the customer associated to the revenue item displays. | ||||||||||
|
Date of Invoice |
Invoice date for an invoice generated in MoversSuite display in this field. | ||||||||||
|
Invoice Number |
The identifier for an invoice generated in MoversSuite displays. If the revenue is not associated to an invoice, then the line item description displays. | ||||||||||
|
Balance |
The open balance for the receivable displays. A fully applied item has a zero Balance. The Balance computes as the total of all items less the amounts of Other Apply and Applied and less any adjustments made at the Service Code Level. Double-click this record to view the Service Code details (through the Apply by Service dialog). | ||||||||||
|
Other Apply |
This is the amount factored into the total applied amount that came from a source outside of this payment, such as a payment for this same order on a different batch. You can utilize the right-click option to Show Other Apply Payments Window to view the source information of the Other Apply amount. This option opens the Other Applied Payments dialog. | ||||||||||
|
Applied |
Click in this field to have the system apply at the Invoice Level. The system computes an amount that includes all open items associated to the invoice or revenue item and applies what is available (computed as the lesser of the balance for the order and the Payment Balance). The computed amount can be modified. Double-click this record to view the Service Code details (through the Apply by Service dialog). | ||||||||||
|
Remaining |
This is the dollar amount left to be applied for the item (to consider it fully paid). It computes as the Balance less the Other Apply amount less the Applied amount. | ||||||||||
|
Adjust |
A checkmark shows in this box if adjustments exist on one or more items at the Service Code Level. Double-click this record to view the Service Code details (through the Apply by Service dialog). | ||||||||||
|
Journal Entry |
| ||||||||||
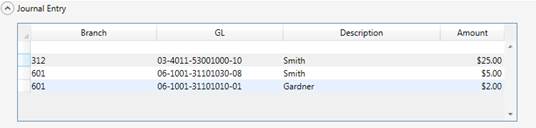
|
Use this section to allocate the payment directly to GL accounts. This section is typically used to handle payments where there is no direct AR to apply it to, i.e. no invoice. An example is if your company was reimbursed for something outside of an order and there is a particular GL account that it can allocate to, e.g. a refund check.
| |||||||||||
|
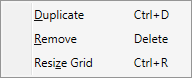
Right-click options for this section The following right-click options are available with the Journal Entry data grid:
Additionally, hotkeys are available once the right-click options are visible (by pressing the Menu or Control button on the keyboard or using the shortcut of Shift+F10). The first letter of each option is the option’s hotkey, e.g. “D” for Duplicate.
Duplicate (Ctrl+D) Creates a duplicate of the selected record.
Remove (Delete) Deletes the selected record. The user is not prompted to confirm this request.
Resize Grid (Ctrl+R) Select this option to have the application readjust this data grid so that the entire grid is visible. This is a helpful feature when there are multiple entries and you want to view them all without having to scroll through the data.
| |||||||||||
|
|
The first column in the grid displays an error, warning, or information icon. The message corresponding to the icon is visible at the bottom of the screen or when the mouse hovers over the icon. | ||||||||||
|
Branch |
Select the branch to create the allocation entry under. This is the source segment for the GL allocation account defaults to the branch set for the payment. Manage branch records through Branch Setup. | ||||||||||
|
Division |
If Divisions is enabled, a drop-down menu appears allowing you to select the division associated to the transaction. The Division value defaults to what is set for the payment. Manage division records through Division Setup. | ||||||||||
|
GL |
Enter the General Ledger (GL) account you wish to offset with this allocation entry. The application defaults to the company and branch segment set for the selected Branch. This field produces a list of valid GL accounts based on the number or description entered. For example, a user can clear this field and enter “Clearing” to see a list of all GL accounts that contain this text.
Note: Use the Backspace button to clear an entry this field. Use ESC to remove changes in reverse order.
GL Account Find Click on the lookup icon (
| ||||||||||
|
Description |
Provided a meaningful description for the transaction (up to 128 characters). The Description defaults to what is set for the Payment Description. | ||||||||||
|
Amount |
Enter the dollar amount of the allocation. | ||||||||||
|
Applied Accounts Payable |
| ||||||||||
|
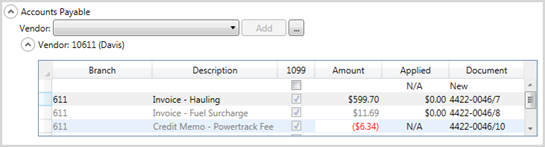
Use this section to manage AP vendor transactions for the order. This section is available for any all types of payments except those where the posting account of the payment is a cash account. You can create multiple payables for each vendor and have multiple vendors assigned to the order. Payables created within this screen display with “New” assigned to the Document number; this data is updated once the item has been processed in Microsoft Dynamics GP. Payables associated to the order and vendor that were created in Microsoft Dynamics GP automatically appear in this grid; they can be applied to the payment and duplicated, but they cannot be deleted.
| |||||||||||
|
AP Vendor
Select a vendor from the list or use the Vendor Find (
Pressing Add creates an entry section below or adds to an existing entry if the vendor already has payables listed. Vendors added with no payable transactions associated to them are removed when the screen is closed or when you move to another payment in the batch.
Adding Payables To add individual payables for a vendor, simply click in the blank line at the top of the grid. Payables created in MoversSuite display “N/A” for the Applied column and “New” in the Document column; this data is updated once the item has been processed in Microsoft Dynamics GP. The Amount associated to the Payable can positively or negatively affect the payment. Payables with a balance created outside of MoversSuite (Microsoft Dynamics GP) display automatically for the vendor. Users can duplicate and apply these payables, but they cannot be deleted. The Amount of these payables can be applied to the payment.
| |||||||||||
|
Right-click options for this section The following right-click options are available with the vendor transaction data grid:
Additionally, hotkeys are available once the right-click options are visible (by pressing the Menu or Control button on the keyboard or using the shortcut of Shift+F10). The first letter of each option is the option’s hotkey, e.g. “D” for Duplicate.
Duplicate (Ctrl+D) Creates a duplicate of the selected record.
Remove (Delete) Deletes the selected record. The user is not prompted to confirm this request.
Resize Grid (Ctrl+R) Select this option to have the application readjust this data grid so that the entire grid is visible. This is a helpful feature when there are multiple entries and you want to view them all without having to scroll through the data.
| |||||||||||
|
|
The first column in the grid displays an error, warning, or information icon. The message corresponding to the icon is visible at the bottom of the screen or when the mouse hovers over the icon. | ||||||||||
|
Branch |
Select the branch you want affected by the payable transaction. The Branch defaults to the branch set for the payment. Manage branch records through Branch Setup. | ||||||||||
|
Division |
If Divisions is enabled, a drop-down menu appears allowing you to select the division associated to the payable transaction. The Division value defaults to what is set for the payment. Manage division records through Division Setup. | ||||||||||
|
Description |
Provide a description for the payable transaction (up to 128 characters). The Description defaults to what is set for the Payment Description. | ||||||||||
|
1099 |
Check this box if the payable is 1099 reportable. The flag defaults to what is set for the vendor. | ||||||||||
|
Amount |
Enter the amount of the payable for this vendor. Payable transactions can be for a positive or negative amount. Positive payables create an AP Invoice (money paid to vendor) and negative payables is an AP Credit Memo (vendor is paying). | ||||||||||
|
Applied |
Payables with a balance created in Microsoft Dynamics GP and linked to this vendor display in the grid automatically. The Amount of the payable can be applied to the balance of the payment. For new payables, those not yet generated, this column displays “N/A.” | ||||||||||
|
Document |
Payables with generated transactions have a Document number displaying in this column. For new payables, those not yet generated, this column displays “New.” | ||||||||||
|
|
| ||||||||||
|
|
Payment Batch Navigation Navigate through the payments for the batch using the arrow keys or by entering a payment in the sequence directly; enter “5” to go to the fifth entry in the batch, for example. The numbers that display include the record number that is open out of a total number associated to the batch. The following shortcuts are available to assist in quickly moving through a batch.
See Keyboard Shortcuts for more information. | ||||||||||
|
|
Done (Alt+D) Close the screen by pressing Done. All changes save automatically without pressing Done. The application will not close the screen if errors are present. | ||||||||||
|
|
Save (Alt+S) Available when adding a new payment, this option saves the new record and closes the screen, returns the user back to the Detail Processing tab. | ||||||||||
|
|
Save & New (Alt+N) Available when adding a new payment, this option saves the new record and clears the screen, allowing you to enter another payment. | ||||||||||
|
|
Cancel (Alt+C) Available when adding a new payment, this option close the screen without saving the new record and returns the user back to the Detail Processing tab. | ||||||||||


 )
)


 ) to evoke the
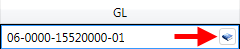

 ) to locate a vendor to create a payable
for. The vendors listed at the top of the menu are those already
associated to the order; with all other available vendors following. The
listing also includes the role of the vendor on the order (displays on the
right side of drop-down when the menu is open). Refer to
) to locate a vendor to create a payable
for. The vendors listed at the top of the menu are those already
associated to the order; with all other available vendors following. The
listing also includes the role of the vendor on the order (displays on the
right side of drop-down when the menu is open). Refer to 


