The MoveTrak Task Entry screen is used to enter and maintain Actions and Categories of actions for an order. This form can be accessed from the menu, or can also be opened directly from Order Entry, in which case it will be loaded with the information on the order selected. If no order has yet been selected in the Order Entry form, this form will be opened with no order chosen, and the user can select the order desired. This form allows for the adding, deleting, or editing of Actions.
Screens
Name |
Description |
Display and edit categories and actions for an order. |
|
Add or update MoveTrak tasks to an order. |
|
Add a category of actions to an order. |
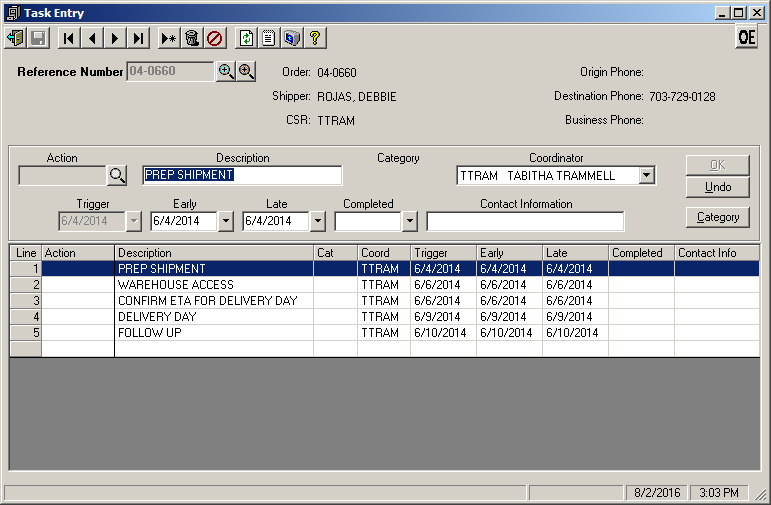
Task Entry Screen
This screen shows all the actions that have been assigned to an order. The screen is divided into two sections, the bottom half of the screen contains the action grid. This grid lists all actions currently assigned to this order by line number. The top half of the screen is the action entry and edit area. If the action was part of a category, the category name is displayed in the edit area as well as in each line of the grid. The Delete icon will delete only the selected action.
Note: The exception to deleting actions is if the action has been set as "Must Complete" in the MoveTrak Action File, the action cannot be deleted.
Field Descriptions
Name |
Description |
|
Use the Extended Lookup to search for all orders that have already been setup in the MoveTrak system. |
|
Use the Alternate Lookup to search for all orders in Vans. |
Reference Number |
This field contains the Reference number of the selected order. If this field is blank, entering a Reference number of an order and clicking the "Tab" key will load the information for the selected order. The lookup button next to this field may also be used to find the desired order, indexed by the field selected in the Search by combo box. |
Order Information |
|
Order |
This display only text box contains the order number (if any) of the order selected. |
Shipper |
This display only text box contains the Shipper Name for the selected order. |
CSR |
This display only text box contains the Customer Service Rep assigned to the selected order. |
Origin Phone |
The origin phone number for the selected order. A display only field. |
Destination Phone |
The destination phone number for the selected order. A display only field. |
Business Phone |
The business phone number of the billing customer (if applicable). This is also a display only field. |
Actions |
|
Action |
This is the Action code for each MoveTrak action. When an Action is selected, the Action code is displayed in this box, but can not be changed. When a new Action is added, you can enter the Action code manually or click the |
Description |
The Action Description for the selected action is displayed in this box. For existing Actions, the Description can not be modified, but for user-defined Actions, it can. |
Category |
If the selected action was added as part of a Category, the Category name will be displayed in this area. |
Coordinator |
The Customer Service Coordinator assigned to this action. This is defaulted from the Action file or Category file, but can be changed. |
Trigger |
This trigger date is the date that this action is set to activate on and is used to calculate the Early and Late action dates. |
Early |
The earliest date that this action can be completed. |
Late |
The latest date that this action can be completed and not be considered missed. |
Completed |
As actions have been completed, you should enter the date they were completed in this box. Entering a complete date in this field causes this action to be considered closed (or completed) by the system and the action will not appear on any future action reports. |
Contact Information |
This text box can contain up to 20 characters for any contact information desired. Generally, you should enter the name of the person contacted and any other notes relevant to that correspondence. |
|
When adding a new action or modifying an existing action, once complete, you may click either the |
|
When adding a new action or modifying an existing action, if you decided that changes are unwanted, click the |
|
This command button opens the Add Category form, which allows the user to add all the actions in any selected category to this order. |
 lookup icon to select from a list of available actions. When adding custom (user-defined) actions, leave the Action code blank.
 cancel icon or the Undo button to cancel the changes. If you do click the
 Creating MoveTrak Tasks
A Task in MoveTrak consists of a set of Actions to be performed on an order. The tasks will appear on the various action reports depending on the dates and status. To add a task, you must either add individual actions or a Category of Actions.
In either case, if a MoveTrak header was not already added for an order, you may need to use the  Alternate lookup icon to find the correct order, since the order will not appear when using the standard lookup.
To create a Task using individual actions
1.Browse to the desired order, enter the correct reference number or select the order by using the appropriate lookup to find the order you wish to add the task to. To search for a specific order, you may use the  Extended lookup if the order has already been setup in MoveTrak or the Alternate lookup if the order has not yet been setup in MoveTrak.
2.To add actions individually, right-click while the mouse is positioned inside the Action grid and choose the Insert Line option or just double click on any blank line in the grid.
3.Enter the Action Code in the provided text box or search for the correct code using the lookup. If you are adding a custom (user-defined) action, leave the action code blank.
4.Edit the action as needed. For predefined actions, the description can not be changed, but for custom actions it can. In addition, the Trigger, Early and Late dates may also be uneditable based on the type of action.
5.Once the changes are complete click  or click the
  Save icon to save the changes or
  to cancel the changes.
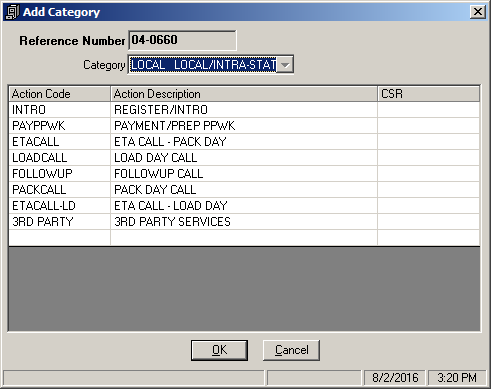
MoveTrak Add Category Screen
This screen allows the addition of all the actions in a category to the selected order. When a category is selected in the "Select Category to add" combo box, the actions to be added will show in the grid. This form is loaded by clicking the "Add Category" command button on the MoveTrak Entry and Maintenance screen.
Field Descriptions
Name |
Description |
Select Category to Add |
This combo box is loaded with all categories that have been set up. Select one category to load the grid with the actions in that category. |
|
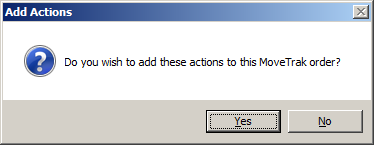
This command button will add the actions showing in the grid to the selected order. A dialog box will appear to confirm the add. |
|
This command button will cancel the add and clear the form fields. |
Action Code |
The code for each action will show in this column. |
Action Description |
This column will display the description for each action. |

To create a Task using a category:
1.Browse to or select the desired order as explained above.
2.Click on the  button to open the Add Category screen.
3.Select the appropriate category and click . This will cause the following confirmation window to be displayed. Confirming the add will immediately add all the actions in this category to the task.
4.If you chose to add these actions, once you return to the task entry screen, the actions from the category will already be updated and there is no further need to save the task, unless changes are made after returning.