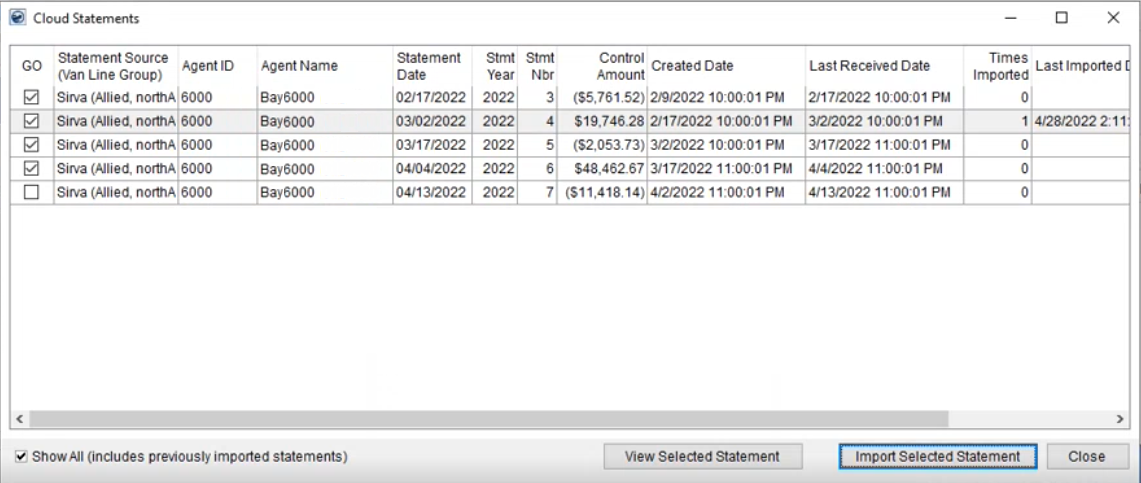
The Cloud Statements screen is available when you choose the Cloud Statements option from the Import Menu within Payment Management. This screen displays pending statements available to you to import. Currently, this screen only supports data from the SIRVA Agent Statement Import.

Figure 3: Cloud Statements screen
Utilize this screen to verify that a statement is complete and ready to import. The GO column provides an indication that the import may be complete. The GO column will be checked for all Statements where the current date is after the day the posting tickets should have come down.
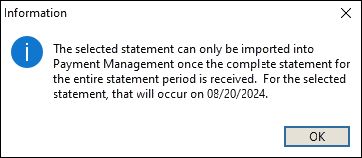
For items that do not have the GO column flag checked, right-click the item to view the date of when the item can be imported. Clicking the Import Selected Statement button or right clicking the Import Statement menu option when it is too early will also generate that screen.

Users should always wait to make sure of the following before attempting an import:
1. They have the Excel spreadsheet that is provided by Sirva.
2. The spreadsheet is downloadable.
3. The statement totals match.
Access the statement details of a single, highlighted statement through the View Selected Statement option. This function opens the Pending Statement View screen, from which you can see the order data, individual service items, and more.
The Show All (includes previously imported statements) option allows you to see all downloads from SIRVA. This includes older, unimported statements as well as those imported. To see these additional items, check the Show All option and then click in the main grid; This causes the grid to refresh.
When you are ready to import a statement, highlight the one statement you wish to import and press Import Selected Statement. This opens the Statement Import Summary screen, from which you see and correct any errors during the import process, assign Payment Codes, set the Cash/Clearing Account, etc.
NOTE: The main grid in the Cloud Statements screen is a full-functioning grid from which you can sort and filter the data. Refer to the Data Grids topic for more information on grid usage.
TECHNICAL NOTES:
A “Cloud Statements Single Distribution Per Payment Detail” option is available through the Global System Option that that instructs the application to combine the same Service Codes on the payment into one detail record. This flag is set to “True” by default to instruct the application to combine the same items into one detail record. Optionally, you can have the Support Team set this to “False” to separate each item into its own detail record, no matter how many are of the same type.
A Van Line Statement Download Log is available to Support Team personnel allowing them to view the specifics of statement, including options to view the JSON file and to instruct the application to ignore a statement.
Right-Click Options
The options available to you through a right-click menu include the ability to import and view the details of the statemen and Refresh Grid.

The Refresh Grid option works with the Show All option available at the bottom of the screen. Checking or unchecking the Show All does not automatically update the grid data, so you will need to use the Refresh Grid option to do so.
Details on the import and view statement options are available in the following table.
Technical Field and Function Information
|
Field/Function |
Description |
|
GO |
When this screen initially loads, the GO box is checked for any statement that appears to be complete and is ready to import. SIRVA Integration The application assumes that a statement is complete from SIRVA when a Posting Tickets download is received. This is typically the third business day after the first of the month or the 16th day of each month. Although, the box may be checked for SIRVA statements, the application cannot know exactly that a statement is complete or not. Please check the Control Amount and other data to determine the status of the import. |
|
Statement Source |
The source of the statement displays. The name that displays is defined within Van Line Group Setup and provides in parenthesis the name of each van line associated to the group. |
|
Agent ID |
Agency information of the statement displays. This information is useful in determining the correct agent affiliation of the statement to ensure that the import is correct. The agent data also determines the branch of the statement batch. The branch is integral in processing of the statement beginning with the next screen (Statement Import Summary). Agent data is defined within Agent Setup. |
|
Agent Name | |
|
Statement Date |
The date of the statement displays, which is considered the journal or posting date. The Statement Date set is the end of period date. The two period dates per month are the 15th of the month and the last date of the month. |
|
Statement Year |
SIRVA Integration SIRVA references statements through a year and number system to track their bi-monthly statements. The number is from 1-24 for the given year as follows: Statement 2022-1 is for first half of January 2022. Statement 2022-2 is for second half of January 2022. Statement 2022-3 is for first half of February 2022. … Statement 2022-24 is for second half of December 2022. The Statement Year and Statement Number provide you with this sequencing. |
|
Statement Number | |
|
Control Amount |
The column displays the total dollar amount of the statement. The amount is reconciled against what the van line has paid out. |
|
Created Date |
The date that the statement was physically created shows in this column. |
|
Last Received Date |
The date and time that the statement made available to you through MoversSuite displays in this column. This is considered the date that the statement initially appeared in this screen. |
|
Times Imported |
A count of the number of times this specific statement has been imported using the Import Selected Statement feature on this screen. There is no limit on the number of times a statement can be imported into MoversSuite. |
|
Last Imported Date |
The date and time that the statement was last imported displays. |
|
Last Imported By |
The name of the MoversSuite user that performed the last import shows in this column. |
|
Bottom Row Functions |
|
|
Show All |
Show All (includes previously imported statements) By default the Cloud Statements screen displays all pending statements. These statements have yet to be imported. If you wish to see all statements that have been made available through this screen, then you can check this option and then click on one of the column headings on the main grid or use the right-click option of Refresh Grid to populate all the existing statements. If you wish to restore the listing to its default, then uncheck this box and then refresh the grid again. Of note, you can use grid features to sort and filter the data (see Data Grids for more information). |
|
View Selected Statement |
View Selected Statement Press this button to view the details of the highlighted record from the main grid. This function opens the Pending Statement View screen that lists all the details line items for each order or control account. |
|
Import Selected Statement |
Import Selected Statements After verifying that the statement is complete and ready for importing into Payment Management, then you can click on this button to initiate the import process. Any errors or other problems with the import will display within the Statement Import Summary screen. |
|
Close |
Close Closes the screen. |
RELATED TOPICS: