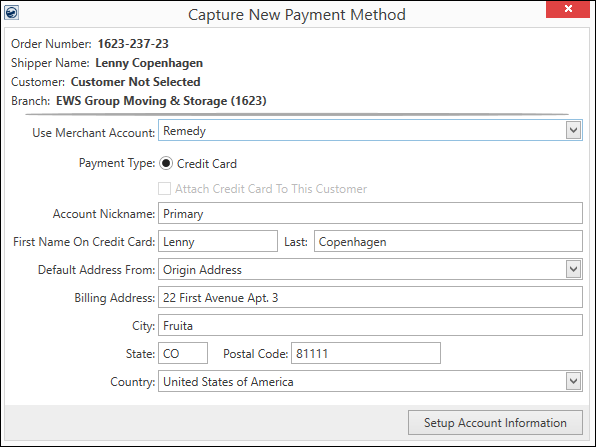
When a MoversSuite user needs enter credit card or bank account information to link that information to a Customer, the Capture New Payment Method screen is used.
USE WHEN:
•Customer gives you a credit card number and it needs to be attached to the Order and/or Customer.
•To create an option within AutoPay Setup (Recurring Billing)
The process for capturing credit card information (or bank account information) is as follows:
NOTE: Currently, Remedy offers the ability to capture credit card information. CSI Pay (PYXiS) can capture credit card information and bank account information, as well.
1. From the Electronic Payments Menu, choose Capture Credit Card Information.
2. This opens the Capture New Payment Method screen. Complete this screen.
3. Clicking the Setup Account Information button (Figure 22) opens the Electronic Capture Processing Page. Simultaneously, a prompt will appear to manage the payment through the browser (Figure 24). Complete the Electronic Capture Processing Page webpage.
4. After completing the Electronic Capture Processing Page, click the message box from MoversSuite which reads: Click me after the card capture has succeeded or been cancelled. The capture will finish processing and a message will appear if the capture was unsuccessful.
5. If successful, the message will close. Now, the credit card information will be available to use for Credit Card/Bank Payment or Authorization.

Figure 22: Capture New Payment Method screen with options unique to Remedy being chosen as the Merchant Account. Other Merchant Accounts will have different options according to their process.
Technical information the Capture New Payment Method screen:
|
Field/Function |
Description |
|
When an order is on the screen and Capture Credit Card Information is chosen from the Electronic Payments Menu, the Order Information data auto-populates this screen with the Order Number, Shipper Name, Customer, and Branch that are linked to that order. | |
|
Use Merchant Account |
Select from the Electronic Merchants that have been set up by your company within Electronic Merchant Setup. When a Merchant Account is selected, the fields and options available on this screen are determined by that provider.
Remedy If the Merchant Account chosen has Remedy Gateway set as the Electronic Service on the Electronic Merchant Setup record. The name of the Merchant Account will be what is set on this record as the Merchant Name. See Electronic Merchant Setup for more details.
CSI Pay (PYXiS) If the Merchant Account chosen has Constellation Payments (PYXiS) set as the Electronic Service on the Electronic Merchant Setup record. The name of the Merchant Account will be what is set on this record as the Merchant Name. See Electronic Merchant Setup for more details. |
|
Payment Type |
The Payment Type options available are dependent on what is selected for the service provider within the Electronic Merchant Setup.
Remedy Only: Credit Card is the only option for Remedy
FOR CSI Pay (PYXiS), the payment type is chosen after clicking the Setup Account Information button. |
|
|
This checkbox and description are grayed as it is implied that the information will be attached to the Customer as it is a capture. Once a payment method is captured, it is available for assignment to billing items through the Payment Setup tab and through the Credit Card/Bank Payment or Authorization screen. |
|
Account Nickname |
Enter an alternate description for the payment method (up to 40 characters). This name can assist when identifying which payment type to use for particular billing, such as storage billing, move billing, etc. |
|
Name
|
The format for this field can take many forms depending on the options chosen for Merchant Account and Payment Type. Essentially, this is the name on the credit card or bank account. |
|
Default Address From: |
Select the address type you wish to reference to populate the billing address. Options from this menu include “New Address,” which you specify if you wish to enter the billing address manually, and from a list of addresses populated for the order and customer records. For example, if you wish to populate the billing address from the Moving From address on the order (from Name, Address, Phone), then choose the “Origin Address” option and the billing address updates accordingly. Address types only list in this menu if there is an actual address assigned to the entry. For example, “Destination Address” only appears if the order has the Moving To address set (Name, Address, Phone). Customer address types pull from Microsoft Dynamics GP. The list under their billing source, e.g. PRIMARY, SECONDARY, etc. |
|
Billing Address: |
Use the Default Address From setting to fill-in data for the billing address automatically from the order or customer associated to the payment. Alternately, choose “New Address” to enter the billing address by hand. The Billing Address populates the corresponding address referenced within the secure hosted page. Note: You can update the billing address through the secure hosted page, as well. |
|
City: |
The city associated to the credit card or bank account. |
|
State: |
The state associated to the credit card or bank account. |
|
Postal Code |
The zip code associated to the credit card or bank account. |
|
Country |
The country associated to the credit card or bank account. The use of Origin, Destination, or Moving To address will auto-populate this field. |
|
|
Click this button to prompt a secure online payments tokenization page, such as the Electronic Capture Processing Page. When complete, the system will let you know if the capture was successful or not. |