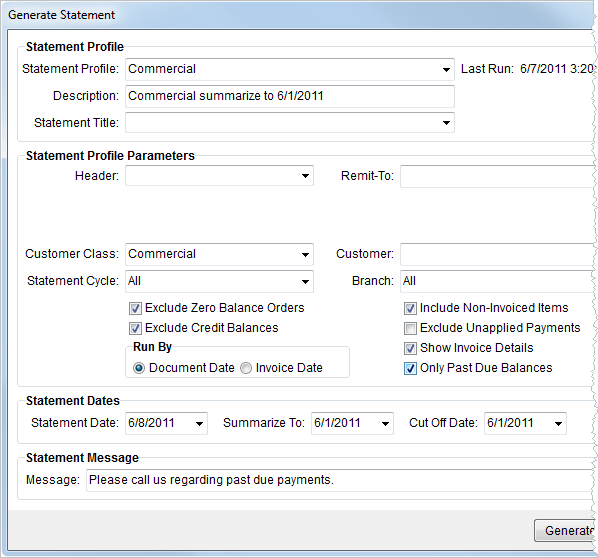
The Generate Statement screen available through the Customer Statement Generation option in the Accounting Tools Menu allows a user to generate customer statements on customer class or for an individual customer based on data retrieved from Microsoft Dynamics GP. The screen provides the user with options to save and reuse statement runs, select statement cycle, and set a message that displays on all report documents generated.
Figure 2: Generate Statement screen
The following table describes the fields and functions available within this screen.
|
Field/Function |
Description |
|
Statement Profile |
|
|
Statement Profile |
Use this option to select a past statement run profile to edit and run. |
|
Last Run |
This field displays the last run date of the selected Statement Profile. |
|
Description |
Enter the text detailing the statement run (up to 256 characters). |
|
Statement Title |
Select title to appear at the top of each statement from the list of those defined within Customer Statement Title Setup. |
|
|
Save This option allows the user to save changes made to the selected Statement Profile. If no Statement Profile is selected, then the Save Statement Profile screen appears with Description set and will prompt the user for a new profile name. Note: The application does not save Statement Dates data to a profile. |
|
|
Save As This option opens the Save Statement Profile screen allowing users to base a new profile off the existing selected Statement Profile. |
|
Statement Profile Parameters |
|
|
Header |
Select a branch from the list of those defined within Branch Setup to represent the company for the statement run. The branch name and address will appear at the top of each statement, just below the Statement Title. |
|
Remit-To |
Select a branch from the list of those defined within Branch Setup as the remittance location for the statement run. Note: The application will retrieve the address from the Address Type of “Payment Remittance” within Branch Setup. The branch name and address will appear next to the “Remit To” label of each statement. |
|
Customer Class |
Select one or more Customer Class records from the list of those defined in Microsoft Dynamics GP. Set this field to “All” (default) to include all Customer Class records in the statement run. |
|
Customer |
Select one or more Customer records from the provided list or use the Customer Find to locate records to be included in the statement run. The application will generate statements for all customers of the specified Customer Class if the Customer field not set. Otherwise, the application ignores Customer Class when the user selects a Customer. |
|
Statement Cycle |
The application will check for items to include in the statement run based on the cycle entered here. By default, the application will check for all cycles. The following option are available through this setting (all defined in Microsoft Dynamics GP): No Statement Weekly BiWeekly Semi Monthly Monthly BiMonthly Quarterly
|
|
Branch |
Select one or more branches from the list of those defined within Microsoft Dynamics GP to include in the statement run. By default, the application includes all branches in the statement run. |
|
Exclude Zero Balance Orders |
Check this option to exclude orders with a zero balance from the statement run. |
|
Exclude Credit Balances |
Check this option to exclude orders with a credit balance from the statement run. |
|
Run By |
Select which date, either Document Date or Invoice Date, to base record selection on. Choosing Document Date will instruct the program to search by the last change or creation date of any relevant document (such credit memo, finance charge, payment, etc.) when comparing to the Summarize To and Cut Off Date fields. Choosing the Invoice Date will instruct the program to use the Invoice Date, or use the Document Date if the Invoice Date does not exist for an item, for its comparison. Note: If non-invoiced items exist within the system, then MoversSuite recommends that the user select records based on Document Date.
For a Recurring Billing statement run: Set Run By to Invoice Date when producing statements for a recurring billing run.
|
|
Include Non-Invoiced Items |
Checking this option will allow the program to include non-invoiced items along with invoiced items on a statement run. Note: This option will only have an effect when using the Document Date as the Run By parameter.
|
|
Exclude Unapplied Payments |
Checking this option will exclude unapplied payments in the itemized listing displayed on the statement run. |
|
Show Invoice Details |
Checking this option will list the documents that make up each invoice. Turning this option on will include all specifics of the charge that would be printed on the invoice otherwise. This is particularly useful if you choose to send out customer statements in lieu of invoices for recurring billed items. |
|
Only Past Due Balances |
Checking this option will ONLY include orders with past due balances on the statement run. |
|
Statement Dates |
|
|
Statement Date |
Enter the statement run date. This date will appear next to the Date field label on each statement report. |
|
Summarize To |
Enter a date to compare to the Document Date or the Invoice Date, depending on what was selected as the Run By parameter, to determine which documents are rolled up as the balance forward date.
For a Recurring Billing statement run: Set this field to the ending date of the prior billing run (beginning balance will summarize to this date)
|
|
Cut Off Date |
Enter a date to compare to the Document Date or the Invoice Date, depending on what was selected as the Run By parameter, to determine which documents a statement contains. Note: If billing quarterly, select the last day of the period to signify the end of the billing cycle (e.g. March 31 for the first quarter).
For a Recurring Billing statement run: Set this field to the ending date of the current billing run (all transactions will be included up through this date)
|
|
Statement Message |
|
|
Message |
Enter a message that will print on each statement report just above the aging information (up to 128 characters). |
|
|
Generate This function falls under the Report Viewer Options and will create a listing of statements using the specified criteria and within the Report Viewer. |
|
|
Cancel Selecting this option will discard any changes made since the last Save or Save As. |


