
This section details the information needed to support and maintain Account Profile Documents on your system. All users that can access the Account Profile tab, can access and view documents through the Documents section within the Account Profile tab.
Create Equipment Document Groups in Account Profile
MoversSuite Administration > Customer Service > Account Profile Document Group
Use the Account Profile Document Group Setup to define the categories you wish to arrange documents under within the Account Profile tab.
Figure 95: Account Profile Document Group Setup example
By default, the groups display in alphabetic order. Optionally, you can set the Group Sort Order to affect the order in which the groups appear. For example, if you wish to have a group always appear at the top of the list, then set the Group Sort Order for that group to 1 and rank additional groups accordingly, i.e., 2, 3, 4, etc.
Create Document Types in Account Profile
MoversSuite Administration > Customer Service > Account Profile Document Type
For each document group, utilize the Account Profile Document Type Setup to establish document types to assign to each document added to the system.

Figure 96: Account Profile Document Type Setup example
In addition to linking a document type to a group, you can use this setup to provide the Description that displays for the record when adding documents to the system through Account Profile Setup records. Note: The Description appears as the Document Type within the Account Profile tab.
Note: If your company wishes to restrict administrators from viewing documents or related setup, then modify user roles through Admin Profile Setup. The roles related to this setup list under the Customer Service category and include Account Profile (Documents Tab), Account Profile Document Group, and Account Profile Document Type.
Add Documents to Account Profile
MoversSuite Administration > Customer Service > Account Profile
With appropriate permissions, administrators can add documents to profiles through the Documents tab within Account Profile Setup. To add a document to the Account Profile, choose an Account Profile and click the Documents tab.
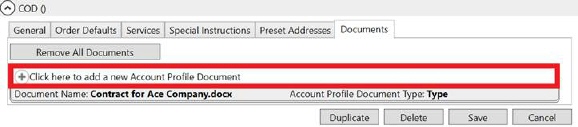
Figure 97: Where to click to add a document in Account Profile
Clicking on Click here to add a new Account Profile Document opens a Choose Document window allowing you to navigate your environment and select an individual document to add. Once a selection is made, the Add Account Profile Document dialog appears allowing you to set any desired properties on the file, including the type, description, and associated notes.
Note: Documents added to the system are stored within the MoversSuite2Docs.DocumentImage table.
Edit Account Profile Document
MoversSuite Administration > Customer Service > Account Profile
Administrators have the option to update the properties associated to a document. To edit document properties, choose an Account Profile record. Choose the document you wish to edit. This opens the Add Account Profile Document dialog allowing you to modify the Account Profile Document Type, Document Description, or Document Notes.
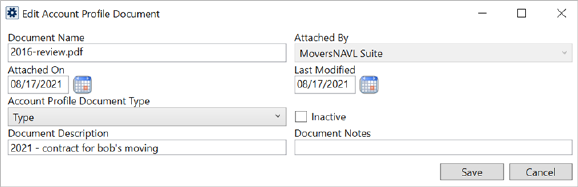
Figure 98: Edit Document in Account Profile
Delete Account Profile Documents
MoversSuite Administration > Customer Service > Account Profile
There is an Inactive box that can be flagged to delete a document and prevent it from appearing as a dropdown option in Administration and the MoversSuite application. To do so, choose an Account profile and then click the Documents tab. Check the Inactive Button. This permanently deletes the document from the record.
This is helpful when options include obsolete documents that can clutter the selection process from option dropdowns.
![]()
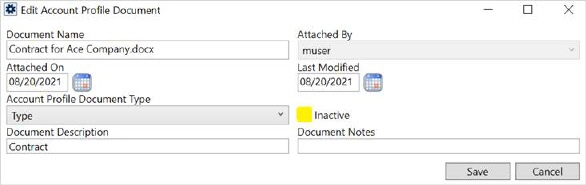
Figure 99: Inactive box on Account Profile document
To quickly delete all documents that are in an Account Profile, go to Administration > Customer Service > Account Profile > Account > Click on Documents tab and then click the Remove All Documents button. This flags the Inactive box for each document and permanently deletes them from the record. A confirmation box will appear to make sure this is what you want to do.
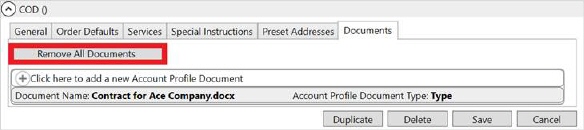
Figure 100: Remove All Documents button on Account Profile Document tab
Technical Field and Function Information
|
Field/Function |
Description |
|
Document Name |
Physical file name and extension of the document (read-only). |
|
Attached By |
The name of the user that attached the document displays (read-only). |
|
Attached On |
Date and time the document was added to the system (read-only). |
|
Last Modified |
Date and time the document properties were last updated. Document properties are updated through the Documents tab within Account Profile Setup (read-only). |
|
Account Profile Document Type |
Selected type assigned to the document. Document Type determines which the group it lists under along with security aspects. Document Type values available through this setting are defined within Account Profile Document Type Setup. |
|
Document Description |
File description provided when the document was added to the system (up to 64 characters). |
|
Document Notes |
Text set for the note when the document was added to the system displays (up to 256 characters). |
|
Inactive |
By default, the option is not checked and the document it is viewable and available in as an option in appropriate dropdown selectors. If checked, the document is deleted and is removed as an option in dropdown selectors. The document remains in the Document Image Database; however, you cannot reconnect it back to the record. |
|
Remove All Documents |
This button checks the Inactive box for each document in the record. By flagging all the documents, all the documents are permanently deleted from the record and removed from dropdown selectors. The documents remain in the Document Image Database; however, you cannot reconnect them back to the record. |
|
In Add mode, the following options are available: | |
|
|
Add Press Add to keep the changes made to the record and store the document within the database. |
|
|
Cancel Cancel the document add and close the screen. |
|
In Edit mode, the following options are available: | |
|
|
Save Save any changes made to the properties of the document record and close the screen. |
|
|
Cancel Reverse any changes made to the document properties and close the screen. |


