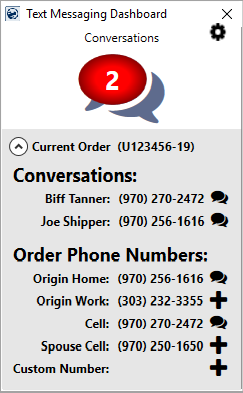
The Text Messaging Dashboard allows you to view information on your conversations along with the contacts established for an order. It also allows you to quickly add contacts to the system. This screen opens through the Text Messaging option within the Tools Menu.

Figure 33: Text Messaging Dashboard
Refer to the Text Messaging topic for more information on using this screen.
Technical Field and Function Information
|
Field/Function |
Description |
|
|
The upper Conversations section displays large text bubbles. When the background is red, the application lists the count of the new messages that you have for all conversations you are associated with. The blue background indicates no new messages. Clicking on this icon opens the Text Messaging Conversations screen displaying all your conversations. |
|
|
The settings options available to you include the following:
Edit Signature This option opens the Edit Signature dialog allowing you to set or edit your signature. Refer to the Edit Signature topic for more information.
Scheduled Messages Opens the Scheduled Messages screen allowing you to manage your scheduled messages. See the Schedule Text Message topic for details.
|
|
Current Order |
Displays the open Order Number or the name of the shipper for a Lead. |
|
The lower section contains information on the specific order you have open. From this section, you can view the existing conversations that order along with initiating new conversations for the order. | |
|
Conversations |
This section lists all conversation (one per phone
number) associated to the order. Click on |
|
Order Phone Numbers |
All phone numbers associated to the order show in this
listing, including those already associated to a conversation ( From this list you can view the conversation associated
to the phone number by clicking on |
|
Custom Number |
Press
Once you provide the number, the application validates and then prompts you to associate a contact name for the account. You also receive prompt to initiate a conversation by sending a message.
Enter the Contact Name, message, and press |