
MoversSuite Administration > Accounting and Financial Services > Rate Plan
Mass Update Rate Plan(s) is an interactive screen used to set new rates across one or more Rate Plan Setup records to users with appropriate security settings. Mass Update Rate Plan(s) is found within Rate Plan Setup > the Mass Record Selection Options menu, which is the dropdown indicated in the image Figure 49. Click Mass Update Rate Plan(s) for this functionality.

Figure 49: Mass Record Selection Options menu
Note: Any rate that is tied to a Rate Matrix cannot be updated through the Mass Update Rate Plan(s) screen.
As an overview, the Mass Update Rate Plan(s) process works as follows:
1. Within the “Filter and Load Rates by…” section, filter by Rate Plan(s), Item Code(s), and/or Effective Dates (No. 1 in Figure 50).
2. Rate plans(s) that result from the filter will list in the “grid” (No. 3 in Figure 50).
3. Update any rate within the list manually or select rate plans to apply to updated rates using tools within “Update Rates for Selected Records” (No. 2 in Figure 50).
4. Review and edit any rates in the list as needed.
5. Save changes.
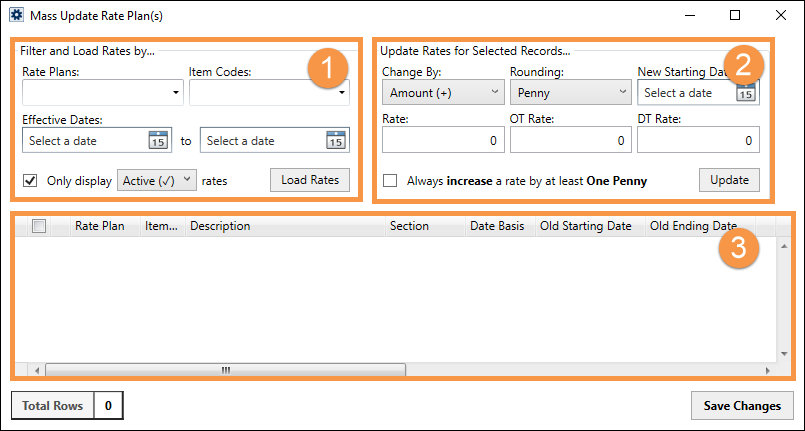
Figure 50: Mass Update Rate Plan(s) with section indicators noted.
There are two sets of instructions in this topic:
•How to use Mass Update Rate Plan(s): Manually set rates
•How to use Mass Update Rate Plan(s): General Instructions (which utilize the “Update Rates for Selected Rates...” section)
How to use Mass Update Rate Plan(s): Manually set rates.
The most common use for this function is to use the Mass Update Rate Plan(s) screen to find all the Rate Plans by item code(s), and then mass update all the rates. This ensures that no Rate Plan with the needed item code(s) is overlooked. Once the list of rate plans is generated and shows in the Grid, each rate can be manually updated and then saved.
To use the “Update Rates for Selected Rates...” section, see “How to use Mass Update Rate Plan(s): General Instructions.”
1. Create an initial list of one or more rate plans.
2. Manually update rates.
3. Save the edits.
STEP 1: Create a list of rate plans.
Setup Area: Filter and Load Rates by…. section
To find all rates that have certain item codes, use the Item Codes dropdown to select as many item codes as needed. Click OK.
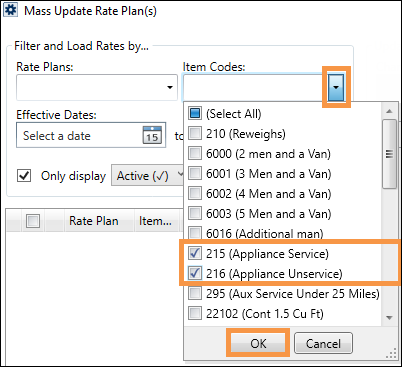
Figure 51: Choose one or more Items Code and click OK.
Click Load Rates. Rate plan(s) that list will have one or more of the item codes selected within their rate plan.
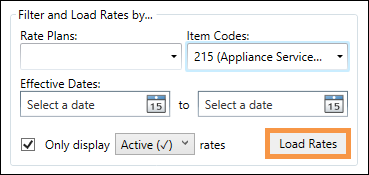
Figure 52: Click Load Rates to apply filters set in the section.
STEP 2: Update one or more rates.
Setup Area: the “Grid”
From the Grid, existing rates will list under Rate, OT Rate, and/or DT Rate columns. Enter new rate(s) within any of the “New” Rate columns. Make any changes as needed. You can navigate to other rate cells by using arrow keys. For example, if you just entered a New Rate in cell and wish to jump to the next cell below it, you can press the down arrow button on your keyboard.
Nothing is saved until Save Changes it clicked and the warning message that appears is confirmed.
In the image below, rates were
added to four Rate Plans under New Rate. As new rates are entered, the red
pencil icon  will appear on the line
items that line item have been edited. Also, at the bottom are two
indicators: “Unsaved” which indicates 4 edits are unsaved and “Total Rows”
which notes the number of rows in the list.
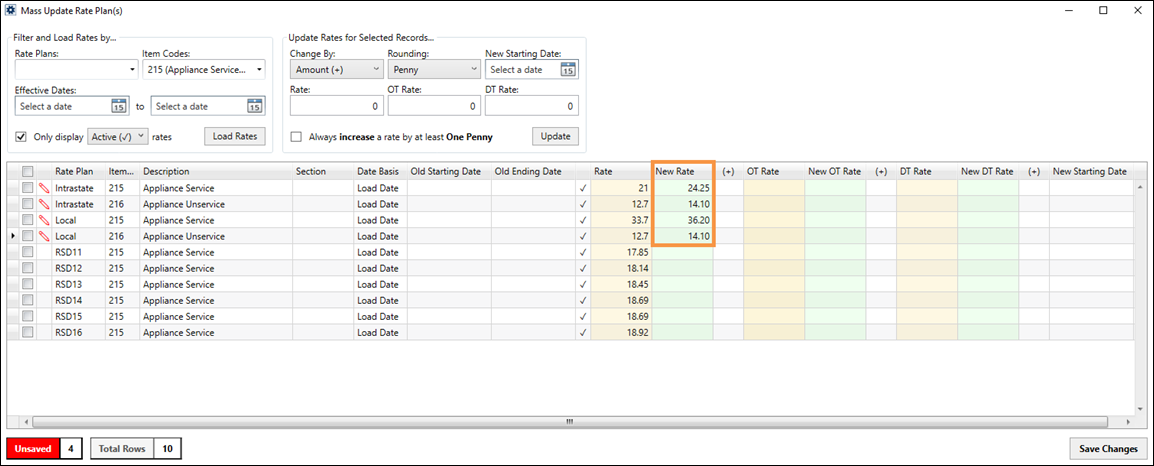
Figure 53: Red pencil icon shows on rates that have been edited or entered. Unsaved reflects the total number of items that have the red pencil icon.
STEP 3: Save the changes.
Setup Area: Save Changes button at the bottom of Mass Update Rate Plan(s) screen.
Edits are only saved once the Save Changes button is clicked and Yes is clicked on the “Confirm Save?” screen.
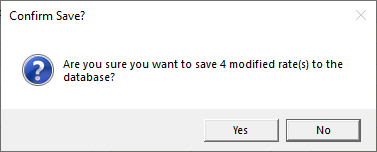
Figure 54: Confirm Save? screen appears after Save Changes button is clicked.
Choosing No on the “Confirm Save?” screen will return you to the Grid and the red pencil icon will still be shown on the lines of rates that have unsaved edits. The icons will remain until a new search is performed, the items are saved, or the screen is closed.
To exit from the Mass Update Rate Plan(s) screen without saving any edits, click the X in the upper right corner of the Mass Update Rate Plan(s) screen.
To continue changing rates in the Grid, just enter different rates, change the filters or the updates. Any of these will cause a prompt that will result in lost changes as explained in the “Confirm Save?” screen.
Each change made to a Rate Plan is tracked within the Admin Tool > Tools > View History Log or Admin History.
How to use Mass Update Rate Plan(s): General Instructions
These instructions detail how to update rates using the Update Rates for Selected Records…:
1. Create an initial list of one or more rate plans.
2. Select from the list the rate plans that are to get the updated rates.
3. Set the details of the updates to be applied to the selected rates from the list (or “grid.”)
5. Choose to save - or exit without making any changes.
STEP 1: Create a list of rate plans.
Setup Area: Filter and Load Rates by….
Create a list of rate plans using any of the following options individually or in combination with other filters in this section:
•Rate Plan: Use this filter when you know the exact Rate Plan(s) you wish to view and/or update.
•Item Codes: Use this filter to locate all Rate Plans that contain the Item Code(s) selected.
•Effective Dates: Use this filter to locate Rate Plans by Effective Start Date or Effective End Date.
•Only Display: Use this filter to view Active, Pending or Expired Rate Plans. By default, this is set to Active.
In the image below, within Filter and Load Rates by… “Local” was selected from the Rate Plans dropdown. When selecting from any dropdown within this section, OK must be clicked to confirm the selections.
Click Load Rates to create a list within the Grid of all the rate plans that meet the criteria set within this section.
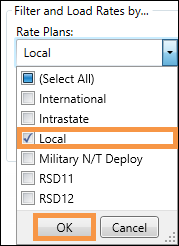
Figure 55: Filtering using Rate Plans.
STEP 2: Select Rate Plans in the Grid.
Setup Area: The Grid
The Grid is simply a list of rates that have met the filtering requirements set in Step 1. The Grid can be filtered and sorted, and the columns can be rearranged by clicking on any column header.
Select the Rate Plans that are to be updated by checking the selection box on the left. Only Rates that are checked will have updates made within Update Rates for Selected Records… applied to them. This step must be completed before Step 3 can be accomplished.
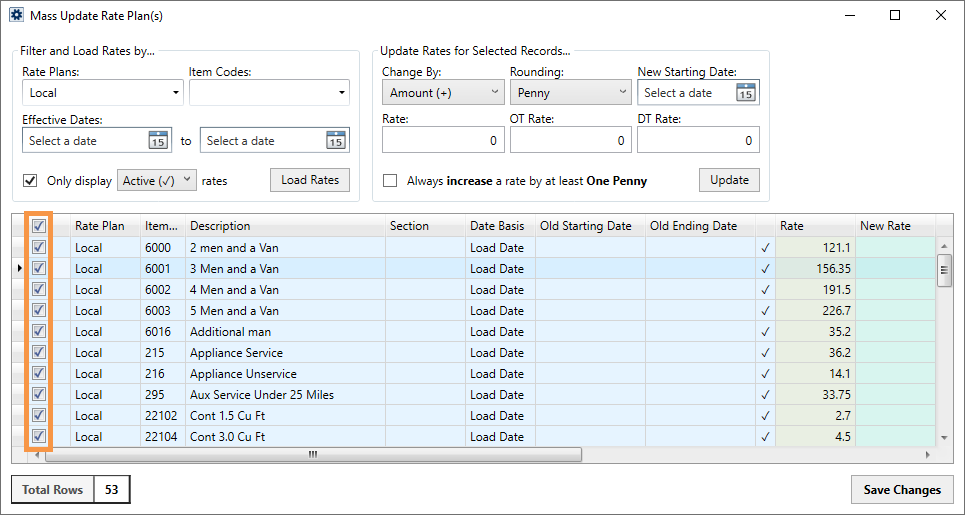
Figure 56: Indicated area shows the line items have been selected. These rates will have the "Update Rates for Selected Records..." changes made to them.
Note: Rates only update if there is a rate set already. Rates can be entered manually for item codes that do not currently have a rate.
STEP 3: Choose rate change criteria.
Setup Area: Update Rates for Selected Records…
Choices made within this section will apply to all the rates selected within Step 2. Rates are not “officially” changed once Update is clicked. Clicking Update will simply update rates according to the selections made in this section. Of note, rates only update if there is a rate set already. Rates can be entered manually for item codes that do not currently have a rate.
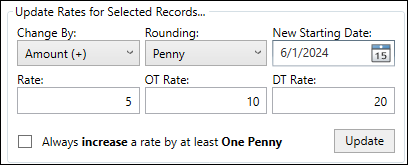
Figure 57: Update Rates for Selected Records... section.
1. Select a Change By option from the dropdown. The (+) options will increase rates by the amount entered. The (-) options will decrease rates by the amount entered.
2. Enter an amount within Rate, OT Rate, and/or DT Rate. The number will increase or decrease the amount according to the option chosen within Change By.
3. If used, enter a New Starting Date, which will become the Effective Date for this update.
4. Click Update.
Within Figure 57, the rates selected within the Grid will be edited using Amount (+), they will have a New Starting Date of 6/1/2024, and the rates will be edited by increasing Rate by $5, OT Rate by $10, and DT Rate by $20.
Note: If a Recurring Billing record has rate based on an Effective Date, then the Effective Date on each Recurring Billing Item for each customer must have the Effective Date updated. Update the Effective Date using Edit Billing Item screen.
STEP 4: Review the changes.
Setup Area: Update Rates for Selected Records…
Go through the edited rates and verify the rates are as desired. Rates were updated according to what was set within “Update Rates for Selected Records” and which line items were selected. In Figure 58, New Rates where applied and each updated rate was changed by +$5. As rates cannot be edited if there is not one already set, New OT Rate and New DT Rate are empty. New Starting Date is shown.
In Figure 58, notice line items
that have edits are indicated with the red pencil  icon. Also, at the bottom are two
indicators: “Unsaved” which indicates 53 edits are unsaved and “Total
Rows” which notes the number of rows in the list.
Rates can be manually entered into any line item at any time and can be entered to “override” what was updated using the Update Rates by Selected Records…. section. Feel free to change variables and rates. No changes are saved until Save Changes is clicked. Additionally, when Save Changes is clicked, the changes are only made to the rates checked(selected) in the grid. Unchecked rates will not be changed.
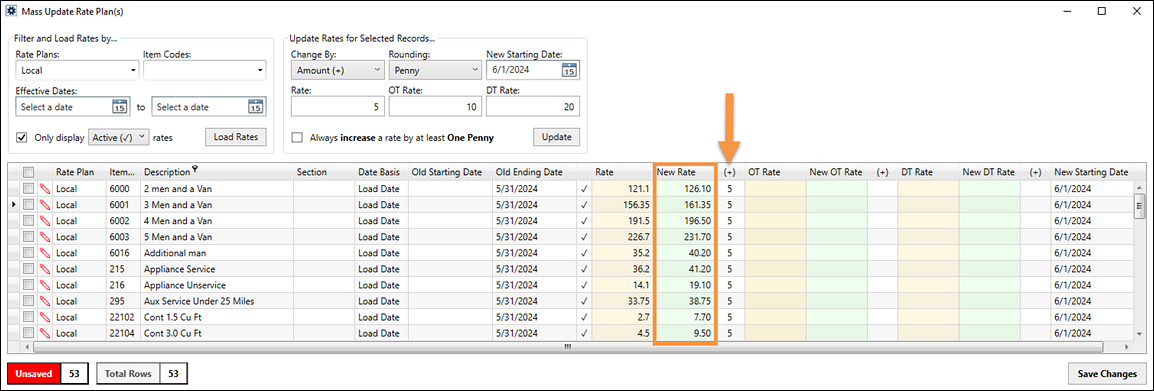
Figure 58: Updates were made within the New Rates column. The (+) column shows how the rates were changed. New Starting Dates shows rates were updated and start on day indicated.
STEP 5: Save the changes.
Edits are only saved once the Save Changes button is clicked and Yes is clicked on the “Confirm Save?” screen.

Figure 59: Confirm Save? screen
Choosing No on the “Confirm Save?” screen will return you to the Grid and the red pencil icon will still be shown on the lines of rates that have unsaved edits. The icons will remain until a new search is performed, the items are saved, or the screen is closed.
To exit from the Mass Update Rate Plan(s) screen without saving any edits, click the X in the upper right corner of the Mass Update Rate Plan(s) screen.
To continue changing rates in the Grid, just enter different rates, change the filters or the updates. Any of these will cause a prompt that will result in lost changes as explained in the “Confirm Save?” screen.
Each change made to a Rate Plan is tracked within the Admin Tool > Tools > View History Log or Admin History.
Technical Field and Function Information
The following table describes the fields within this setup.
|
Field/Function |
Description |
|
|
Filter Data By… Use one or more filters in this section to create a list of Rate Plans which list in the grid. |
| |
|
Rate Plans |
By default, all plans are included in the search. Optionally, choose from the dropdown and select the rate(s) needed. This is useful when you know the exact Rate Plans needed. |
|
|
Item Codes |
By default, all codes are included in the search. Optionally, you can select from the list to include specific codes. When looking for all the rate plans that include certain item codes, just enter the item code(s) here – without entering anything under Rate Plan. (It is not necessary to check Select All under Rate Plan.) The system will look at all the Rate Plans and list every Rate Plan that includes every incidence of the Item Codes selected. Note: The filter looks for each occurrence of each Item Code selected. It does not just look for Rate Plans that only contain all the items codes as a group. |
|
|
Effective Dates |
If using this filter, set the starting date of the range and, if desired, enter an ending date of the range. Only Rate Plans that meet the start or end date are included. |
|
|
|
If checked, choose from Pending, Active or Expired to further refine the data based on the status of the rates. The default setting for this option is checked and Active.
Pending rates are those that have recently been modified. Do not attempt to further change these rates to avoid errors.
Active rates are those that are currently in effect.
Expired rates are those that are not currently in effect, such as those that have yet to be in effected based on dates assigned to the rate.
Unchecking this box automatically includes all rates based on status.
|
|
|
|
Click this button to apply the filter(s) and prompts the grid list of the results. |
|
|
Update Rate |
| |
|
Change By |
Choose from this dropdown menu to determine if the rate is to be increased or decreased by Amount or Percentage. The options are: Amount (+) (default): This option will increase Rate, OT Rate, and/or DT Rate by dollar amount. The dollar amount will be the number entered within any or all these rates. For example, if 5 was entered under Rate, the existing rate plan amount would increase by $5.
Amount (-): This option will decrease Rate, OT Rate, and/or DT Rate by dollar amount. The dollar amount will be a number entered within any or all these rates. For example, if 5 was entered under Rate, the existing rate plan amount would decrease by $5.
Percentage (+):This option will increase Rate, OT Rate, and/or DT Rate by a percentage amount. The percentage amount will be the number entered within any or all these rates. For example, if 5 was entered under Rate, the existing rate plan amount would increase by 5%.
Percentage (-): This option will decrease Rate, OT Rate, and/or DT Rate by a percentage amount. The percentage amount will be the number entered within any or all these rates. For example, if 5 was entered under Rate, the existing rate plan amount would decrease by 5%. |
|
|
Rounding |
Choose from this menu to set how the updated rate is rounded. The amount is rounded up regardless of whether the Change By option increased or decreased the amount. The menu options include: Penny (default): This option will round up to the next penny.
Nickel: This option will round up to the next multiple of .05. For example, a rate changed to $35.78 will be set at $35.80.
Quarter: This option will round up to the next multiple of .25. For example, a rate changed to $35.78 will be set at $36.00.
3 Decimal Places: This option will update the rate to third decimal space, such as $35.782.
4 Decimal Places: This option will update the rate to fourth decimal space, such as $35.7829.
|
|
|
New Starting Date |
Enter a date which will be the updated Effective Start Date for the rates plan(s) selected. The New Starting Date will not go into effect until the changes are saved by clicking Save Changes. Just by having a new Starting Date listed in the grid does not mean it is in effect.
If no date is entered and rates are changed, the updated becomes in effect and the previous rate is immediately expired.
TIP: MoversSuite allows for Effective Dates to be changed, even when in use. The only criteria are that date ranges cannot overlap. So, if an Effective End date is set, then a New Effective End Date can be set that would create a new effective range altogether. This enables the existing rate to be updated to expire at the end of a certain period: Then the rate can set up to end for a next period. If used this correctly, rates can be viewed for the next period to see what is set to expire. Used in conjunction with the Rates by Rate Plan report, changes can be made to affect the next billing cycles. |
|
|
Rate |
Enter an amount. How that amount is applied to Rate(s) for the Rate Plans selected is determined by the Change By option selected. For example, if 5 is entered and Change By is set to Percentage (-),Rates will be decreased by 5%. |
|
|
OT Rate |
OT refers to Overtime. Enter an amount. How that amount is applied to OT Rate(s) for the Rate Plans selected is determined by the Change By option selected. For example, if 10 is entered and Change By is set to Percentage (+), OT Rates will be increased by 10%. |
|
|
DT Rate |
DT refers to Double Time. Enter an amount. How that amount is applied to DT Rate(s) for the Rate Plans selected is determined by the Change By option selected. For example, if 10 is entered and Change By is set to Amount (+), OT Rates will be increased by $10. |
|
|
|
This checkbox changes according to what is set under Change By and Rounding. For example, if Change By is Percentage (-), and Rounding is set to Nickel, then the checkbox would read: Always decrease a rate by at least One Nickel.
Choose this option to apply the statement to selected rates. | |
|
|
Click this to apply the parameters set within the Update Rate section to the Rate Plans selected with in the grid. This does not actually change rate. When the list updates to reflect the Update Rate selections, a box will open at the bottom of the screen with number of unsaved changes that are in the grid. |
|
|
Grid |
| |
|
The results of the Filter Data By filter(s) list here. Click and drag column headers to rearrange the grid, if desired.
Hover or click over any header to
prompt the Filter icon and the Sort icon. Click the Filter icon
|
| |
|
Select checkbox |
Check (or select) line items to apply parameters set within the Update Rates for the Selected Records… section.
If updating rates manually, it is not necessary to select a line item to update a rate; however, the line items must be selected to save the changes.
Only selected items will save when Save Changes is clicked. |
|
|
Edit icon |
Though not labeled in the header, this column is blank until edits are made.
|
|
|
|
This box is a tally of all the line items in the grid. |
|
|
|
Unsaved is a tally of the number of lines that have been edited/updated and have not been saved. Updates are not saved until Save Changes is clicked and Yes is chosen within the confirmation box. |
|
|
|
Clicking Save Changes only saves the line items that have been selected. (Lines are selected by checking the checkbox.) Any line items that are not checked will not be saved. There is a confirmation dialog to confirm or cancel the save. |
|