This functionality has been replaced by MoversSuite Email Service and MoversSuite Email Service Setup and Administration.
|
|
This functionality has been replaced by MoversSuite Email Service and MoversSuite Email Service Setup and Administration. |
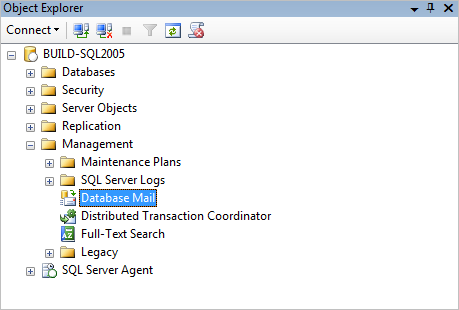
The Monitor Orders Email functionality relies on the Database Mail utility within Microsoft SQL Server Management.

Figure 11: Object Explorer in Microsoft SQL Server Management
The following table describes the steps to take to setup Database Mail.
|
Step |
Description | ||||||||||||||||||
|
Access Database Mail option | |||||||||||||||||||
|
1 |
Open the Microsoft SQL Server Management application. | ||||||||||||||||||
|
2 |
Open a connection to the server hosting MoversSuite using the Connect > Database Server option, which opens the Connect to Server window. | ||||||||||||||||||
|
3 |
Select the Server name and appropriate authentication and press Connect to open. | ||||||||||||||||||
|
4 |
Locate the Database Mail option ( | ||||||||||||||||||
|
Create Database Mail Account | |||||||||||||||||||
|
The following steps instruct a user on how to add a MoversSuite mail account and profile. Instructions for editing an existing mail account are also included. | |||||||||||||||||||
|
5 |
Right-click on the Database Mail option and choose “Configure Database Mail”. This opens the wizard to guide the user through the setup process. Press Next. | ||||||||||||||||||
|
6 |
Select “Manage Database Mail accounts and profiles” from the Select Configuration Task screen and press Next. | ||||||||||||||||||
|
7 |
Select “Create a new account” from within Manage Profiles and Accounts screen and then press Next. When editing an account, choose “View, change, or delete an existing account”. | ||||||||||||||||||
|
8 |
Enter the following data within the New Account screen and press Next.
| ||||||||||||||||||
|
9 |
Confirm the account was added correctly on the Complete Wizard screen and press Finish to save the account. | ||||||||||||||||||
|
Create Database Mail Profile | |||||||||||||||||||
|
These steps guide you on creating a profile that links to the MoversSuite mail account created above. | |||||||||||||||||||
|
10 |
From the Select Configuration Task page, select “Manage Database Mail accounts and profiles” and press Next. | ||||||||||||||||||
|
11 |
Select “Create a new profile” from the Manage Profiles and Accounts page and press Next. | ||||||||||||||||||
|
12 |
Enter “MoversSuiteDBMail” for the Profile name and provide a meaningful Description. | ||||||||||||||||||
|
13 |
In the SMTP accounts listing, press Add and then select the “MoversSuiteDBMail” account from the listing. Verify the other fields and press OK. | ||||||||||||||||||
|
14 |
Press Next from the New Profile page. | ||||||||||||||||||
|
15 |
Verify that the profile and account link correctly and are both named “MoversSuiteDBMail” and press Finish. | ||||||||||||||||||
|
Test the Connection | |||||||||||||||||||
|
16 |
Right-click the Database Mail folder (see Step #4) and choose “Send Test E-Mail” from the list of options. | ||||||||||||||||||
|
17 |
Enter your email address for the “To” as the recipient of the test email then press the “Send Test E-Mail” button. The application sends a test message to the To email address to validate the Database Mail is working correctly. If a message is received from the account, then the mail utility is working and setup is complete. | ||||||||||||||||||
RELATED TOPICS: