MoversSuite > Revenue Entry > Transactions tab > Add Item > Revenue Item
Use the Add Revenue Item screen to add individual revenue items belonging to a revenue group. Users can access the screen through the Add Item selector located on the Transactions tab within Revenue Entry.
Figure 43: Location of Add Item button within Transactions

Figure 44: Add Revenue Item
The following table describes the fields and functions available within the Add Revenue Item screen.
|
Field/Function |
Description | ||||||||
|
Revenue Group |
| ||||||||
|
Revenue Group |
The revenue group that the new item is associated to displays in this field. | ||||||||
|
Percentage |
For allocated items, the item percentage of the revenue group displays, otherwise no Percentage field displays. | ||||||||
|
Amount |
Current amount allocated to the listed Revenue Group for the order as a whole. | ||||||||
|
Allocation Information |
| ||||||||
|
Revenue Branch |
Select the branch from the list defined in Branch Setup that revenue will report under for the item.
Note: This value defaults to the branch of the order.
| ||||||||
|
AR Branch |
Select the branch from the list defined in Branch Setup to record account receivables under.
Note: This value defaults to what is selected for the Revenue Branch.
| ||||||||
|
Customer |
Users can choose a different customer to bill or choose
a different address to bill for an item from the list of customers
available in the drop-down menu or by accessing the Customer screen through the ellipses button (
Note: This value defaults to the Customer set within Order Information (Revenue Entry).
| ||||||||
|
Service |
Select the Item Code (pulled from the Rate Plan Setup) used to record revenue, billing, and invoicing. Optionally, choose to view the listing By Name to display the Item Code description instead of the Item Code value. Item Codes are administrated through Item Code Setup. | ||||||||
|
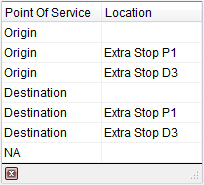
Point of Service |
Select a value to indicate where the Point of Service (and Location) originates.
Figure 45: Point of Service menu
Extra stop locations will appear with a caption of “Extra Stop” followed by the Stop Type (“P” for Pickup or “D” for Delivery) and the corresponding Stop Number (see Extra Stops).
Military EDI Integration The Point of Service is updated through a UniGroup Rating Send (see UniGroup Downloads) and through EDI Item assignments. Setting the Point of Service affects which EDI Item options are available (as defined in EDI Customer Setup).
Sales Tax Integration This field also affects Sales Tax Integration. The address referenced by this field will be validated for the appropriate sales tax rates. The following address fields are checked for Sales Tax validation based on the Point of Service:
If the Point of Service field is not set, then the application will check the Origin location for Sales Tax rate validation. Refer to Point of Service Setup for more information. | ||||||||
|
EDI Item |
This field determines what rating information will display on invoices generated through Military EDI Invoice Integration. The EDI Item field is only available when the Customer (above) is defined as an EDI customer (through EDI Customer Setup). This field may be set automatically based on the Service code entered above. This field can also be set manually to one of the options defined within the Customer EDI Item section as part of the EDI Customer Setup. | ||||||||
|
Invoice Description Invoice (flag) |
The description of the selected service will display in this field by default and a user can update the text (up to 128 characters). This description will appear on invoices for this transaction. Check the Invoice flag have this item appear automatically on an invoice. If not checked, then the item can still be added manually through Invoicing. The Invoice will be check automatically when a Customer is selected or if the Service code selected has an Invoice Flag set (see Item Code Setup).
Tip: See the Orders with Revenue Not Invoiced Report to view a list of all transaction not invoiced that quality to be invoiced.
Users can update the Invoice Description for all non-invoiced items (posted or non-posted). Transaction items cannot be updated after they have been invoiced. To change an invoice description for an item on an invoice, a user will need to void the original invoice and recreate it through Invoicing. | ||||||||
|
Work Ticket |
Select a work ticket from the list of those generated for Local Services completed for the order. Typically, revenue items are associated to the Work Ticket for the service that generated the revenue. The drop-down menu displays the work ticket number, service date, service description, and partial, overflow, and setoff segment data. In order to commission local crew and drivers associated to this revenue item, they must be assigned to the Work Ticket associated to the revenue item. You can change or set the Work Ticket after transactions generate for an item (through the Edit Item feature). This is to allow for commissioning on local crew and drivers. | ||||||||
|
Rating Information |
| ||||||||
|
Rate Type |
Select a type from the list defined within Rate Type Setup used to determine how transactions are calculated and how they appear on the invoice. Additionally, special logics exists for “100-Weight” and “Miles” types. These two types retrieve order data to assist in computing the rate. Refer to Rate Type Setup for details. The Rate Type affects other rating data on this item, including Rate, Quantity field(s), and Gross Charges. Setting the Rate Type may trigger Advanced Rating as well. See Rating Systems for an overview and setup options. | ||||||||
|
Rate As |
If the Apply Regular, OT and Double Rates flag is set for the selected Rate Type (and Rate Plan) (Rate Type Setup), then the Rate As option appears. This option allows you to determine the default Rate for the item based on one of the following rates: Regular Rate Overtime Rate Double Time Rate
Refer to the Rate As Option topic for more information. | ||||||||
|
Quantity |
The quantity field labels are dependent on the selected Rate Type. The application multiples the value entered for the quantity field(s) by the Rate to compute Gross Charges. | ||||||||
|
Rate |
The rate applied to quantity values to compute the Gross Charges. The Rate may set automatically based on the Rate Plan and Item Code (Service) assigned to the record. View the Advanced Rating topic for more information. | ||||||||
|
Gross Charges |
The computed charges based on the Rate Type and related fields will display here. Alternately, users can enter an amount manually, as well. This amount represents the total charge prior to any discount or reduction. | ||||||||
|
Discount |
Discount the item based on the entered percentage. The discount computes automatically based on the contract assigned to the order (see Contract Master Setup) or a user can enter a value (ranging from 0 to 100 percent). The computed discount amount will reduce the Gross Charges amount to compute the Invoice Amount. | ||||||||
|
Invoice Amount |
The computed actual revenue amount of the item displays in this field. The Invoice Amount is the Gross Charges less any discounts. Users can manually enter the Invoice Amount as well. | ||||||||
|
Allocation Percentage |
When the revenue item is an allocation, the Allocation Percentage field will display and allow the user to modify the percentage amount. When a split exists, the screen will display the computation of the Allocation Percentage field value adjacent to the field including the Original Allocation and Split Haul percentage used. | ||||||||
|
Allocation Amount |
When the revenue item is an allocation, the Allocation Amount field will display. The amount of which is computed as the Allocation percentage of the Invoice Amount. | ||||||||
|
Reduction Amount |
The calculator icon ( You can have the application automatically apply reductions to new revenue based on the Reduction Profile set within the Order Information (Revenue Entry) tab. Refer to occur using Reduction Profile and Reduction Profile Setup for more information. | ||||||||
|
Reduced Invoice Amount |
This field displays the computed amount of the Invoice Amount less any reductions. | ||||||||
|
Agent Percentage |
Non-allocated revenue items will offer an Agent Percentage option allowing the user to specify a percentage amount to the agent (ranging from 0 to 100). The application will default the setting to 100%. | ||||||||
|
Revenue Amount |
This field displays the final, computed amount that the item will post. | ||||||||
|
Distribution Information |
Use this section to distribute revenue between more than one Sister Agent or branch. | ||||||||
|
Branch ID |
The identifier of the selected distribution branch displays in this column. | ||||||||
|
Branch Name |
Distribution branch name displays in this column. | ||||||||
|
% |
The percentage of revenue distributed to the branch displays. | ||||||||
|
|
Add (Alt+A) This function opens the Add Distribution Item dialog where a user can specify a percentage distribution to an branch. | ||||||||
|
|
Edit(Alt+E) This function opens the Add Distribution Item dialog in edit mode allowing the user to update non-posted items or view Posting Information. | ||||||||
|
|
Delete (Alt+D) This function removes the selected, non-posted distribution from the revenue item without prompting the user to confirm or cancel the request. | ||||||||
|
|
| ||||||||
|
|
Posting Information (Alt+P) This option opens the Posting Information dialog allowing the user to view key data for a posted item. The Posting Information button is available for posted items only. See Dynamics GP Order Inquiry for more data on posted items. | ||||||||
|
|
Go To Reduction If the item is an Add Back as Item Code record in Reductions for another group or item, then the Go To Reduction button will allow the user to close the Add Revenue Item screen and navigate to the Reductions dialog to view/edit the reduction record. | ||||||||
|
|
Save (Alt+S) The Save button is a menu that produces the following options when clicked.
Save & New Item (Alt+S+I) Choose this option to save the revenue item you are currently on and open an empty Add Revenue Item screen.
Save & Add Commission (Alt+S+C) Choose this option to save the revenue item you are currently on and open an empty Add Revenue Commission screen.
Save & Add Third Party (Alt+S+T) Choose this option to save the revenue item you are currently on and open an empty Add Third Party Item (Revenue Entry) screen.
Save & Close (Alt+S+S) Choosing this option saves the changes to the revenue item you are currently working on and closes the screen, returning screen focus back to the Transactions tab.
| ||||||||
|
|
Cancel (Alt+C) This function discards any changes made and closes the screen. |
RELATED TOPIC:
Add Third Party Item (Revenue Entry)
 ).
).
 ) opens the