You cannot void or reverse a batch once it is split.
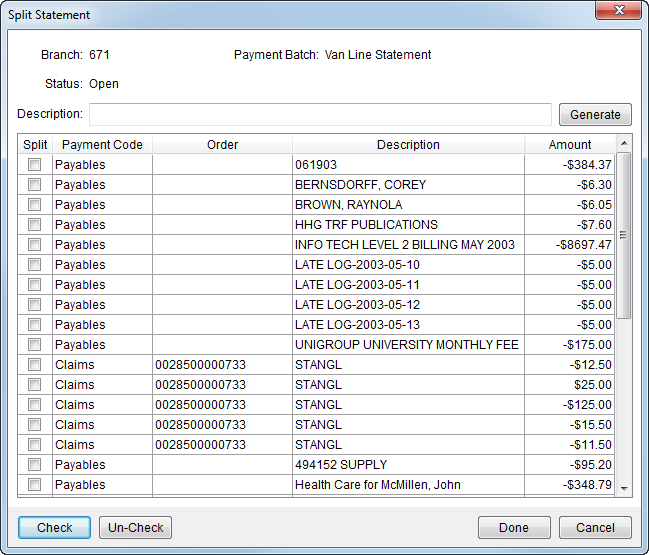
The Split Statement screen allows the user to break up a payment statement into separate groups of records identified by a given description. A batch, for example, can be separated into groups of similar items for accounting purposes, such as splitting charges owed to a van line (AP) from the payment received from a van line (AR), and then assigned to multiple workers to process a single batch concurrently.
A user can only split a batch with a status of Downloaded, Manual, or Open.
The Split Statement screen is available through the Split function in Batch Management.
|
You cannot void or reverse a batch once it is split. |

Figure 11: Split Statement screen
The table below lists the field and functions within the Split Statement screen.
|
Field/Function |
Description | ||
|
Branch |
This field displays the branch of the agency that the statement import represents. | ||
|
Payment Batch |
This field displays the name of the batch. | ||
|
Status |
This field displays the status of the batch. | ||
|
Description |
Enter a text description to be associated to the split group (up to 128 characters). This group name will display under the original batch listing in Batch Management. | ||
|
|
Generate This function creates a split containing all records selected in the Split column. Users will receive a confirmation to proceed with the split creation or to cancel it. Users can generate any number of splits to break up a batch, such as separating all payables (Payment Code of “Payables”) together in a split group titled “A/P.”
IMPORTANT: Items with a Payment Code of “Payables” that are related to an order for a positive amount should have their Payment Code changed to “Receivables”. See Payment Application for more information.
Changes made to this screen will not save until users presses Done. To make corrections to an incorrect split, press Cancel and reinitiate the Split function from Batch Management. | ||
|
|
| ||
|
Split |
Place a check in each box to be included in the split defined under the Description heading when Generate is pressed. | ||
|
Payment Code |
The Payment Code assists in determining how to apply a payment through the Payment Application screen. Setting or changing this value has no effect on how the transaction is applied, however it can link the payment to external application (that may affect van line statement processing). Refer to Statement Payment Code Setup for more information. | ||
|
Order |
The Order Number associated to the line item displays. | ||
|
Description |
The statement item description displays in this column. | ||
|
Amount |
The dollar amount of the transaction displays in this column. | ||
|
|
Check Places a check in the Split column to indicate that the record(s) selected in the data grid will be included in the split group. Users can select and include more than one record at a time by holding down CTRL key and selecting records individual or by selecting a range by holding down the SHIFT key and selecting a range. | ||
|
|
Un-Check Removes the check from the Split column and deselects the record(s) selected in the data grid from the split group. | ||
|
|
Done Creates all split groups generated within the Split Statement dialog. Generated split groups do not save until Done is pressed.
| ||
|
|
Cancel This function cancels creating the split group and discards all changes made. |
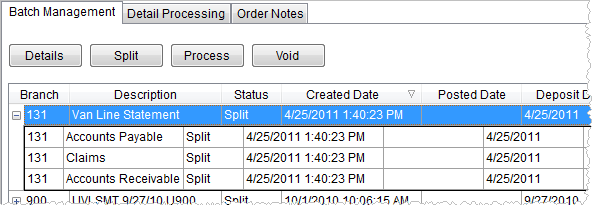
Each split will appear as a separate listing under the original batch description.

Figure 12: Split batch
The batch and related split groups will have a status of “Split” and each split group will display a Control Amount that reflects the total dollar amount of all transactions within each grouping. Use the Details button in Batch Management to view the split group summary data and to update the Control Amount associated to the particular group through the Statement Detail screen.