This section covers establishing Commissions on your system.
Prior to establishing Commissions, consider the following available commissioning options:
•Do you wish to offer a Sales Team Split?
•Do you wish to enable Preferred Revenue Agent functionality?
•Do you wish to establish Auto Commissions?
•Do you wish to enable effective dates for commissions?
•Do you wish to use the Hourly Commissions for commissioning of employees?
•Do you wish to use the % of Hourly Rate or Hourly Pay type commissions?
•Do you wish to add any of the Commissioning Restrictions on the commissions?
•Do you wish to have selected commissioning available for local service crew through the Only Commission Local Service Crew Based on Work Ticket Flag?
The following generalized steps provide a basic flow of Commissions setup (followed by detailed instructions on each step that includes information on the options listed above):
1. Identify and list sources of revenue that are commissionable (Item Code Setup)
2. Build plans with detailed commissions for each revenue source (Commission Plan Setup)
3. Assign plans to employees (Personnel Setup)
4. Update user access to commission functionality and reports (Security Profile Setup and Report Profile Setup)
5. Enable Auto Commissions functionality
6. Enable Preferred Revenue Agent functionality
7. Set Hourly Pay or % of Hourly Rate type commissions for commissioning of employees on hourly basis (Add Commission Plan Detail)
Refer to the Commissions topic for usage information.
STEP 1: List the sources of commissionable revenue
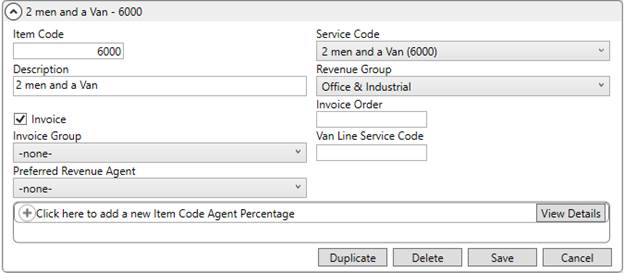
Reference Item Code Setup records to produce a list of commissionable revenue items. The Item Code is the primary identifier referenced when building commission plans and when generating the actual commission.
Figure 24: Item Code Setup
You can utilize the Item Code Mappings Report to view additional information on an Item Code, including which authority and labor types it is valid for.
You may find it valuable to list Item Code Setup records by their associated Revenue Group to make the list more manageable. You can search by a specific Revenue Group as illustrated in the example below (Figure 15).
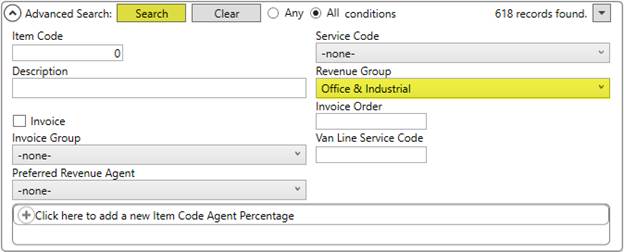
Figure 25: Revenue Group Setup
View the Revenue Group Details Report for information on which Item Codes associate to each group.
STEP 2: Build Commission Plans
Organize the list of Item Codes into appropriate plans. Create a base plan within Commission Plan Setup and use the Duplicate feature to make copies.
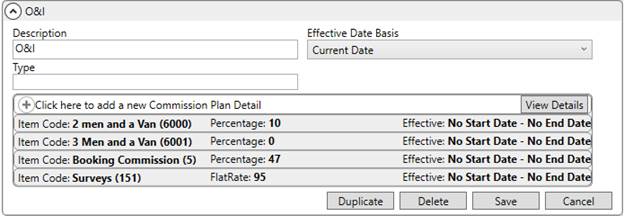
Figure 26: Commission Plan Setup
You can also utilize the right-click options to duplicate or remove Commission Plan Detail items.

Figure 27: Right-click options within Commission Plan Detail section
The Effective Date Basis determines the type of date that is evaluated when identifying which plan detail item is in effect. Refer to the Commission Plan Setup topic for more information on this, and other, settings.
Add plan details within the Commission Plan Detail section. These are the specific records evaluated to determine the basic commission amount for an Item Code. Add and edit these records through the Add Commission Plan Detail dialog.
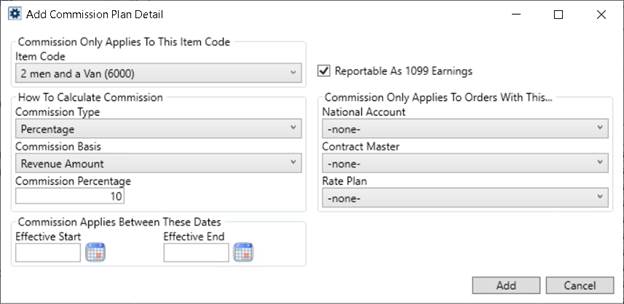
Figure 28: Add Commission Plan Detail
The Item Code is the source of revenue that the commission is based on. It is referenced as the Service setting when adding or editing revenue through the Add Revenue Item screen and as the Rate Item within the Add Revenue Group screen. The Item Code is also referenced for commissions generated through Import Actuals and Revenue Import processes.
You can set an Item Code multiple times on a given plan, however, there can only be one Item Code in effect for a given date range. Therefore, if you wish to set multiple detail records, you will need to specify effective dates.
Check the Reportable As 1099 Earnings flag if need be.
How to Calculate Commission
Set the fields of this section as per your needs. In the figure above the Commission Type is set to Percentage, along with a Commission Percentage of 10 and Commission Basis of Revenue Amount. The MoversSuite application translates this into a commission amount equivalent to 10% of the total Revenue Amount.
Refer to Add Commission Plan Detail for detailed information on the Commission Types.
Set the Contract Master if you wish to restrict auto-commissions to only those Item Codes listed within the Contract set on the order. Refer to Contract Master Setup for a list of values and additional information.
Set the Rate Plan if you wish to restrict auto-commissions to only those Item Codes listed within the Rate Plan set on the order. Refer to Revenue Group Setup for a list of values and additional information.
Set Effective Start and/or Effective End dates if you wish to phase in or retire a detail record on specific dates. The date evaluated for the effective period is that set at the plan-level through the Effective Date Basis setting within this Commission Plan Setup record.
Refer to the Add Commission Plan Detail topic for additional information for each of these settings.
View the Commission Plan Details Report to see a list of established plans.
STEP 3: Assign Commission Plans to Employees
For all Commissionable Employees, verify that the Vendor is set correctly and Commission Plan(s) are assigned for each appropriate labor area within the Accounting tab of Personnel Setup.
Each labor area assigned to the employee lists within the Accounting tab. If you wish to assign a new labor area to the person, then do so through the Labor Type Item section within the General tab. See Personnel Setup for further information.
To view or add commission plans, go to Administration > Personnel > choose Employee > Accounting tab.
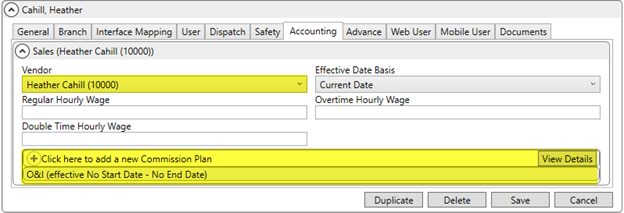
Figure 29: Labor Area for this record is O&I
Vendors are established within the Microsoft Dynamics GP or Vendor Setup, depending on your company setup.
Add and edit employee plans through the Add Commission Plan dialog.
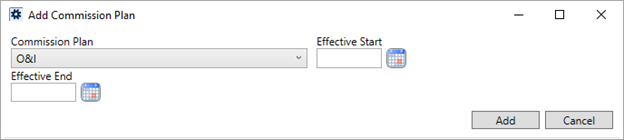
Figure 30: Add Commission Plan dialog
Set Effective Start and/or Effective End dates if you wish to phase in or retire a plan for the employee for specific dates. The date evaluated for the effective period is that set for the labor area within the Effective Date Basis setting within the labor area listing within the Accounting tab.
You can set multiple plans for each labor area, however, there can only be one plan in effect for a given date range. Therefore, if you wish to set multiple plans records, you will need to specify effective dates.
Note: Contract records that are marked as Inactive will not show as dropdown selectable options in Commission Plan detail records. This is helpful to remove contracts that are no longer current from dropdown options. (To Inactive a Contract Record, see Contract Master Setup.)
Refer to the Personnel Setup topic for additional information for each of these settings.
View the Employee Commission Plans Report to see a list of employee vendor and plan assignments by Labor Type or by Commission Plan.
STEP 4: Update user access
For users you wish to access Commission Statement Management functionality, create a single record for the Commission Statement module within Security Profile Setup.

Figure 31: Security Profile Setup detail record
The Commission Statement module is not branch-specific and therefore you only need the one record to enable access.
You can adjust the Access Type to suit your needs. If you want to give someone the ability to generate commission statements, then set the Access Type to Full. Read Only allows a person to view or print generated commissions only.
Commission Statement Management requires access to specific reports through the Report Profile Setup. Verify that users can access the following reports:
|
Report |
System Location |
|
Commission Statement Report | |
|
Commission Statement Summary Report |
The following two examples include the two necessary reports.
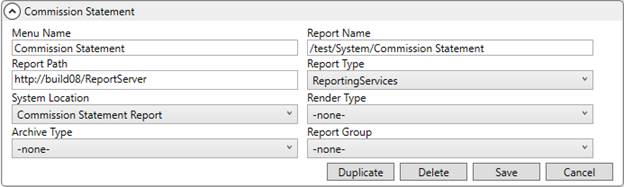
Figure 32: Report Setup example
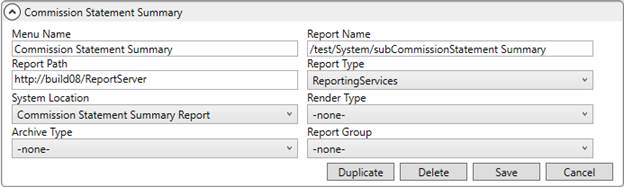
Figure 33: Report Setup example
Other reports you may consider granting access to personnel including the following:
1099 Applied by Commission Statement Date Report
Commission Plan Details Report
Employee Commission Plans Report
My Generated Commissions Report
View the User Details List Report for information on security and report profile assignments by branch.
STEP 5: Enable Auto Commission functionality
To generate commissions automatically when revenue is created or imported, then set the Enabled flag within Auto Commission Option Setup for the corresponding labor type. In the example below (Figure 24), the Sales team is auto commissioned.

Figure 34: Auto Commission Option setup
The Labor Area corresponds to the actual commissioned type established within the Accounting menu on Personnel Setup records. Therefore, each person you wish to include in auto commissioning must be one of your Commissionable Employees. Refer to the Commissionable Employees topic for a breakdown of each of these Labor Areas by Labor Type.
Sales Team Split
If you wish to automatically generate a Sales Team Split commission, then optionally assign personnel to the Sales Team Split section on specified Account Profile Setup records. Refer to the Sales Team Split topic for setup and usage information.
STEP 6: Enable Preferred Revenue Agent functionality
You can control which labor areas are commissionable by setting the Preferred Revenue Agent within the Auto Commission Option Setup and within Item Code Setup. The application compares what is set for the labor type within Auto Commission Option Setup to what is set for the Item Code. If it finds a match, it allows for auto-commissioning on the Item Code.
In the following examples, the Sales labor type links to a Booking Preferred Revenue Agent (Figure 25).
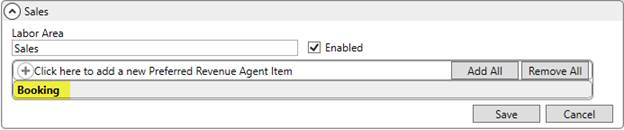
Figure 35: Auto Commission Option setup
Once this is set, only those Item Codes that also have the Preferred Revenue Agent set within Item Code Setup auto-commission. In this illustration (Figure 26), the Sales team qualifies for auto-commissioning on Item Code 6000, since the agent of Booking matches what is set within Auto Commission Option Setup. If the Preferred Revenue Agent was a different type, Origin for example, then the auto-commission would not occur.
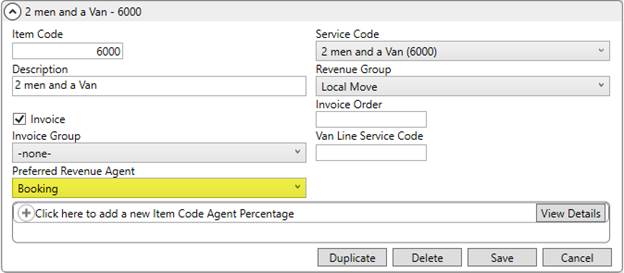
Figure 36: Item Code setup
STEP 7: Set Hourly Commissions if needed
Other than the regular commissioning types based on Flat Rate, Miles, Percentage and Weight, you also have the ability to base commission calculations on employee hours. While being in the Step 2, you can choose % of Hourly Rate or Hourly Pay from the Commission Type dropdown.
In case of % of Hourly Rate, you can commission people based on a certain percentage of revenue that you are charging your customer for. The % of Hourly Rate type calculates commissions based on a percentage of the assigned revenue, which is based on what is specified for the Commission Basis and Commission Percentage of Hourly Rate on the plan. In the example below, the hourly commission is calculated as 10% of the assigned revenue through Commission Plan Setup.
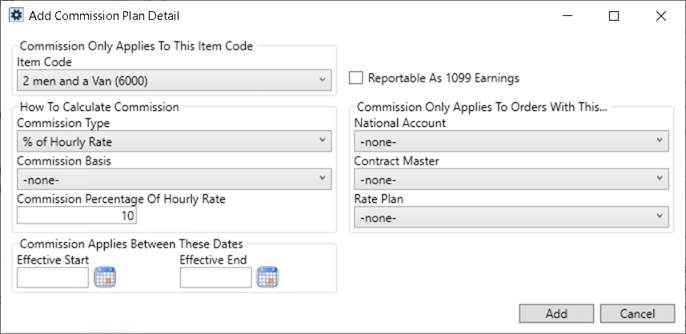
Figure 37: Add Commission Plan Detail dialog
If you choose the Hourly Pay type, you can commission people based on a certain amount for the revenue type. The Hourly Rate type calculates the commission based on a flat rate on the number of hours worked. The default rate is supplied through the Commission Amount Per Hour setting.
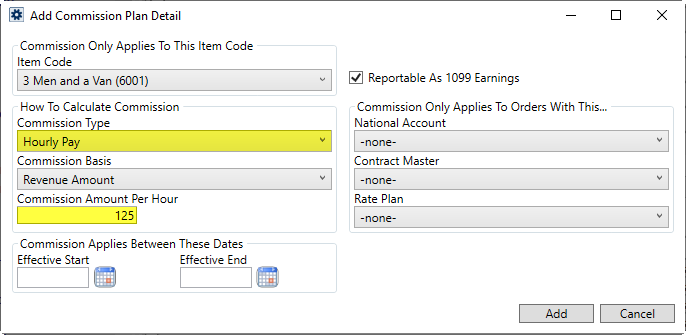
Figure 38: Add Commission Plan Detail dialog
Technical Setup Information
The following table lists the setup areas that affect commissions.
|
Field |
Description |
|
Establish Sales Team Split within this setup. | |
|
Use this setup to define which employees are eligible to be auto commissioned when transactions are created in MoversSuite. It also defines which labor areas are deemed a Preferred Revenue Agent. | |
|
Create attribute templates used when calculating commissions. Attributes include the amount or percentage based on a particular type (flat, percentage, or on weight), the Item Code that the commission Is on, effective date range, etc. | |
|
Item Codes are the revenue sources that are commissionable. Optionally, you can control auto-commissions for one or more Preferred Revenue Agent. | |
|
Labor type links a commissionable employee to Auto Commissions records. Additionally, you can mark a labor area as part of a Sales Team Split. | |
|
Control which revenue are auto-commissioned based on agent affiliation. | |
|
Establish employees as one of your Commissionable Employees through this setup. | |
|
You can split the commission received by the Salesperson to others assigned to the order through the Sales Team Split. |
RELATED TOPICS: