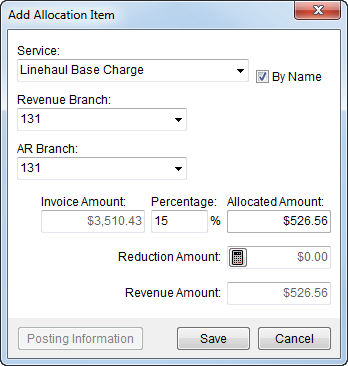
Use the Add Allocation Item dialog to allocate percentage amounts of revenue associated to a group to particular agencies, such as booking, hauling, and origin agents. Access this dialog through the Add and Edit buttons from the Allocation Information section of Add Revenue Group; the revenue group must have an Invoice Amount prior to creating allocations.
Figure 34: Add Allocation Item
|
Note |
|
The Type of Move set for an order along with the Revenue Group selected for an item determine the allocations that generate automatically. See Allocation Master Setup for more information. |
The following table describes the fields and functions available within the Add Allocation Item screen.
|
Field/Function |
Description |
|
Service |
Select a service code from the list of those available for the Revenue Group chosen within the Add Revenue Group screen. The Service is the Item Code used to create allocation transactions for the group. Select By Name to view the Item Code description instead of the Item Code number. See Allocation Master Setup for more information and Item Code Setup for related information. |
|
Revenue Branch |
Select the branch from the list defined in Branch Setup that revenue will receive the allocated percentage of revenue for the item. |
|
AR Branch |
Select the branch from the list defined in Branch Setup to record any account receivables to. |
|
Invoice Amount |
This field displays the invoice amount set for the revenue group, which the applications bases Allocated Amount computation on. |
|
Percentage |
Enter the percentage from 1 to 100 (in NN.NN format) allocated to the agent from the Invoice Amount. The total percent of allocations cannot exceed 100%. When an allocation change or addition causes the percentage to exceed 100%, an error will return when the user attempts to save the revenue group changes (see Add Revenue Group).
Note: Typically own authority moves will total 100% allocation of revenue associated to transportation. Van line orders may not total 100% allocation due to the company itself retaining some portion of the revenue.
|
|
Allocated Amount |
The computed amount allocated for the agent displays in this field. |
|
Reduction Amount |
The calculator icon ( |
|
Revenue Amount |
The amount that displays in this field is the Allocated Amount less the Reduction Amount. This amount is what will be set for the allocation item when Save is pressed. |
|
|
Posting Information This option opens the Posting Information dialog allowing the user to view key data for a posted item. The Posting Information button is available for posted items only. See Dynamics GP Order Inquiry for more data on posted items. |
|
|
Save (Alt+S) Pressing Save will add the allocation for the group or any changes made to an existing allocation (edit mode) and close the dialog. |
|
|
Cancel (Alt+C) This option closes the dialog discarding any changes made. |
Each defined allocation will be its own line item associated to the revenue group. From the Transactions tab, users can edit and delete line item allocations.
RELATED TOPIC:
 ) opens the

