MoversSuite Administration > Accounting and Financial Services > Reduction Template
Reduction Template records are available to assign to revenue items through the Reductions screen. Use Reduction Template Setup to specify individual reduction items that can be applied to transactions. This setup defines how the reduction is calculated and the option to reduce the reduction by other reduction templates. With these records, you can charge a reduction to a specific agent type based on branch assignment for the Item Code associated. So, when importing from a van line in Revenue Entry, for example, you can assign the reduction record and the application will build the associated transactions within Add Revenue Group and/or Add Revenue Item dialogs.
NOTE: To activate or inactivate multiple records at a time, use Mass Record Selection Options, found by clicking the dropdown arrow next to the number of records in the top right corner of the Reduction Template Setup screen.

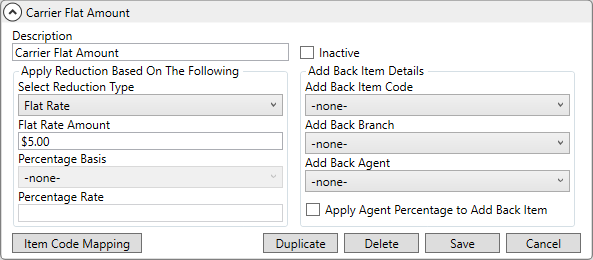
Figure 102: Sample Reduction Template Setup records setting Flat Amount field.
To create a new Reduction Template:
Setup area: MoversSuite Administration > Accounting & Financial Services > Reduction Template Setup
To create a new Reduction Template, select Click here to add a new Reduction Template, located towards the top of the screen.

Figure 103: Click to add new Reduction Template
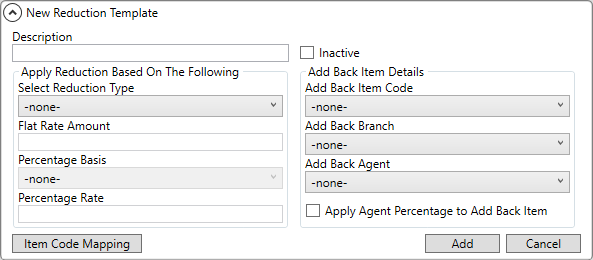
Use the reference table at the end of this topic to detail the fields and information used in this template.

Figure 104: New Reduction Template
Use the Item Code Mapping button to assign Item Codes to the Reduction Template. Item Codes must be set to a Reduction Template to use the Reduction Template with Reduction Profile(s).
Clicking Item Code Mapping opens the Item Code Selection screen. From this screen, choose a group (or all groups) on the left pane and then select Item Codes individually (or select all Item Codes for the highlighted group). Use the Select All and Clear All options to facilitate selection. All Item Codes that are checked trigger automatic reductions being generated. See Item Code Selection for more information on using the Item Code Selection button.
NOTE: Be sure to click Add to save the templates. Additionally, if any changes are made to Item Code Selection, changes will not be saved unless Add is clicked.
Reference the data in the following table when managing these records.
|
Field |
Description | |
|
Description |
Enter a title for the template (up to 128 characters). The values entered here will be available as Reduction Template options in Reductions and Add Group Reductions. | |
|
Inactive |
Setting this flag marks this record as inactive and users will not see this record as an option within the options available in MoversSuite, such as within Add Revenue Group and Add Allocation Item. Use this option if you cannot delete the record (because it links to another record) and do not want it available to users in MoversSuite. Options exist through the Mass Record Selection Options
(
Figure 105: Options menu for selected records
| |
|
Apply Reductions Based On the Following | ||
|
Select Reduction Type |
Define how to create the amount of the reduction by choosing one of the following types: Flat Rate: Choose this option to define a Flat Amount for the reduction amount.
Percentage: Selecting this option allows you to base the reduction amount on a certain Percentage and Basis. | |
|
Flat Rate Amount |
This field is only when the Select Reduction Type set is “Flat Rate.”
This field is only when the Select Reduction Type set is “Flat Rate.” If the Select Reduction Type is set to “Flat Rate,” then set the dollar amount of the reduction in this field. For example, if you wish for a $50.25 reduction, then set this value to “50.25.” | |
|
Percentage Basis |
This field is only when the Select Reduction Type set is “Percentage.”
If the Select Reduction Type set is “Percentage,” then you can define which revenue amount to base the reduction on through one of the following types: After All Reductions* Allocated Amount Gross Amount Group Gross Amount Group Invoice Amount Invoice Amount
*When set to this option, the reduction is applied after all other reductions are processed. This setting is used in conjunction with the Percentage setting to determine the dollar amount of the reduction.
Refer to the Basis definition within field descriptions in Reductions for details. | |
|
Percentage Rate |
This field is only when the Select Reduction Type set is “Percentage.”
If the Select Reduction Type set is “Percentage,” then set the percent of the selected Percentage Basis for the reduction. For example, if you wish for a 3% reduction based on the amount of the invoice, set the Basis to “Invoice Amount” and set this field to “3.” | |
|
Add Back Item Details | ||
|
Add Back Item Code |
Select the Item Code to which to assign the Add Back. | |
|
Add Back Branch |
Select the Branch to which to assign the Add Back. | |
|
Add Back Agent |
Select the Agent to which to assign the Add Back. | |
|
Apply Agent Percentage to Add Back Item |
Check this box to base an addback item on the agent percentage of the revenue item. When set, the Agent Percentage and Add Back Amount are itemized on the Reductions screen and can be updated.
The intent of this functionality is not ever be applied to allocated (Revenue Group) items. It is also only enabled for templates that are on the After All Reductions basis. | |
|
Reduction Template Detail | ||
|
Use Item Code Selection to access this section to define all the detailed reduction items linked to this profile. These are the details the comprise the amount of the reduction, which includes either a percentage amount or flat dollar amount. You can also specify effective dates ranges as well as apply a different reduction template amount. | ||
|
|
Item Code Mapping Click to open the Item Code Selection screen to choose which Item Codes trigger this reduction template. See Item Code Selection for details. | |