MoversSuite Administration > Accounting and Financial Services > Reduction Template
This screen allows a user to select item codes to be assigned to a particular Reduction Template record either by selecting the entire revenue group (left side) or by selecting individual item codes (on the right side of the screen). This screen is available through the Item Code Selection button found within Reduction Template Setup.
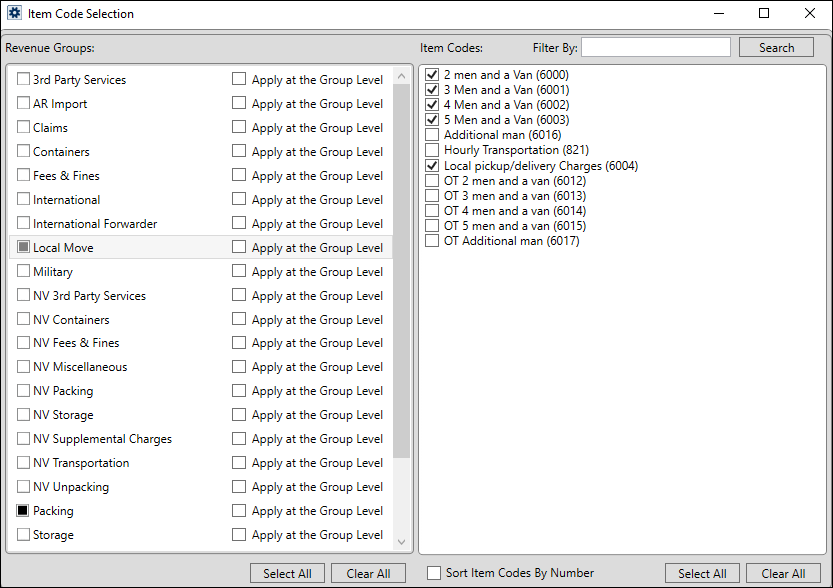
Choosing the Item Code Selection button opens the Item Code Selection screen. From this screen, choose a group (or all groups) on the left pane and then select Item Codes individually (or select all Item Codes for the highlighted group). Use the Select All and Clear All options to facilitate selection. All Item Codes that are checked trigger automatic reductions being generated.
IMPORTANT: Whatever changes you make within the Item Code Selection screen are stored temporarily until you Save the template. So, once you close this screen (by clicking the X in the upper right corner), if you wish to save any changes you made, please remember to press Save on the template itself.

Figure 106: Item Code Selection screen
Using the Item Code Selection screen
The Revenue Groups listing on the left contains all available Item Codes. Select the group on the left to view the codes associated to it on the right side of the screen.
Selection Identifiers for Revenue Groups
|
|
No Item Codes for the group are selected |
|
|
Some Item Codes for the group are selected |
|
|
All Item Codes for the group are selected |
Selection Identifiers for Item Codes
|
|
Item Code not selected |
|
|
Item Code selected |
Options on the bottom of the screen allow you to select or clear all items displaying in the pane above. For example, pressing Select All for the right pane automatically includes all Revenue Groups and all associated Item Codes those groups. Conversely, pressing Clear All removes all selections on the grid.
To select individual Item Codes, select the appropriate revenue group from the left pane and then click on the individual Item Codes to select or unselect them.
Additional options include the ability to filter the Item Codes. Enter the phrase to identify which Item Codes you want to see and then press Search. If you wanted only those Item Codes that contain “Non-“ for example, enter “Non-“ in the Filter By field and press Search. To remove the search, clear the entry and press Search again.
By default, the screen displays the Item Codes by their name. Alternatively, you can check the Sort Item Codes By Number option to arrange the codes by their numeric identifier.
The Apply at the Group Level option allows you to also trigger reductions on the Revenue Group. Setting this flag will set the reduction automatically when rated data is added at the group level; this includes setting the Rate Item and/or entering the basic rating information (Rate Type, Quantity, Rate, etc.). This option is in addition to selecting Item Codes, which instructs the application to apply the reduction for each specified Item Code (including allocations).