Step
Description
Before you begin…
•You must have access to the MoversSuite2 database you want to view data from.
•Have the name of the view or views you want on hand along with the name of the SQL Server.
•The desired views be loaded correctly through Microsoft SQL Server Management.
•Have a basic experience using Microsoft Excel. If using Pivot Tables or Pivot Charts, additional knowledge is required.
1
Open Microsoft Excel.
2
Open the Data ribbon from the file menu.
3
Select From Other Sources > From SQL Server.
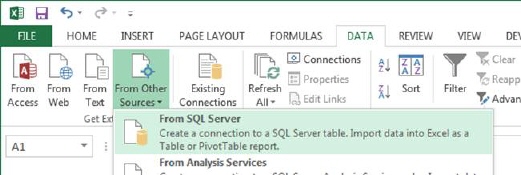
Figure 1: Microsoft Excel
Create the Data Connection
4
On the Data Connection Wizard dialog, under the Connect to Database Server options, set the Server name to the name and instance of your SQL Server, e.g. “SERVER\MSSSQLSERVER2008.”
5
For Log on credentials, choose “Use Windows Authentication” and press Next.
Select the View
6
Under the Select Database and Table options, enter “MoversSuite2” under the Select the database that contains the data you want option.
7
Check the Connect to a specific table option.
8
Select the MoversSuite Data Views you want from the list and press Next.
Tip: You can expand the screen to see more listings at once, sort by Name or by the Type, which is “VIEW.”
If you are unable to find the view you want, please make sure that it was added correctly and that you have appropriate privileges to access the view.
9
Under the Save Data Connection File and Finish options, provide a Description of the connection and view to make it easier to locate later.
10
Enter a Friendly Name to assist in finding the connection later and press Finish.
Import Data into a Worksheet
11
On the Import Data dialog, choose from the list of Select how you want to view this data in workbook options. Of note, selecting “Table” (default) inserts all columns and rows directly into the Excel worksheet. Choose this option if you want a straight dump of the data with formatted column headings.
Note: The “PivotTable Report” and “PivotChart” options require a familiarity with pivoting data in Excel.
12
Optionally, select where you wish the data to be inserted into within the Where do you want to put the data option. The option of “Existing worksheet” referencing cells “=$A$1” as the starting point is the default.
13
Press OK to insert data in the worksheet. The data can be sorted, filtered, grouped, and processed using existing Microsoft Excel functions.
Save and Refresh Options
14
Optionally, save this listing through File > Save As to an “Excel Workbook (*.xlsx)” file. Saved files that access data views can be refreshed with the latest information from MoversSuite through the Data ribbon and selecting Refresh All > Refresh All.