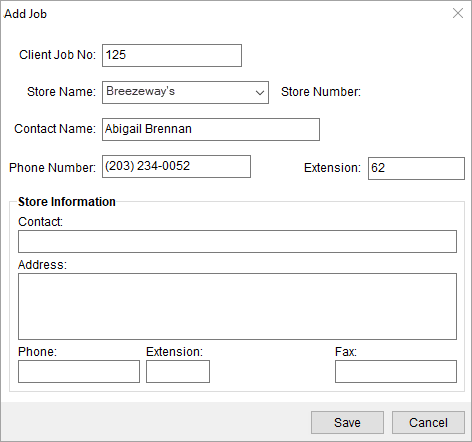
The Add Job dialog, evoked through the Add Job and Edit Job buttons from the Store Information tab, allows users to document specifics of a job and link it to a store.

Figure 126: Add Job dialog
Described in the table below are the fields and functions of the Add Job dialog.
|
Field/Function |
Description |
|
Client Job Number |
Enter the client provided job number to document the service (up to 50 characters). The Find references this field (see Logistics Information Search Criteria). |
|
Store Name |
Assign a store to the job by selecting a value from the drop-down menu. Store Name values are defined in Store Setup. The Find references this field (see Logistics Information Search Criteria). |
|
Store Number |
This field displays the identifier assigned to the selected store name. Store Number values are defined in Store Setup. The Find references this field (see Logistics Information Search Criteria). |
|
Contact Name |
Enter the name of the contact at the store in this field (up to 50 characters). This field is automatically populated when a Store Name is selected, however, the field can be updated and will not affect the master Store Setup record. |
|
Phone Number |
Enter the phone number of the store in this field (see Phone Number Entry). This field is automatically populated when a Store Name is selected, however, the field can be updated and will not affect the master Store Setup record. |
|
Extension |
Enter the phone number extension of the contact person (up to 10 characters). |
|
Address |
This field displays the physical address of the selected store. |
|
Phone |
This field displays the phone number for the selected store. |
|
Fax |
This field displays the fax number for the selected store. |
|
|
Save (Alt+S) Pressing Save will close the dialog after saving any changes made to the record. |
|
|
Cancel (Alt+C) Pressing Cancel will close the dialog without saving. |